Viewing
Watching TV
First Time Setup
Watching TV
Basic connection (p. 9-10)
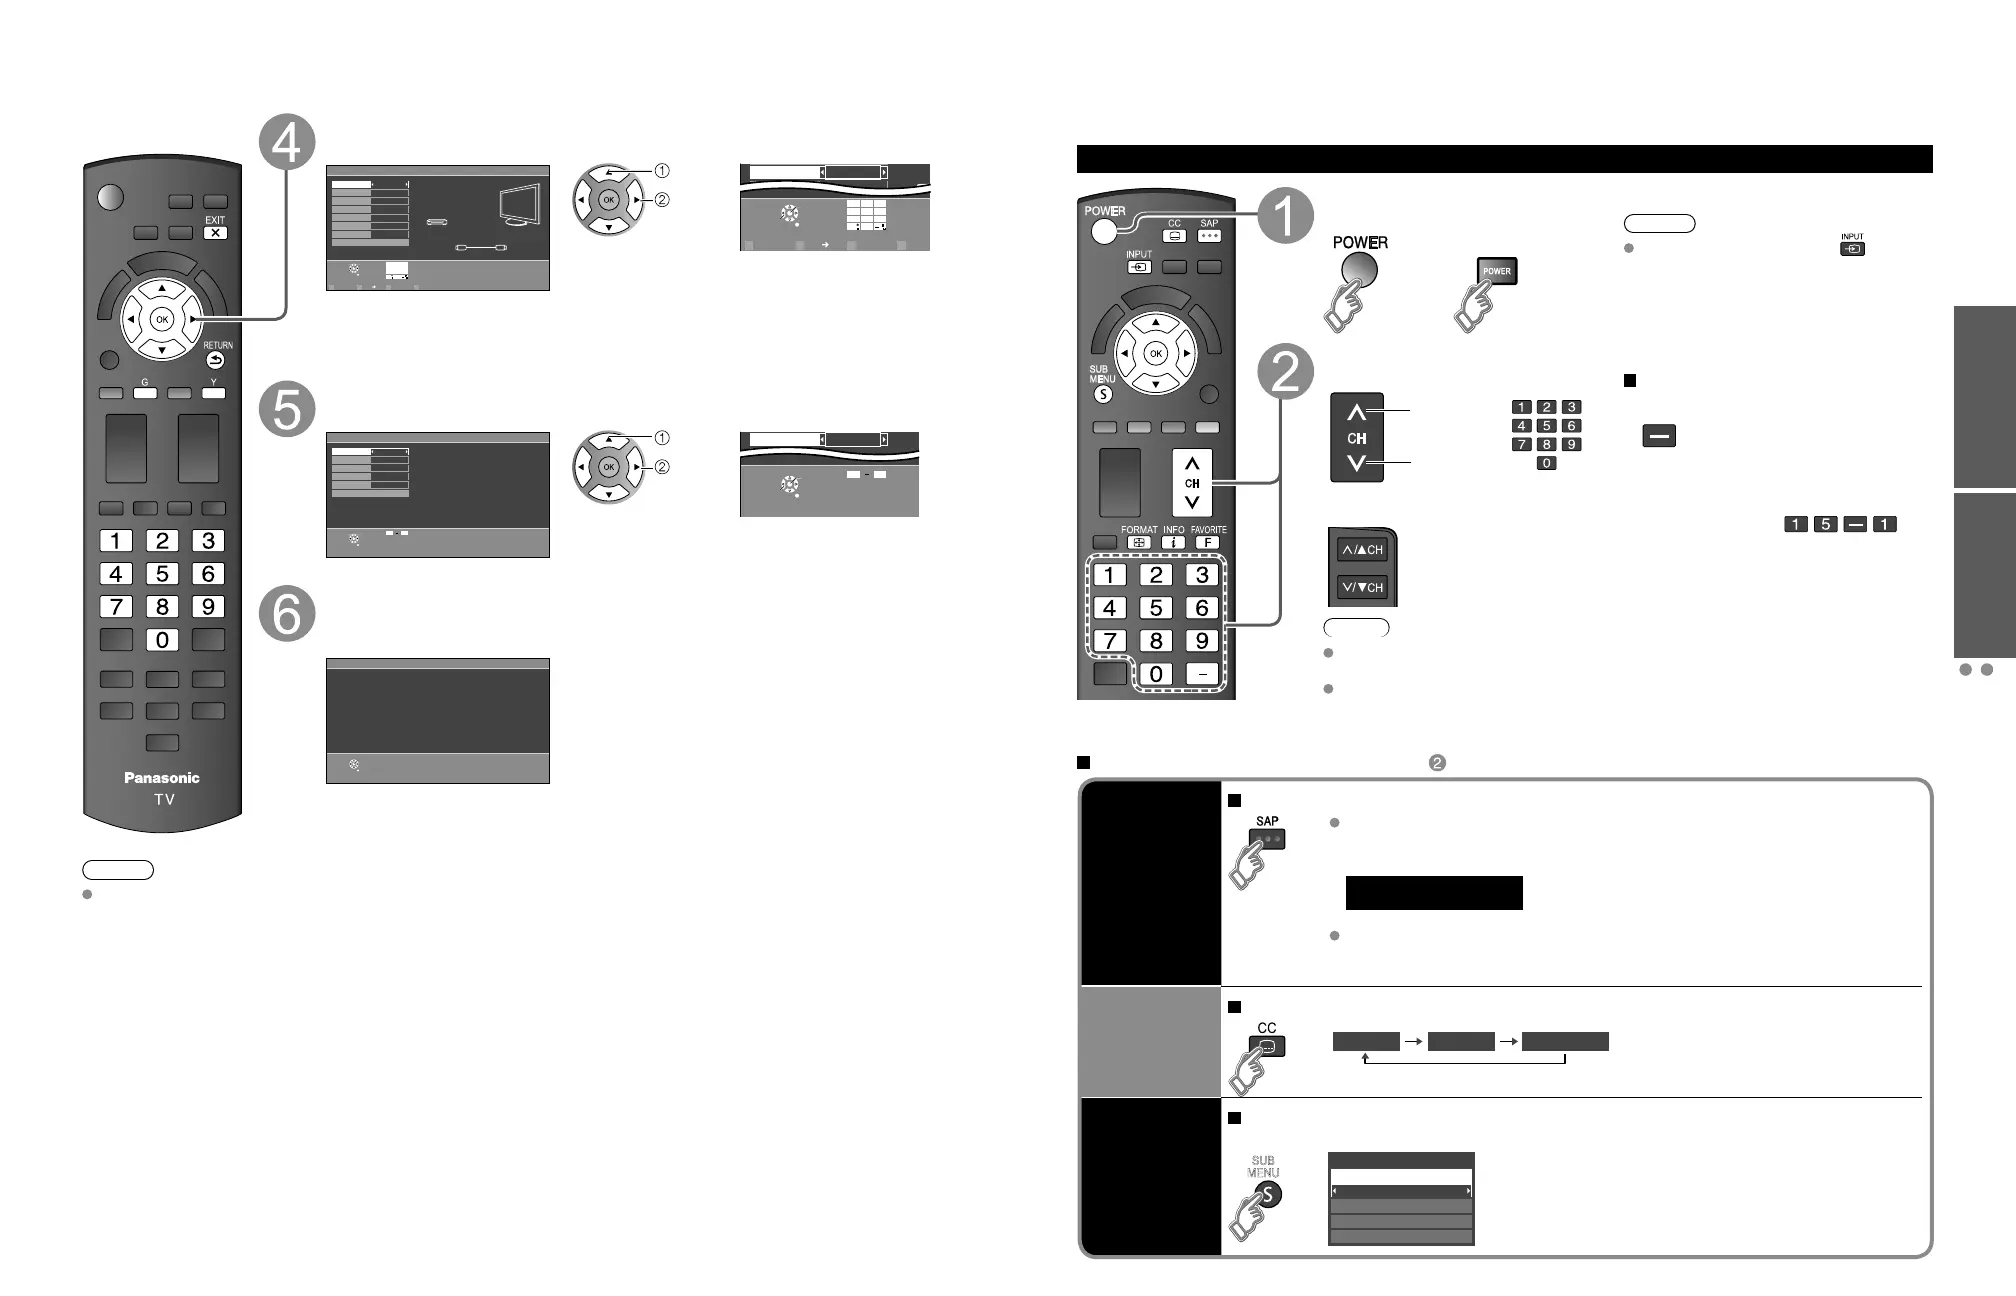
To watch TV and other functions
Turn power on
(TV)
or
(Remote)
Note
If the mode is not TV, press and
select TV. (p. 24)
Select a channel number
up
down
or
(Remote)
To directly enter the digital
channel number
When tuning to a digital channel,
press the button to enter the
minor number in a compound
channel number.
example: CH15-1:
(TV)
Note
Reselect “Cable” or “Antenna” in “ANT in” of “ANT/Cable setup” to switch the signal
reception between cable TV and antenna. (p. 13, 39)
The channel number and volume level remain the same even after the TV is turned
off.
Listen
with SAP
(Secondary
Audio
Program)
Select Audio mode for watching TV
Digital mode
Press SAP to select next audio track (if available) when receiving a digital
channel.
Audio track 1 of 2
(English)
Analog mode
Press SAP to select the desired audio mode.
• Each press of SAP will change the audio mode. (Stereo/SAP/Mono)
Closed
caption
Switches the Closed caption mode On or Off
Closed caption Off Closed caption On muteClosed caption On
Display the
SUB MENU
Press SUB MENU to show the sub menu screen (p. 29)
This menu consists of shortcuts to convenient functions.
SUB
MENU
All
Setup SUB MENU
Edit CH caption
Signal meter
Set favorite
Channel surf mode
Other Useful Functions (Operate after )
First Time Setup (Continued)
Note
About broadcasting
systems
Analog (NTSC):
Conventional
broadcasting
Digital (ATSC):
New
programming
that allows
you to view
more channels
featuring
high-quality video
and sound
Select the Input labels (Label inputs)
Select NEXT then press OK to go to next step.
Label inputs
Step 5 of 6
Press RIGHT to select a label for each input.
Example: DVD, Blu-ray, etc. or “Not used”.
Press OK to customize the label.
Edit
Blu-ray, DVD ...
HDMI HDMI
RETURN
Change
Select
HDMI 3
Component
Video 1
Video 2
PC
Next
HDMI 1
HDMI 2
ABC Deleteabc
R G B Y
1
@.
4
GHI
7
PQRS
2
ABC
5
JKL
8
TUV
3
DEF
6
MNO
9
WXYZ
0
- ,
LAST
OK
RETURN
Select
ABC Deleteabc
R G B Y
1
@.
4
GHI
7
PQRS
2
ABC
5
JKL
8
TUV
3
DEF
6
MNO
9
WXYZ
0
- ,
LAST
Follow the instructions on
screen to complete the
following operations.
Label: [BLANK] Not used/Blu-ray/DVD/DVD REC/HOME THTR/GAME/COMPUTER/
VCR/CABLE/SATELLITE/DVR/CAMERA/MONITOR/AUX/RECEIVER/MEDIA
CTR/MEDIA EXT/OTHER
Adjust the Clock (Set clock)
Select NEXT then press OK to go to next step.
Step 6 of 6
Edit
RETURN
Change
Select
09
Set clock
--
--
--
--
--
Day
Hour
Minute
Next
Year
Month
Current year.
or
Follow the instructions on
screen to complete the
following operations.
Complete the First time setup
Completion message is displayed when you successfully completed the First
time setup.
OK
RETURN
Setup is complete. Enjoy your
Panasonic VIERA TV.
Press OK to exit.
 Loading...