Refrigerating Specialties Division
2
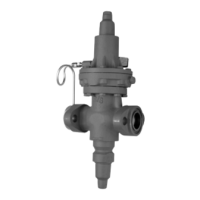
Principles of Operation
This is a pilot operated regulator whose main
valve is opened by a power piston in response
to the inlet fluid pressure received from below
the regulator diaphragm. The outlet pressure is
introduced through a sensing tube, which is part
of the Flange Ring-tube Assembly (20), from the
outlet of the regulator into the bonnet and to the
top of the diaphragm, thus allowing the regula-
tor to maintain a differential pressure between
the inlet and outlet equivalent to the spring
pressure.
After the regulator is set for the desired pressure
differential, the pressure at the inlet of the regu-
lator will rise and fall, pound for pound, with the
rise and fall of pressure at the regulator outlet,
always maintaining the set-for differential pres-
sure across the regulator. If the difference be-
tween inlet pressure and outlet pressure of the
regulator is less than the set-for pressure, the
regulator will remain tightly closed.
Manual Opening Stem:
All Type A4AL Regulators are provided with a
manual opening stem. To open the regulator
manually, back the stem out (turn counterclock-
wise) until it stops. To put the regulator into
automatic operation, turn the stem in (clock-
wise) until only the flats on the stem protrude
from the packing nut.
Adjustment
For adjustment, pressure gauges should be
connected to the gauge port at the regulator
inlet and also downstream of the regulator. With
the system operating, back the adjusting stem
all the way out to stop (counterclockwise) to
give minimum differential, which is about 2 psi.
Gradually turn the adjusting stem in (clockwise)
until the desired differential pressure is reached,
assuming the system is capable of achieving
such a differential. Check the differential setting
after the system has been in operation for a
while and make any minor corrections neces-
sary.
Installation
All regulators are packed for maximum protec-
tion. Unpack carefully, check the carton to
make sure all flanges and other items are un-
packed. Save the enclosed instructions for the
installer and eventual user.
Do not remove the protective coverings from the
inlet and outlet of the regulator until the regula-
tor is ready to be installed. Protect the inside of
the regulator from moisture, dirt and chips be-
fore and during installation. When welded or
brazed flange connections are used, all slag,
scale and loose particles should be removed
from the flange interior before the regulator is
installed between the flanges. It is advisable to
install a close-coupled companion strainer
(RSF) at the inlet of the regulator to help protect
it from any foreign material in the system.
The A4AL series of regulators will give optimum
performance if mounted in a horizontal line in a
vertical position with the manual opening stem
on bottom. Where other positions are desired,
the factory should be consulted: please give
application and piping details. The regulator
must be installed with the arrow on the valve
body pointing in the direction of the fluid flow for
the regulator to function properly. Backward
flow through the regulator is uncontrolled and
will vary with valve model and the reverse pres-
sure drop encountered. The regulator is not a
check valve.
Tighten the flange bolts and nuts evenly to
provide proper seating of the flange gasket and
to avoid damage to gaskets or flanges. (See
Bolt Torque Table). Avoid using the regulator
flange bolts to stretch or align pipe. Even the
heavy duty body of an A4A can be distorted,
causing the precision parts to bind.
The regulator should be installed in a location
where it is easily accessible for adjustment and
maintenance. The location should be such that
the regulator can not be easily damaged by
 Loading...