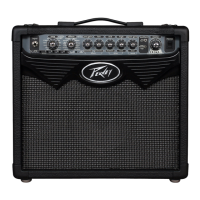
VarIabVarIabLE INStrumENt LE INStrumENt INputINput
On the VIP 2, you can input an electric, an acoustic, or a bass guitar. On the VIP 2, you can input an electric, an acoustic, or a bass guitar. There are amp models for all 3There are amp models for all 3
instrument types. instrument types. Once you plug into the amp, you select the Once you plug into the amp, you select the instrument type to the right (item 1). The ampinstrument type to the right (item 1). The amp
then changes its input sensitivity and gain structure to match your selection.then changes its input sensitivity and gain structure to match your selection.
NOtNOtE: VIp alifes e designed o E: VIp alifes e designed o e sed wih insens wih e sed wih insens wih ssive eleconics. When singssive eleconics. When sing
insens wih cive eleconics, he vole of he insens wih cive eleconics, he vole of he insen need o insen need o e edced o evene edced o even
cliing (nwned disoion).cliing (nwned disoion).
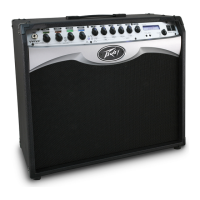
INStrumENt typE/prESEtSINStrumENt typE/prESEtS
The VypyrThe Vypyr
®®
VIP series was designed for usVIP series was designed for use with electric guitars, acoustic e with electric guitars, acoustic guitars and bass guitars! guitars and bass guitars! WithWith
these buttons you select which type of instrument you these buttons you select which type of instrument you are using with the amp. are using with the amp. There are 4 banks withThere are 4 banks with
4 presets each, for a total of 16 4 presets each, for a total of 16 presets. presets. The names of the preset banks are associated with The names of the preset banks are associated with the type ofthe type of
instrument being used . Tinstrument being used . To access the different o access the different presets within the current bank, simply continue tappingpresets within the current bank, simply continue tapping
the button and the LED will change color to indicate whicthe button and the LED will change color to indicate which preset you have selected. h preset you have selected. Any changes youAny changes you
make to the settings (except for master volume level) can be saved back to the preset if desired. To savemake to the settings (except for master volume level) can be saved back to the preset if desired. To save
settings over the loaded preset, just press and hold its bank button until its LED begins to blink and thensettings over the loaded preset, just press and hold its bank button until its LED begins to blink and then
continue to hold the button until the LED stops blinking. Pressing the Tap Tempo button cancels the save.continue to hold the button until the LED stops blinking. Pressing the Tap Tempo button cancels the save.
To save changes to the current preset over a different preset, press and hold its bank button until its LEDTo save changes to the current preset over a different preset, press and hold its bank button until its LED
begins to blink. The LEDs for any other banks in which the preset can be saved will also blink. Select thebegins to blink. The LEDs for any other banks in which the preset can be saved will also blink. Select the
bank to save in by tapping the desired bank button - it will continue to blink but the other bank LEDs willbank to save in by tapping the desired bank button - it will continue to blink but the other bank LEDs will
turn off. If the bank LED is not the color of the desired preset to overwrite, tap the bank LED again until theturn off. If the bank LED is not the color of the desired preset to overwrite, tap the bank LED again until the
color matches the desired preset number. To complete the save, press and hold the bank button until thecolor matches the desired preset number. To complete the save, press and hold the bank button until the
LED stops blinking. LED stops blinking. Pressing the TPressing the Tap Tempo button cancels the ap Tempo button cancels the save.save.
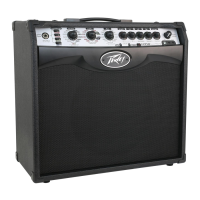
INStrumENt/StOmp ENCODErINStrumENt/StOmp ENCODEr
For the first time evFor the first time ever in a modeling amp, you have accer in a modeling amp, you have access to instrument models! ess to instrument models! Using your electricUsing your electric
guitar, you can access 10 different instrument models, from acoustic guitars to baritone guitars and even aguitar, you can access 10 different instrument models, from acoustic guitars to baritone guitars and even a
synth! synth! The other side of the encoder is dedicated to stompboxes, so yThe other side of the encoder is dedicated to stompboxes, so you have access to a full complementou have access to a full complement
of stompbox effects! of stompbox effects! Turn Turn this knob to select this knob to select your desired pre-amplifier effect your desired pre-amplifier effect (if any). (if any). Press the encoderPress the encoder
momentarily to enter Edit mode (Item momentarily to enter Edit mode (Item 12). 12). You’You’ll also notice a small ll also notice a small ‘m’ on ‘m’ on a few effects and a few effects and the bassthe bass
simulation. simulation. This is This is because these arebecause these are
onohonic effecsonohonic effecs
and as such, you’ll need to be careful to playand as such, you’ll need to be careful to play
one noe ieone noe ie
for them to for them to work properlywork properly. . The LEDs on this The LEDs on this encoder are bi-colorencoder are bi-color. . At the bottom of theAt the bottom of the
encoder is a guide to show which color represents which effect.encoder is a guide to show which color represents which effect.
VIVIp p 2 F2 Foon n ppnenell
00
11
22
1 1 2 2 33
1111
0 0 44
 Loading...