MAN-0012 Rev. I Page | 32
4) Starting with the end cell
nearest your legs, begin
flaking the nose of the
canopy. Pull each cell
completely out, and keep it in
your hand. Then, pick up the
next, taking care not to miss
any until all seven cells are in
your hand.
When you have the entire
nose flaked, tuck it between
your knees and hold it there.
5) Clear the stabilizers. Flake
the material between each
line group out toward the
stabilizers, keeping the line
groups stacked together in
the middle of the pack job.
Clear the tail, flaking the
material be-
steering line toward the
outside of the pack job.
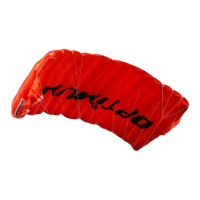
The diagram at right shows
the correct organization of
the canopy after step 5 is
completed. The leading edge
will be closest to your body,
and the trailing edge will be
When looking straight down
into the canopy from above,
diagram.
Note: to improve clarity, the
slider is not shown.
attachments
ribs