Service Modes, Error Codes, and Fault Finding
EN 18 Q522.2HE LA5.
2010-Jun-30
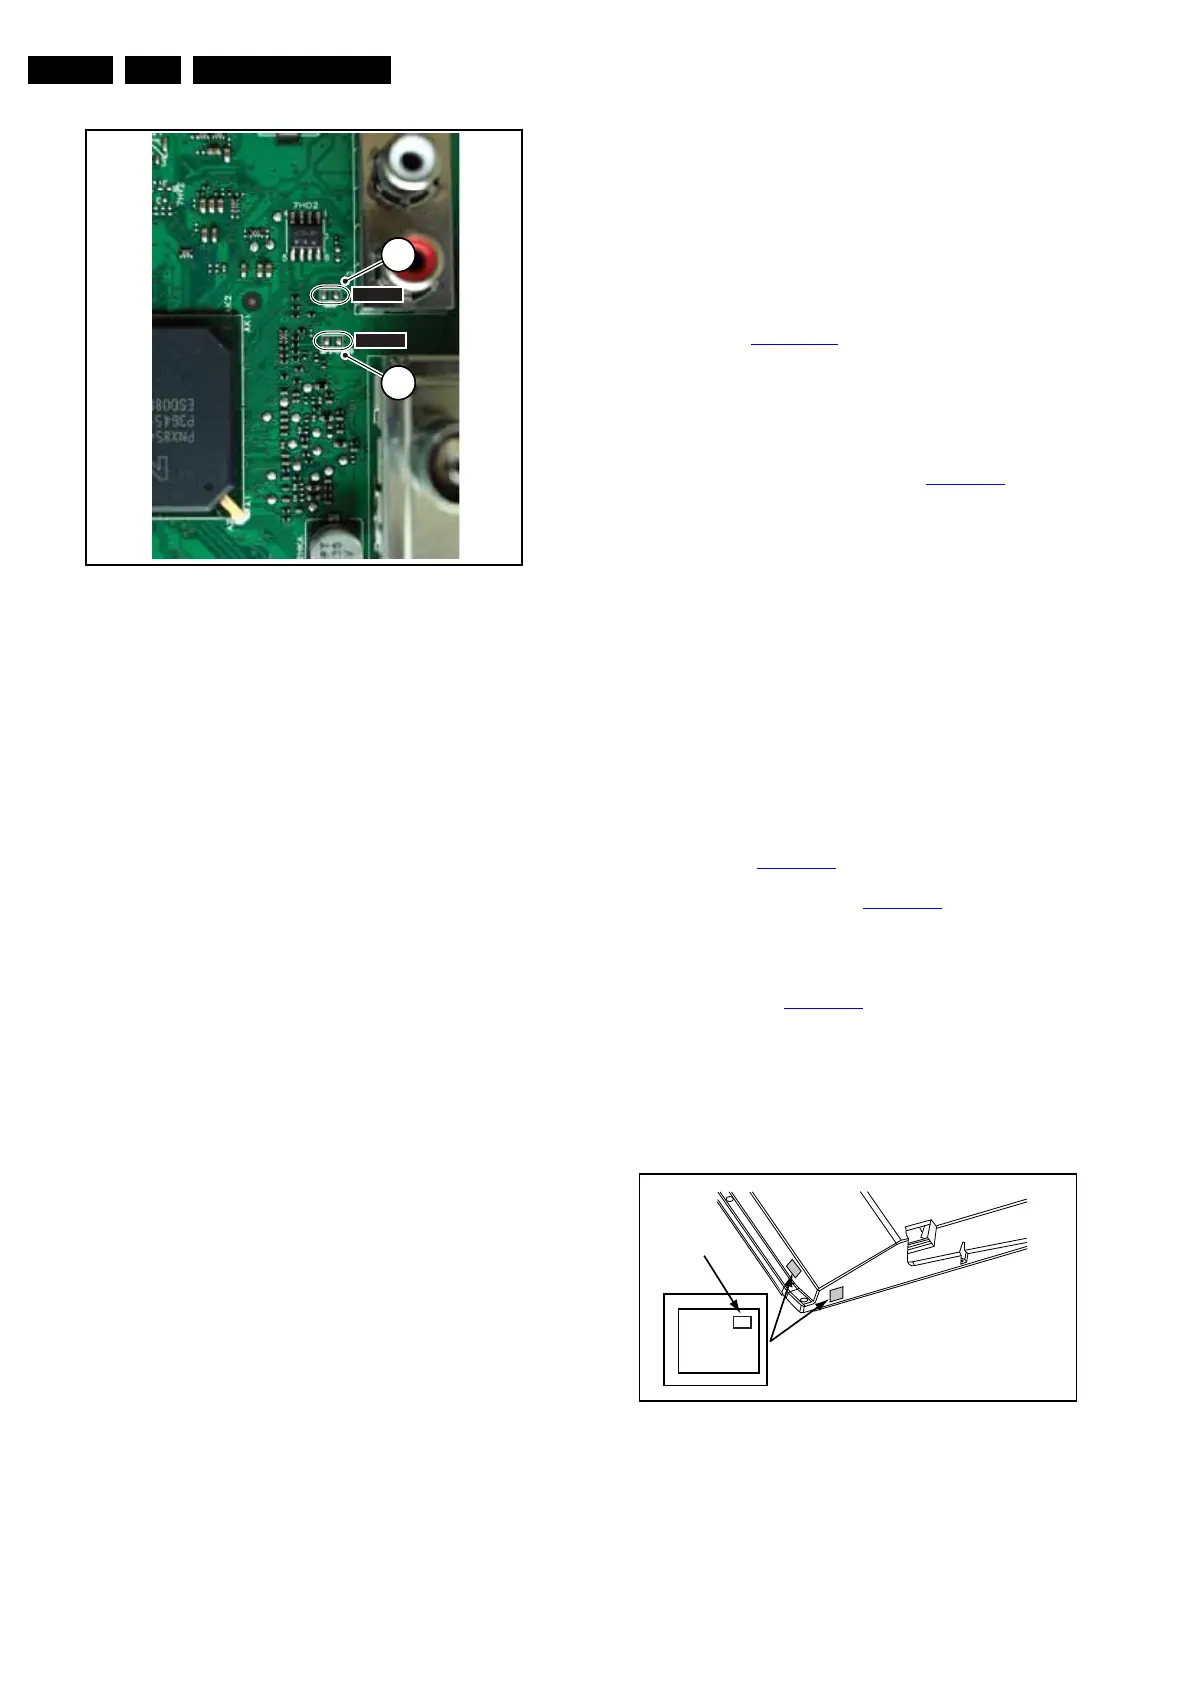
Figure 5-1 Service mode pads
After activating this mode, “SDM” will appear in the upper right
corner of the screen (in case a picture is displayed).
How to Navigate
By pressing the “MENU” button on the RC transmitter, the set
will toggle between the SDM and the normal user menu (with
the SDM mode still active in the background).
How to Exit SDM
Use one of the following methods:
• Switch the set to STAND-BY via the RC-transmitter.
• Via a standard customer RC-transmitter: key in “00”-
sequence.
5.3.2 Service Alignment Mode (SAM)
Purpose
• To perform (software) alignments.
• To change option settings.
• To easily identify the used software version.
• To view operation hours.
• To display (or clear) the error code buffer.
How to Activate SAM
Via a standard RC transmitter: key in the code “062596”
directly followed by the “INFO” button. After activating SAM
with this method a service warning will appear on the screen,
to continue press the red button on the RC.
Contents of SAM:
• Hardware Information.
– A. SW Version. Displays the software version of the
main software (example: Q522E-1.2.3.4 =
AAAAB_X.Y.W.Z).
• AAAA= the chassis name.
• B= the region: A= AP, E= EU, L= LatAm, U = US.
For AP sets it is possible that the Europe software
version is used.
• X.Y.W.Z= the software version, where X is the
main version number (different numbers are not
compatible with one another) and Y.W.Z is the sub
version number (a higher number is always
compatible with a lower number).
– B. SBY PROC Version. Displays the software version
of the stand-by processor.
– C. Production Code. Displays the production code of
the TV, this is the serial number as printed on the back
of the TV set. Note that if an NVM is replaced or is
initialized after corruption, this production code has to
be re-written to NVM. ComPair will foresee in a
possibility to do this.
• Operation Hours. Displays the accumulated total of
operation hours (not the stand-by hours). Every time the
TV is switched “on/off”, 0.5 hours is added to this number.
• Errors (followed by maximal 10 errors). The most recent
error is displayed at the upper left (for an error explanation
see section Error Codes
).
• Reset Error Buffer. By pressing “cursor right” (or the “OK
button) and then the “OK” button, the error buffer is reset.
• Alignments. This will activate the “ALIGNMENTS” sub-
menu.
• Dealer Options. Extra features for the dealers.
• Options. Extra features for Service. For more information
regarding option codes, see chapter Alignments
.
Note that if the option code numbers are changed, it has to
be confirmed with the “OK” button before storing the
options. Otherwise any changes will be lost.
• Initialise NVM. The moment the processor recognizes a
corrupted NVM, the “initialize NVM” line will be highlighted.
Now, two options are available (dependent of the service
instructions at that moment):
– Save the content of the NVM via ComPair for
development analysis, before initializing. This will give
the Service department an extra possibility for
diagnosis (e.g. when Development asks for this).
– Initialize the NVM.
Note: When NVM is corrupted, or the NVM has been replaced,
there is a high possibility that the set will not display a picture
anymore because the display code is not correct. So, before
initializing the NVM via the SAM, the set should display a
picture and therefore the correct display option is a necessity.
Refer to chapter Alignments
for details. To adapt this option,
the ComPair tool can be used (the correct HEX values for the
options can be found in chapter Alignments
) or a method via a
standard RC (described below).
Changing the display option via a standard RC: Key in the
code “062598” directly followed by the “MENU” button and
“XXX”, where XXX is the 3 digit decimal display code (see table
Table 6-4 in chapter Alignments
, or sticker on the side/bottom
of the cabinet). Make sure to key in all three digits, also the
leading zero’s. If the above action is successful, the front LED
will go out as an indication that the RC sequence was correct.
After the display option is changed in the NVM, the TV will go
to the Stand-by mode. If the NVM was corrupted or empty
before this action, it will be initialized first (loaded with default
values). This initializing can take up to 20 seconds.
Figure 5-2 Location of Display Option Code sticker
• Store. All options and alignments are stored when
pressing “cursor right” (or the “OK” button) and then the
“OK”-button.
• SW Maintenance.
I_18010_068.eps
130608
1
SDM
1
12
SDM
SDMSPI
PHILIPS
MODEL:
32PF9968/10
PROD.SERIAL NO:
AG 1A0620 000001
040
39mm
27mm
(CTN Sticker)
Display Option
Code
E_06532_038.eps
240108