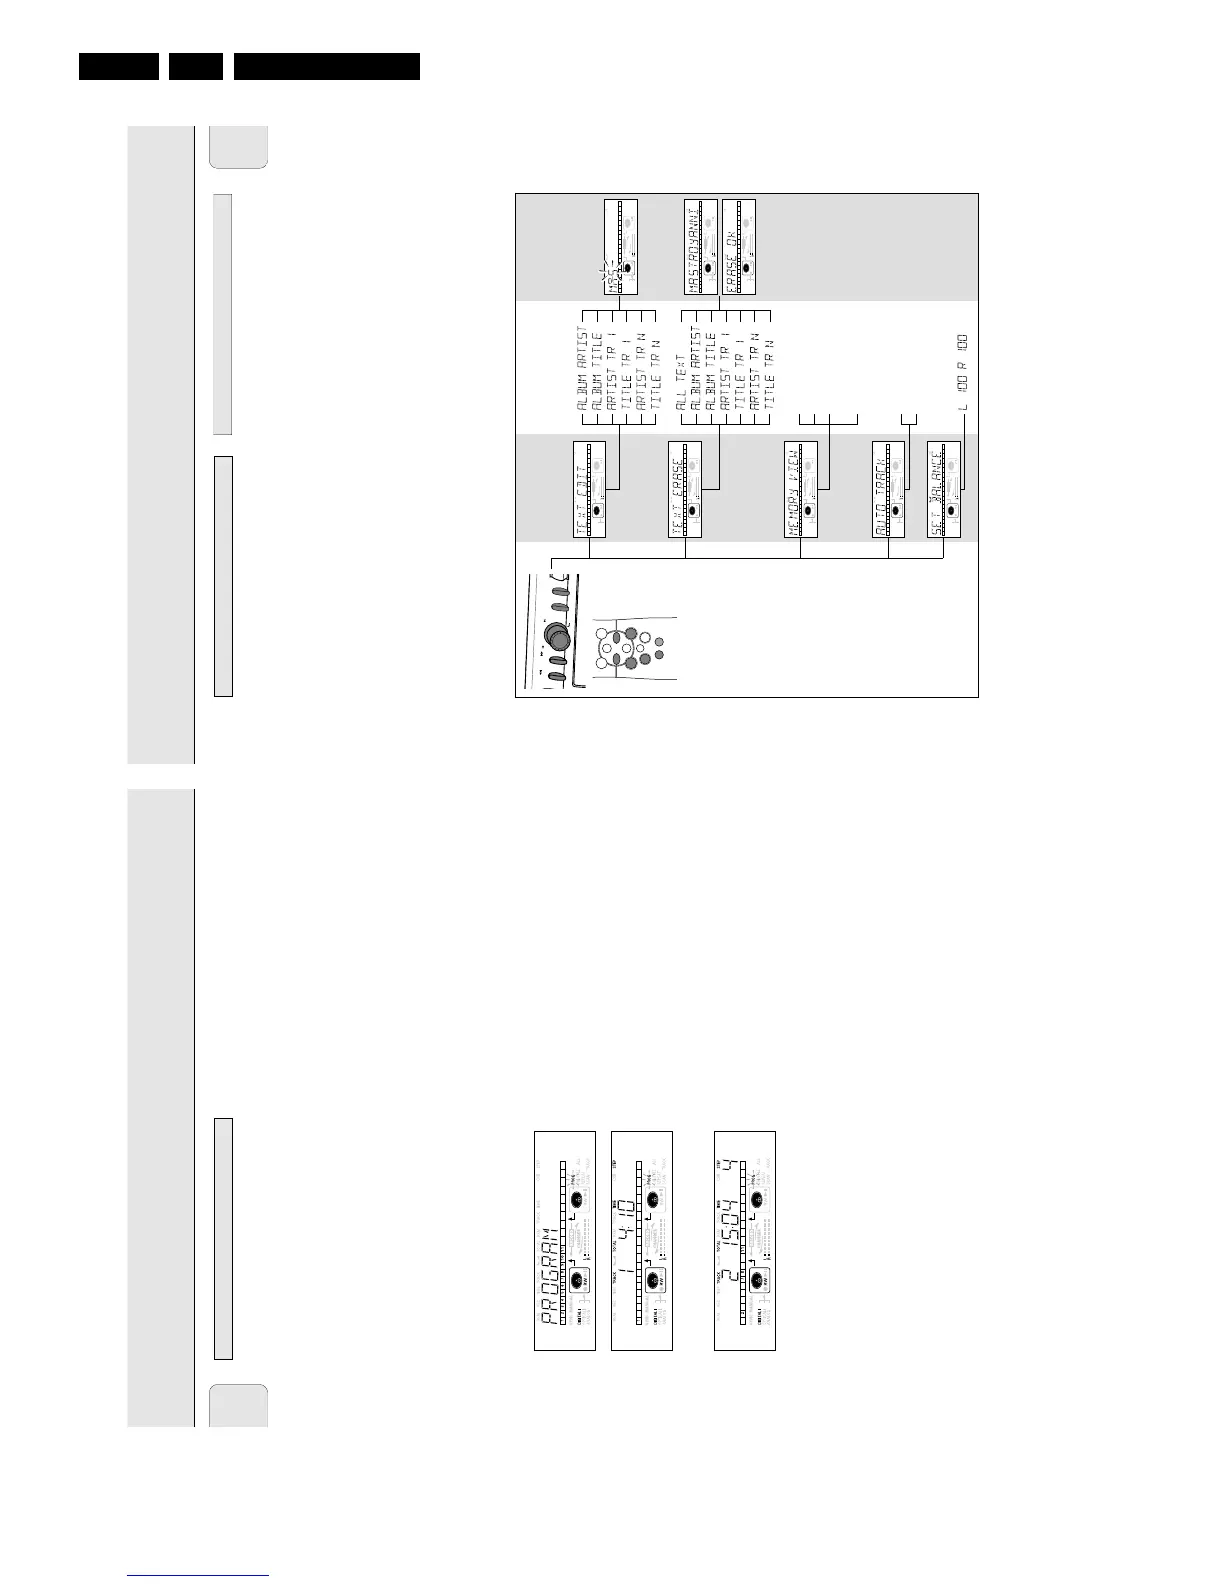
•In Menu mode you will have access to a number of features
which are not available via the regular keys (on the deck’s
front and the remote control).
•The TEXT submenus (A-B) allow you to give names to discs
and tracks. The disc and track names will be displayed
during playback.
•In the RECORDING submenus (D-E) you can set Auto Track
and Balance.
•All settings (except Balance) made in Menu mode will be
stored in the deck’s memory and can be called up and
changed at any time.
Menu active in Recording or Stop mode.
1 When using the remote control select first CDR.
2 Press STORE/MENU on the deck or the remote control to
enter Menu mode.
➜ TEXT EDIT appears on the display.
3 Rotate EASY JOG/ENTER to select the required submenus.
4 Press EASY JOG/ENTER to confirm selections.
5 Rotate EASY JOG/ENTER to select options in the submenus.
6 Press EASY JOG/ENTER to confirm selections.
7 Press STORE/MENU to store settings and return to the
submenu.
8 Press STOP 9 to store settings and exit Menu mode.
Note: Text can only be edited for unfinalized discs. (Finalized
CDRW discs must be unfinalized first.)
General operation of MenuRemarks about Menu mode
MENU MODE
English
27
•You can program up to 99 tracks to play in any desired
sequence.
•Tracks can be programmed more than once, but each time
counts as a track. (
STEP
)
•A program for playback can be made from both the disc in
the recorder deck and the disc in the player deck. A program
for recording can only be made from the disc in the player
deck.
Programming for playback
1 Select Changer mode or DJ mode using the DJ MODE key.
➜ CHANGER MODE or DJ MODE appears on the display.
2 Press CDR or CD to select the required deck.
➜ Selected key lights up.
3 Press PROG(ram) to enter Program mode.
➜
PROG
flashes and PROGRAM followed by track
information appears on the display.
4 Select the required track numbers by turning the EASY
JOG/ENTER key left or right and store by pressing ENTER.
or:
Key in a track number with the number keys on the remote
control and press ENTER to confirm. For 2-digit numbers,
press the keys in rapid succession.
➜ The track will be stored in the program.
➜ The track number, total program time and the number of
programmed tracks (
STEP
) are displayed.
5 Repeat step 4 for all tracks to be programmed.
6 Press STOP or PROG(ram) to end programming.
➜
PROG
lights continuously.
7 Press PLAY/PAUSE 2; to start programmed play.
Note:
- To review the program, press PROG(ram), followed by
5
or
6
with the CD player or CD recorder in stop mode.
- To add more tracks to the program, repeat steps 2 to 6.
- If you try to store more than 99 tracks,
PROG FULL
appears on the display.
Programming for recording
1 Press REC TYPE to select the required recording mode (see
‘Recording’).
2 Compile your programme as described in “programming for
playback”. (steps 3 to 5)
•Only tracks from the disc in the CD player can be stored.
3 Press RECORD to start recording.
Clearing a program
1 Press STOP 9 if necessary to stop programmed play.
2 Press STOP 9 again to clear the program.
➜
PROG
disappears from the display.
•The program is also cleared if you open the disc tray.
Erasing a track from a program
1 In Stop mode press PROG(ram) to enter Program mode.
2 Use 5 or 6 to select the track that has to be deleted.
➜ The track number and program step will be shown on
the display.
3 Press CANCEL/DELETE to erase the track from the program.
➜ The remaining program steps and the remaining playing
time of the program will be displayed.
4 Repeat step 2 and 3 for all tracks to be erased.
5 Press STOP 9 or PROG(ram) to end erasing.
➜
PROG
lights continuosly.
Remarks about programming
PROGRAMMING
English
26