English
1 Important
Read this user manual carefully before you use the appliance, and save the user manual for
future reference.
Danger
• Do not immerse the motor unit in water nor rinse it under the tap.
Warning
•
Neveruseyourngersoranobjecttopushingredientsintothefeedingtubewhilethe
applianceisrunning.Onlyusethepusher.
• Beforeyouconnecttheappliancetothepower,makesurethatthevoltageindicated
onthebottomoftheappliancecorrespondstothelocalpowervoltage.
• Never connect this appliance to a timer switch, to avoid a hazardous situation.
•
Ifthepowercord,theplug,orotherpartsaredamaged,donotusetheappliance.
• Ifthepowercordisdamaged,youmusthaveitreplacedbyPhilips,aservicecenter
authorizedbyPhilips,orsimilarlyqualiedpersonstoavoidahazard.
• Thisapplianceisnotintendedforusebypersons(includingchildren)withreduced
physical,sensoryormentalcapabilities,orlackofexperienceandknowledge,unless
theyhavebeengivensupervisionorinstructionconcerninguseoftheappliancebya
person responsible for their safety.
• For their safety, do not allow children to play with the appliance.
• Never let the appliance run unattended.
•
Iffoodstickstothewalloftheblenderjarorbowl,switchofftheapplianceandunplug
it. Then use a spatula to remove the food from the wall.
• Be careful when you handle or clean the discs, the blade unit of the food processor,
andthebladeunitoftheblender.Thecuttingedgesareverysharp.
• Donottouchtheblades,especiallywhentheapplianceispluggedin.Thebladesare
very sharp.
•
Ifthebladesgetstuck,unplugtheappliancebeforeyouremovetheingredientsthat
block the blades.
Caution
•
Neverswitchofftheappliancebyturningtheblenderjar,thebowl,ortheirlids.Always
switchofftheappliancebyturningtheknobto0.
•
Unplugtheapplianceimmediatelyafteruse.
• Alwaysunplugtheappliancebeforeyoureachintotheblenderjarwithyourngersor
anobject.
• Waituntilthemovingpartsstoprunningbeforeyouremovethelidofthebowlorjar.
• Donotexceedthemaximumlevelindicationonthejarorthebowl.
• Thoroughlycleanthepartsthatcomeintocontactwithfoodbeforeyouusethe
applianceforthersttime.
• Beforeyouremoveorcleanthekneadingaccessoryordiscs,unplugtheappliance.
• Never use any accessories or parts from other manufacturers or that Philips does not
specicallyrecommend.Ifyouusesuchaccessoriesorparts,yourguaranteebecomes
invalid.
• This appliance is intended for household use only.
•
Donotexceedthequantitiesandprocessingtimeindicatedintheusermanual.
• Lethotingredientscooldown(<80ºC)beforeprocessingthem.
• Always let the appliance cool down to room temperature after each batch that you
process.
•
Certainingredientsmaycausediscolorationsonthesurfaceoftheparts.Thisdoesnot
haveanegativeeffectontheparts.Thediscolorationsusuallydisappearaftersome
time.
• Noise level = 85 dB [A]
Electromagneticelds(EMF)
ThisPhilipsappliancecomplieswithallstandardsregardingelectromagneticelds(EMF).
Ifhandledproperlyandaccordingtotheinstructionsinthisusermanual,theapplianceissafe
tousebasedonscienticevidenceavailabletoday.
Recycling
Yourproductisdesignedandmanufacturedwithhighqualitymaterialsandcomponents,
which can be recycled and reused.
When you see the crossed-out wheel bin symbol attached to a product, it means the
productiscoveredbytheEuropeanDirective2002/96/EC:
Never dispose of your product with other household waste. Please inform yourself about
the local rules on the separate collection of electrical and electronic products. The correct
disposalofyouroldproducthelpspreventpotentiallynegativeconsequencesonthe
environment and human health.
2 Introduction
CongratulationsonyourpurchaseandwelcometoPhilips!Tofullybenetfromthesupport
thatPhilipsoffers,registeryourproductatwww.philips.com/welcome.
This appliance is equipped with a built-in safety lock. You can only switch on the appliance
afteryoucorrectlyassemblethefollowingpartsonthemotorunit:
• the food processor bowl and its lid, or
•
theblenderjaranditslid(HR7628,HR7629only),or
• thecitruspress(HR7629only)
If these parts are assembled correctly, the built-in safety lock is unlocked.
Forrecipestousewithyourfoodprocessor,gotowww.philips.com/kitchen
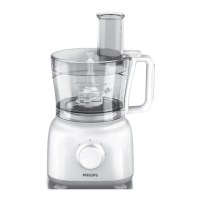
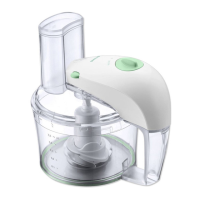
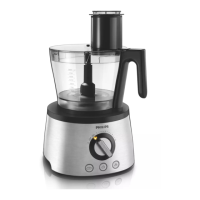
3 Foodprocessor
Warning
• Neveruseyourngersoranobjecttopushingredientsintothefeedingtubewhiletheapplianceis
running.Onlyusethepusher.
Blade unit
Beforeyoustart,makesureyouassembleaccordingtoFig.2.
Youcanusethebladeunittochop,mix,blend,orpureeingredients.Youcanalsouseitto
mix and blend cake batters.
Caution
• Donotusethebladeunittochophardingredients,likecoffeebeans,turmeric,nutmeg,andice
cubes,asthismaycausethebladetogetblunt.
Note
• Donotlettheapplianceruntoolongwhenyouchop(hard)cheeseorchocolate.Otherwisethese
ingredientsbecometoohot,starttomelt,andturnlumpy.
• Precutlargepiecesoffoodintopiecesofapprox.3x3x3cm.
1 Turnthethebowlclockwisetoxitonthemotorunit,andthenputthetoolholderin
the bowl.
» Whenthebowlisxedcorrectly,youhearaclick.
2 Put the blade unit on the tool holder.
3 Puttheingredientsinthebowl.
4 Putthelidonthebowl,andthenturnthelidclockwisetoxit.
» Whenthelidisassembledcorrectly,youhearaclickandthelidisxedtothebowl
handle.
5 Putthepusherintothefeedingtube.
6 Connectthepowerplugtothepowersupply.
7 Checkthepreparationtime,themaximumamountandthespeedsettingrequiredfor
theingredientsinTable1.Turntheknobtothedesiredspeedsetting.
8 After use, turn the knob to 0,andthenunplugtheappliance.
Tip
• When you chop onions, turn the knob to Pafewtimestopreventtheonionsfrombecomingtoo
nelychopped.
• How to remove food that sticks to the blade or to the inside of the bowl? 1. Switch off the appliance,
andthenunplugit.2.Removethelidfromthebowl.3.Removetheingredientsfromthebladeor
from the side of the bowl with a spatula.
Kneading accessory
Beforeyoustart,makesureyouassembleaccordingtoFig.3.
Youcanusethekneadingaccessorytokneadyeastdoughforbreadandpizzas.Youneed
toadjusttheamountofliquidtoformthedoughaccordingtothehumidityandtemperature
condition.
Note
• Donotusethekneadingaccessorytoblendcakebatters.Usethebladeunitforthisjob.
• Alwaysputthekneadingaccessoryinthebowlbeforeyouaddtheingredients.
1 Turnthethebowlclockwisetoxitonthemotorunit,andthenputthetoolholderin
the bowl.
» Whenthebowlisxedcorrectly,youhearaclick.
2 Putthekneadingaccessoryonthetoolholder.
3 Puttheingredientsinthebowl.
4 Putthelidonthebowl,andthenturnthelidclockwisetoxit.
» Whenthelidisassembledcorrectly,youhearaclickandthelidisxedtothebowl
handle.
5 Putthepusherintothefeedingtube.
6 Connectthepowerplugtothepowersupply.
7 Turn the knob to the 1 position.
8 Checkthepreparationtime,themaximumamountandthespeedsettingrequiredfor
theingredientsinTable1.
9 After use, turn the knob to 0,andthenunplugtheappliance.
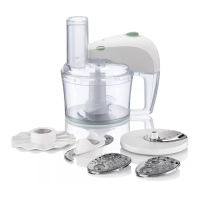
Discs and Inserts
Beforeyoustart,makesureyoupickyourdesireddiscfromfollowingandassemble
accordingtoFig.4andFig.5.
• Emulsifyingdisc
• Insertforne(HR7627andHR7628only)
• Insertforgranulating(HR7627andHR7628only)
• Reversibleslicing/shreddingdisc(coarse)(HR7629only)
Caution
• Becarefulwhenyouhandletheslicingbladeofdisc.Ithasaverysharpcuttingedge.
• Neverusethedisctoprocesshardingredients,likeicecubes.
• Donotexerttoomuchpressureonthepusherwhenyoupressingredientsintothefeedtube.
Note
• Precutlargeingredientsintochunksthattinthefeedingtube.
1 Turnthebowlclockwisetoxitonthemotorunit,andthenputthetoolholderinthe
bowl.
» Whenthebowlisxedcorrectly,youhearaclick.
2 Putthediscontheshaft.Forinserts(HR7627andHR7628only),placeaninsertinthe
insert holder as indicated below, then place the insert holder with insert on the shaft.
Placetheopeningoftheinsertovertheshaftoftheinsertholder.
Pushtheopeningoftheinsertovertheprojectionontheshaft.
Press the insert onto the insert holder until it locks in position with a click.
3 Putthelidonthebowl,andthenturnthelidclockwisetoxit.
» Whenthelidisassembledcorrectly,youhearaclickandthelidisxedtothebowl
handle.
4 Puttheingredientsintothefeedingtubewiththepusher.Fillthefeedingtubeevenlyfor
thebestresults.Whenyouhavetoprocessalargeamountofingredients,processsmall
batches and empty the bowl between batches.
5 Connectthepowerplugtothepowersupply.
6 Checkthepreparationtime,themaximumamountandthespeedsettingrequiredfor
theingredientsinTable1.Selectthespeedthatmatchesthecoloroftheaccessory.
7 After use, turn the speed selector to 0,andthenunplugtheappliance.
Citruspress(HR7629only)
Beforeyoustart,makesureyouassembleaccordingtoFig.6.
You can use the citrus press to squeeze citrus fruits.
1 Turnthethebowlclockwisetoxitonthemotorunit,andthenputthetoolholderin
the bowl.
» Whenthebowlisxedcorrectly,youcanhearaclick.
2 Put the sieve for citrus press on the tool holder in the bowl. Make sure that the
projectiononthesieveislockedintheslotofthebowlhandle.
» Whenthesieveisxedcorrectly,youcanhearaclick.
3 Put the cone on the sieve.
4 Connectthepowerplugtothepowersupply.
5 CheckthemaximumamountrequiredfortheingredientsinTable1.Turntheknobto
speed 1.
» Theconestartsrotating.
6 Press the citrus fruit onto the cone.
7 Stoppressingfromtimetotimetoremovethepulpfromthesieve.Whenyounish
pressingorwhenyouwanttoremovethepulp,turntheknobto0 and remove the bowl
from the appliance with the sieve and cone on it.
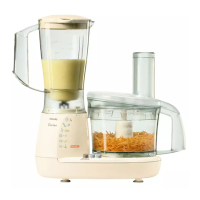
Blender(HR7628andHR7629only)
Beforeyoustart,makesureyouassembleaccordingtoFig.7.
Theblenderisintendedfor:
• Blendinguids,likedairyproducts,sauces,fruitjuices,soups,mixeddrinks,andshakes.
• Mixingsoftingredients,likepancakebatter.
• Pureeingcookedingredients,likebabyfood.
• Crushingice.
Note
• Donotexerttoomuchpressureonthehandleoftheblenderjar.
• Neveropenthelidtoputyourhandoranyobjectinthejarwhiletheblenderisrunning.
• Alwaysassemblethesealingringontothebladeunitbeforeyouattachthebladeunittotheblenderjar.
• Toaddliquidingredientsduringprocessing,pourthemintotheblenderjarthroughthefeedinghole.
• Precutsolidingredientsintosmallpiecesbeforeyouprocessthem.
• Ifyouwanttopreparealargequantity,processsmallbatchesofingredientsinsteadofalarge
quantity at once.
• Toavoidspillage:Whenyouprocessaliquidthatishotortendstofoam(forexample,milk),donot
putmorethan1literofliquidintheblenderjar.
• Ifyouarenotsatisedwiththeresult,switchofftheapplianceandstirtheingredientswithaspatula.
Remove some of the contents to process a smaller quantity or add some liquid.
1 Turnthebladeunitontheblenderjar.
2 Placetheblenderjaronthemotorunitandturnitclockwisetoxit.
» Whenthejarisxedcorrectly,youhearaclick.
3 Puttheingredientsintheblenderjarwithinthemaximumlevelindication.
4 Placethelidontheblenderjar,andthenturnitclockwisetoxit.
5 Connectthepowerplugtothepowersupply.
6 Checkthepreparationtime,themaximumamountandthespeedsettingrequiredfor
theingredientsinTable1.Turntheknobtothedesiredspeedsetting.Tocrushice,turn
the knob to P.Pressthebuttonagaintostop.
7 After use, turn the knob to 0,andthenunplugtheappliance.
Tip
• Howtoremovetheingredientsthatsticktothesideoftheblenderjar?1.Switchofftheappliance,
andthenunplugit.2.Openthelid,andthenuseaspatulatoremovetheingredientsfromthesideof
thejar.3.Keepthespatulaatleast2cmfromtheblade.
Quick cleaning
Youcanfollowthefollowingstepstocleanthefoodprocessorbowlandblenderjareasier.
Note
• Make sure that the blade is assembled in the bowl if you clean the food processor bowl.
1 Pourlukewarmwater(notmorethan0.5liters)andafewdropsofwashing-upliquid
intothefoodprocessorbowlorblenderjar.
2 Placethelidonthefoodprocessorbowlorblenderjar,andthenturnitclockwisetox
it.
3 Turn the knob to P. Let the appliance run for 30 seconds or until the food processor
bowlorblenderjarisclean.
4 After use, turn the knob to 0,andthenunplugtheappliance.
5 Detachtheblenderjarorfoodprocessorbowlandrinseitwithcleanwater.
Cleaning and storage
Warning
• Beforeyoucleantheappliance,unplugit.
Caution
• Makesurethatthecuttingedgesofthebladesanddiscsdonotcomeintocontactwithhardobjects.
Thismaycausethebladetogetblunt.
• Thecuttingedgesaresharp.Becarefulwhenyoucleanthebladeunitofthefoodprocessor,the
blade unit of the blender and the discs.
1 Cleanthemotorunitwithamoistcloth.
2 Cleantheotherpartsinhotwater(<60ºC)withsomewashing-upliquidorina
dishwasher.
3 Store the product in a dry place.
4 Guarantee and service
If you have a problem, need service, or need information, see www.philips.com/support or
contactthePhilipsConsumerCareCenterinyourcountry.Thephonenumberisinthe
worldwideguaranteeleaet.IfthereisnoConsumerCareCenterinyourcountry,
gotoyourlocalPhilipsdealer.

 Loading...