1-12
PREPARATIONS AND CONNECTIONS
Connections
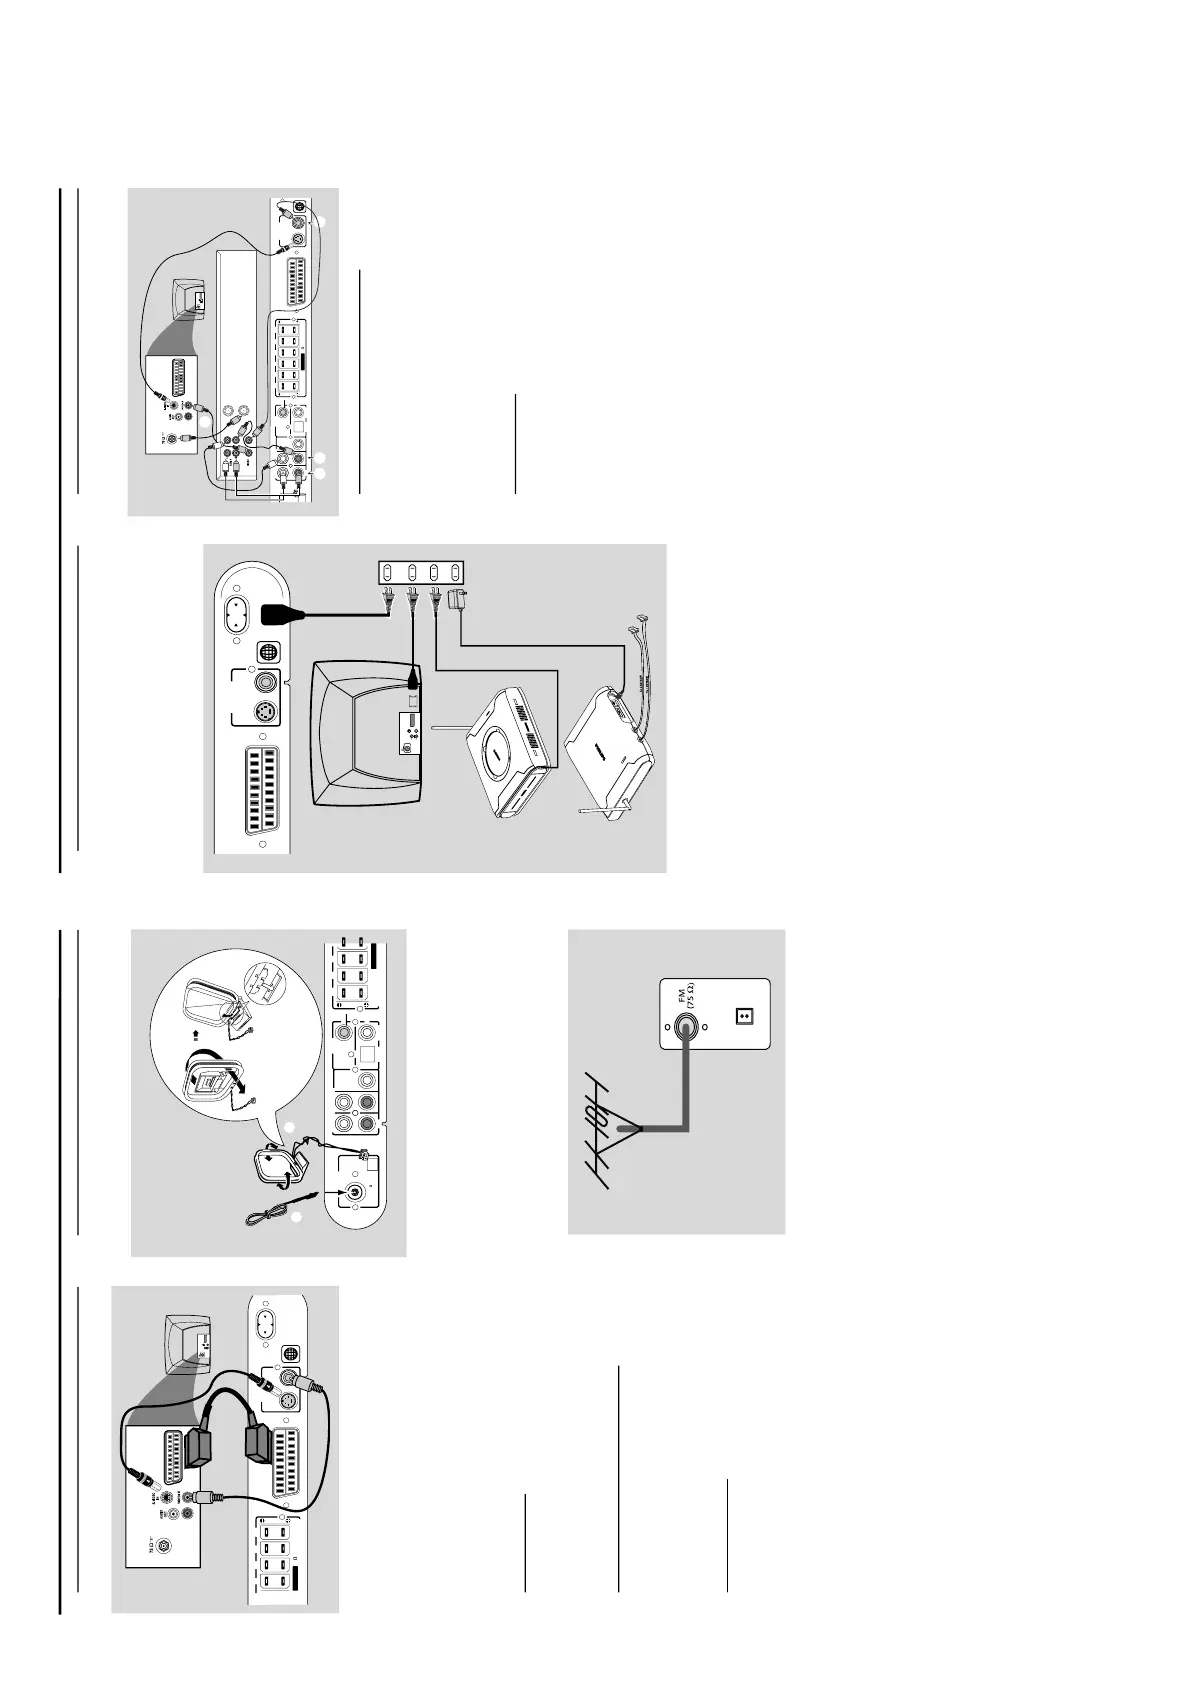
Step 4: Connecting TV
IMPORTANT!
–You only need to make one video connection
from the following options, depending on the
capabilities of your TV system.
– Connect the DVD system directly to the TV.
– Scart Video connection provides higher
picture quality. This option must be available on
your TV.
– S-Video connection provides better picture
quality. This option must be available on your TV.
Using Scart jack
● Use the scart video cable (black) to connect the DVD
system’s A/V SCART OUT jack to the corresponding
Scart input jack on the TV.
OR
Using Composite Video jack (VIDEO)
● Use the composite video cable (yellow) to connect the
DVD system’s VIDEO jack to the video input jack (or
labelled as A/V In, Video In, Composite or Baseband) on
the TV.
OR
Using S-Video jack
● Use the S-video cable (not supplied) to connect the DVD
system’s S-VIDEO jack to the S-Video input jack (or
labelled as Y/C or S-VHS) on the TV.
If your TV is not equipped with a SCAR
T
● To hear the TV channels through this DVD system, use the
audio cables (white/red) to connect AUDIO IN-AUX
jacks to the corresponding AUDIO OUT jacks on the TV.
Before starting operation, press AUX/DI on the remote to
select “AUX-ANA” in order to activate the input source.
Step 5: Connecting FM/MW
antennas
1 Connect the supplied MW loop antenna to the MW jack.
Place the MW loop antenna on a shelf or attach it to a
stand or wall.
2 Connect the supplied FM antenna to the FM jack. Extend
the FM antenna and fix its ends to the wall.
For better FM stereo reception, connect an external FM
antenna (not supplied).
Notes:
– Adjust the position of the antennas for optimal reception.
–Position the antennas as far as possible from your TV, VCR
or other radiation sources to prevent unwanted interference.
AM
(MW)
2
A/V SCART OUT
AC MAINS~
S-VIDEO
VIDEO OUT
VIDEO
(8 )
SPEAKERS
SLSR SWCFL
Rear of TV
(example only)
AUDIO
OUT
S-VIDEO
IN
VIDEO IN
SCAR
T IN
SCART IN
AUDIO IN
AUX
AUDIO OUT
WOOFER
LINE OUT
AM
ANTENNA
SPEAKERS
FR SRCFL
OUT
OPTICAL COAXIAL
DIGIT
AL
IN
FM (75
)
FM Antenna
AM Antenna
Fix the claw to
the slot
1
2
Step 6: Connecting the power
cord
After everything is connected properly, plug in the
AC power cord to the power outlet.
Never make or change any connections with the power
switched on.
Step 7: Connecting a VCR or
Cable /Satellite Box
Viewing and listening to the playback
1 Connect the VCR or Cable/Satellite Box to the TV as
shown.
2 Connect the DVD system’s AUDIO IN-AUX jacks to the
AUDIO OUT jacks on the VCR or cable / satellite box.
Before starting operation, press AUX/DI on the remote to
select “AUX-ANA” in order to activate the input source.
Recording DVDs
Some DVDs are copy-protected. You cannot record or
dub protected discs using a VCR.
3 Connect the DVD system’s VIDEO jack to the VIDEO IN
jack on the VCR.
4 Connect the DVD system’s AUDIO OUT jacks to the
AUDIO IN jacks on the VCR. This will allow you to make
analogue stereo (two channel, right and left) recordings.
To view DVD playback while recording. You must connect
the DVD system to your TV using the SCART or the S-
VIDEO connection.
ANT IN
TO TV
VCR or
Cable/Satellite
Box
OUT IN
Rear of TV
(example only)
AUDIO
OUT
S-VIDEO
IN
VIDEO IN
SCART IN
SCART IN
2
A/V SCART OUT
AUDIO IN
AUX
AUDIO OUT
WOOFER
LINE OUT
S-VIDEO
VI
DEO OUT
VIDEO
AM
(8 )
SSPPEEAAKKEERRSS
FR SLSR SWCFL
OUT
OPTICAL CO AXIAL
DIGITAL
IN
1
24 3
2
A/V SCART OUT
AC MA INS~
S-VIDEO
VI DEO OU T
VIDEO
AUDIO
OUT
S-VIDEO
IN
VIDEO IN
SCART IN
~ AC MAINS
4
1
Connections
IMPORTANT!
The type plate is located at the bottom of the
system.
This product complies with the radio interfer
ence
requirements of the European Community.
The apparatus shall not be expose to dripping or
splashing and that no objects filled with liquid such
as vase shall be placed on the apparatus.
To avoid overheating of the system,
a safety circuit
has been built in. Therefore, your system may
switch to Standby mode automatically under
extreme conditions. If this happens, let the
system cool down before reusing it.
 Loading...