EasyManua.ls Logo

Pioneer CT-WM70R User Manual

Pioneer CT-WM70R
52 pages
To Next Page IconTo Next Page
Page #1 background imageLoading...
Page #1 background image
@
PIONEER’
The
Art
of
Entertainment
Operating
instructions
Mode
d’emploi
CT-VVM7OR
CIT-VVMO6OR
~
MULTI-CASSETTE
CHANGER
CHANGEUR
MULTI-CASSETTES
®
CT-WM70R
®
CT-WM60R
(The
illustration
shows
U.S,
and
Canadian
model.)
(L’illustration
représente
le
modéle
américain
et
canadien.)
WARNING
:710
prevent
FIRE
OR
SHOCK
HAZ-
ARD,
DO
NOT
EXPOSE
THIS
APPLIANCE
TO
RAIN
OR
MOISTURE.
IMPORTANT
NOTICE
[For
U.S.
and
Canadian
models]
The
serial
number
for
this
equipment
is
located
on
the
rear
panel.
Please
write
this
serial
number
on
your
enclosed
war-
ranty
card
and
keep
it
in
a
secure
area.
This
is
for
your
security.
[For
Canadian
model]
CAUTION:
10
prevent
ELECTRIC
SHOCK
DO
NOT
USE
THIS
(POLARIZED)
PLUG
WITH
AN
EXTENSION
CORD,
RECEPTACLE
OR
OTHER
OUTLET
UNLESS
THE
BLADES
CAN
BE
FULLY
INSERTED
TO
PREVENT
BLADE
EXPOSURE.
ATTENTION:pour
prevenin
Les
cHocs
ELECTRIQUES
NE
PAS
UTILISER
CETTE
FICHE
POLARISEE
AVEC
UN
PROLONGATEUR
UNE
PRISE
DE
COURANT
OU
UNE
AUTRE
SORTIE
DE
COURANT,
SAUF
SI
LES
LAMES
PEUVENT
ETRE
INSEREES
A
FOND
SANS
EN
LAISSER
AUCUNE
PARTIE
A
DECOUVERT.
®
This
model
is
equipped
with
a
demonstration
display
mode.
See
the
rear
cover
for
details
®
Ce
modéle
est
équipé
d’un
mode
d’affichage
de
démonstration.
Voir
la
couverture
arriére
pour
les
détails,
2
Medium-size
screwdriver
Only
multi-voltage
models
are
provided
with
this
switch.
U.S.
and
Canadian
models
are
not
provided
with
this
switch,
Main
voltages
in
Saudi
Arabia
are
127V
and
220V
only.
Never
use
this
mode!
with
110V
setting
in
Saudi
Arabia.
The
line
voltage
selector
switch
is
on
the
rear
panel.
Before
your
model
is
shipped
from
the
factory,
this
switch
is
set
to
the
power
requirements
of
the
destination.
Check
that
it
is
set
properly
before
plugging
the
power
cord
into
the
AC
outlet.
If
the
voltage
is
not
properly
set
or
if
you
move
to
an
area
where
the
voltage
requirements
differ,
adjust
the
selector
switch
as
follows.
1.
Disconnect
the
power
cord.
2.
Use
a
medium-size
screwdriver.
3.
Insert
the
screwdriver
into
the
groove
on
the
voltage
selector,
and
adjust
so
that
the
tip
of
the
arrow
points
to
the
voltage
value
of
your
area.
Question and Answer IconNeed help?

Do you have a question about the Pioneer CT-WM70R and is the answer not in the manual?

Pioneer CT-WM70R Specifications

General IconGeneral
Track System4-track, 2-channel stereo
Tape Speed4.8 cm/s
Total Harmonic Distortion1.0%
TypeDouble Cassette Deck
Frequency Response30Hz to 16kHz (Metal Tape)
InputLine In
OutputLine Out

Summary

IMPORTANT NOTICE

For U.S. and Canadian Models

Serial number location and security information for US/Canadian models.

For Canadian Model

Electric shock caution for Canadian models regarding plug usage.

LINE VOLTAGE SELECTOR SWITCH

SAFETY INSTRUCTIONS

General Safety Precautions

Covers reading, retaining instructions, heeding warnings, and following directions.

USER INFORMATION AND WARNINGS

For U.S. Model Users

FCC compliance and interference information for US models.

For Canadian Model Users

Radio interference regulations for Canadian digital apparatus.

POWER CORD SAFETY

Power Cord Handling Precautions

Guidelines for safe handling and care of the power cord.

PACKING LIST

Included Accessories

List of items included in the package with the unit.

INSTALLATION GUIDELINES

Location and Ventilation

Recommendations for placing the unit to ensure proper ventilation and avoid hazards.

Installation Precautions

Advice on placement relative to amplifiers, TVs, and avoiding blocked vents.

Condensation

Handling condensation when moving the unit between temperature zones.

CASSETTE DECK PREPARATION

Cassette Tray Protector

Instructions for removing and storing the cassette tray protector.

CASSETTE TAPE HANDLING

Pre-Use Cassette Checks

Ensuring tape is wound correctly and erasure prevention tabs are intact.

CASSETTE TAPE HANDLING

Automatic Tape Selector Function

How the deck detects and sets bias/equalization for different tape types.

Tips for Cassette Tape Usage

Advice on storing tapes, using leader tape, and avoiding C-120 tapes.

CONNECTIONS

Connecting Audio Input/Output Cords

Properly connecting plugs for left and right audio channels.

Connecting the Power Cord

Instructions for connecting the power cord to US/Canadian outlets.

CONNECTIONS

CD Deck Synchro Connection

Connecting the deck to a Pioneer CD player for synchro recording.

Pioneer System Remote Control

Using a single remote for multiple Pioneer components.

FRONT PANEL FACILITIES (CT-WM70R)

Power, Timer, and Cassette Controls

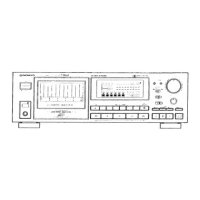
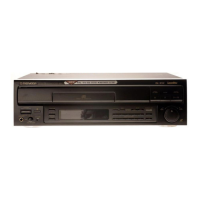
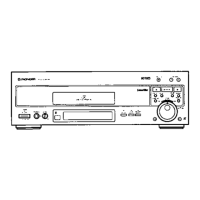
Explanation of POWER, TIMER switches, and CASSETTE RETURN button.

Deck 1 Components and Copy Modes

Overview of Deck 1 door, tray, RELAY button, and COPY MODE buttons.

FRONT PANEL FACILITIES (CT-WM60R)

Deck 1 and Deck 2 Transport Controls

Controls for ALL REWIND, DECK II EJECT, and Deck II transport buttons.

FRONT PANEL FACILITIES

Deck II Recording and Pause Controls

Buttons for Recording, Pause, and Noise Reduction settings.

Copy Mode Buttons (CT-WM60R)

Buttons for NORMAL and HI-SPEED tape copying.

FRONT PANEL FACILITIES

Counter and Other Controls

Controls for counter, Dolby NR selection, and remote control sensor.

FRONT PANEL FACILITIES

Display Window Indicators

Explanation of level meter, cassette number indicators, and reverse mode indicator.

FRONT PANEL FACILITIES

Indicator Functions

Details on RELAY, CD SYNC, DECK II indicators, and COPY indicator.

Dolby HX PRO and Dolby NR Systems

Explanation of Dolby HX PRO headroom extension and Dolby NR noise reduction.

REMOTE CONTROL UNIT (CT-WM70R only)

Remote Control Button Functions

Overview of all buttons on the remote control unit.

REMOTE CONTROL OPERATION

Operating Deck I with Remote Control

How to select and operate Deck I using the system remote control.

Switching Between Decks

Procedure for switching remote control operation between Deck I and Deck II.

INDICATORS

Tape Transport Indicators

Visual indicators for tape movement modes in Deck I and Deck II.

INDICATORS

DECK I Tape Remaining Time Indicators

How the deck indicates approximate remaining tape time.

USING THE COUNTER

Counter Operation Modes

Switching between tape counter and time counter display modes.

INDICATORS

Counter Reset and Time Counter

Resetting the counter and how the time counter functions.

TAPE COUNTER INFORMATION (DECK I/II)

Factors Determining Displayed Deck

How the deck determines which deck's tape counter info is shown.

RECORDING (DECK I)

Recording Procedure Steps

Step-by-step guide for recording on Deck I, including mode and level settings.

RECORDING (DECK I)

One Way and Reverse Mode Recording

How to record on one or both sides of the tape.

RECORDING (DECK II) (CT-WM70R only)

Recording Procedure Steps

Step-by-step guide for recording on Deck II, including modes and levels.

RECORDING (DECK II) (CT-WM70R only)

One Way and Reverse Mode Recording

How to record on one or both sides of the tape on Deck II.

ADDITIONAL RECORDING OPERATIONS

Setting the Dolby NR System

Programming different Dolby NR settings for each tape in Deck I.

Programming Dolby NR Settings per Tape

Steps to set Dolby NR for each tape and Deck II.

ADDITIONAL RECORDING OPERATIONS

Relay Recording (Deck I only)

How to select and perform relay recording on Deck I.

Creating Blank Sections Between Tracks

Using the recording mute button to insert blank spaces.

Erasing the Tape

Procedure for erasing tape content by setting REC LEVEL to MIN.

ADDITIONAL RECORDING OPERATIONS

Adjusting the Recording Level

Factors affecting recording level and how to set it for optimal results.

PLAYBACK (DECK II)

Playback Procedure Steps

Step-by-step guide for playback on Deck II, including mode and Dolby NR selection.

PLAYBACK (DECK II)

Playback Modes and Controls

Details on one-way, reverse playback, stopping, pausing, and fast forward/reverse.

Blank Skip Function (Relay Mode Only)

How the deck skips blank tape sections during relay playback.

RELAY PLAYBACK (DECK I only)

Playback Modes and Tape Loading

How tapes are played back sequentially in relay mode.

PLAYBACK (DECK I)

Playback Procedure Steps

Step-by-step guide for playback on Deck I, including mode and Dolby NR selection.

One Way and Reverse Mode Playback

How to play one or both sides of the tape.

RELAY PLAYBACK (DECK I only)

Playback Modes and Tape Loading

How tapes are played back sequentially in relay mode.

PLAYBACK (DECK I)

Fast Forward/Reverse and Blank Skip

Using fast forward/reverse and the blank skip function.

RELAY PLAYBACK (DECK I only)

Playback Modes and Tape Loading

How tapes are played back sequentially in relay mode.

PLAYBACK (DECK I)

Random Playback (Deck I only)

Playing cassette tapes in a random order.

Scan Playback (Deck I only)

Playing the first 10 seconds of all cassettes on the tray.

MUSIC SEARCH

Returning to the Beginning of the Current Track

How to return to the start of the currently playing track.

Moving to Prior Tracks

Skipping backward to previous tracks on the tape.

Moving to Subsequent Tracks

Skipping forward to later tracks on the tape.

MUSIC SEARCH

Music Search Notes and Examples

Conditions affecting music search and examples of its use.

TAPE COPYING

Copying a Tape (Deck II to Deck I)

Steps for copying a tape from Deck II to Deck I, including modes and notes.

Stopping Tape Copying

How to stop tape copying mid-process.

TAPE COPYING

Note on HI-SPEED Copying

Precautions regarding high-speed tape copying and potential interference.

EDITING A TAPE (DECK I TO DECK II) (CT-WM70R only)

Relay Edit Copying

Copying up to 6 cassette tapes onto a single cassette tape.

TAPE COPYING

Tape Copying Operations and Modes

Details on different tape copying operations, modes, and stopping.

TAPE COPYING

Edit Copying

Steps for copying selected tracks from one or more tapes.

TAPE COPYING

After Tape Copying

Procedures after tape copying is completed, including mode transitions.

Tape Copying Modes and Stopping

Details on one-way, reverse modes, and stopping mid-copy.

CD DECK SYNCHRO RECORDING (DECK I only)

NORMAL SYNCHRO RECORDING

Recording one or more CDs onto a single cassette tape.

Program recording

Setting up synchro recording based on CD player program.

CD DECK SYNCHRO RECORDING (DECK I only)

Recording Process Steps

Step-by-step guide for synchro recording from CD player.

CD Playback Completion Scenarios

Handling scenarios when CD playback finishes or changes discs.

CD DECK SYNCHRO RECORDING (DECK I only)

RELAY SYNCHRO RECORDING

Recording a single CD onto each tape sequentially.

CD Playback Completion Scenarios

Handling scenarios when CD playback finishes or changes discs.

RECORDING USING AN AUDIO TIMER (DECK I only)

TIMER RELAY RECORDING

Setting up unattended relay recording using an audio timer.

Recording Process Steps

Step-by-step guide for timer relay recording, including mode and Dolby NR.

RECORDING USING AN AUDIO TIMER (DECK I only)

Timer Function Usage

Using or not using the timer function and audio timer connections.

PLAYBACK USING AN AUDIO TIMER (DECK I only)

TIMER PLAYBACK

Setting up automatic playback using an audio timer.

Playback Process Steps

Step-by-step guide for timer playback, including mode and Dolby NR.

PLAYBACK USING AN AUDIO TIMER (DECK I only)

Timer Function Usage

Using or not using the timer function and audio timer connections.

MAINTENANCE

Cleaning Heads, Pinch Rollers, and Capstans

How to clean critical tape path components for optimal performance.

MAINTENANCE

Head Cleaning for Deck II

Specific instructions for cleaning Deck II heads, capstans, and pinch rollers.

Cleaning the Front Panel Section

How to clean the exterior panel of the cassette deck.

TROUBLESHOOTING

Power and Remote Control Issues

Troubleshooting guide for power not turning on and remote control not operating.

Playback and Recording Issues

Troubleshooting common problems during playback and recording.

TROUBLESHOOTING

Sound Quality and Noise Issues

Resolving problems related to poor sound quality, distortion, and noise.

Other Operational Issues

Troubleshooting music search, auto-start, remote system, and CD sync errors.

SPECIFICATIONS (CT-WM70R)

System and Component Specifications

Detailed technical specifications for the CT-WM70R unit.

Miscellaneous and Accessories

Power requirements, dimensions, weight, and included accessories.

SPECIFICATIONS (CT-WM60R)

System and Component Specifications

Detailed technical specifications for the CT-WM60R unit.

Miscellaneous and Accessories

Power requirements, dimensions, weight, and included accessories.

DEMONSTRATION MODE

CT-WM70R Demonstration Mode

How to activate and stop the demonstration mode on CT-WM70R.

CT-WM60R Demonstration Mode

How to activate and stop the demonstration mode on CT-WM60R.

Related product manuals