EasyManua.ls Logo

Pioneer SA-1060 User Manual

Pioneer SA-1060
10 pages
To Next Page IconTo Next Page
Page #1 background imageLoading...
Page #1 background image
Operating
Instructions
STEREO
AMPLIFIER
A-1060
Photograph
shows
BLACK
finished
model.
Thank
you
for
buying
this
Pioneer
product.
Please
read
through
these
operating
instructions
and
then
you
will
know
how
to
operate
your
model
properly.
After
you
have
finished
reading
the
instructions,
put
them
away
in
a
safe
place
for
future
reference.
In
accordance
with
the
power
and
voltage
requirements
of
dif-
fering
areas,
the
following
model
names
are
used
to
designate
models
with
differing
electrical
specifications.
Models
I
HE,
HEZ,
NE,
NEZ
WE,
WB,
WP
|
a.c.
220—240
volts
~
S,
S/G,
SS
AC
110,
120,
220,
240
volts
(Switchable
voltage)
Line
voltage
a.c.
220
volts
~
D,
D/G
AC
120,
220,
240
volts
(Switchable
voltage)
R,
R/G
|
AC
110—120,
220—240
volts
(Switchable
voltage)
KU,
KC
AC
120
volts
YP,
YB
HB,
HP
a.c.
240
volts
~
NOTES:
e
The
model
names
are
stamped
on
the
packing
case.
e
These
operating
instructions
are
prepared
on
the
basis
of
the
KU
model,
and
they
can
be
used
for
other
models.
Although
the
design
of
the
power
plug
and
the
power
outlet
shown
may
differ
from
the
actual
one,
the
operating
procedures
are
the
same.
WARNING:
To
preveENT
FIRE
OR
SHOCK
HAZARD,
DO
NOT
EXPOSE
THIS
APPLIANCE
TO
RAIN
OR
MOISTURE.
CONNECTIONS.
20...
.ccceseeceeeeentereresseenreraeteeees
PANEL
FACILITIES
OPERATIONS
-
CONTENTS
LINE
VOLTAGE
SELECTOR
SWITCH
Only
multi-voltage
models
are
provided
with
this
switch.
U.S.A.,
Canadian,
European,
U.K.,
and
Australian
models
are
not
provided
with
this
switch.
You
will
find
the
line
voltage
selector
switch
on
the
rear
panel.
This
switch
has
positions
for
110
V,
120
V,
220
V
and
240
V
power
sources.
Before
your
model
is
shipped
from
the
factory,
the
switch
is
set
to
the
power
requirements
of
the
destination;
nevertheless,
you
should
check
that
it
is
set
properly
before
plugging
the
power
cord
into
the
AC
outlet.
If
the
voltage
is
not
properly
set
or
if
you
move
to
an
area
where
the
voltage
requirements
differ,
adjust
the
selector
switch
as
follows.
Before
adjusting
disconnect
the
power
cord.
1.
Provide
yourself
with
a
medium
size
flat
tip
screwdriver.
2.
Insert
the
screwdriver
into
the
arrow
on
the
voltage
selector
and
adjust
so
that
the
tip
of
the
arrow
points
to
the
voltage
value
of
your
area.
VOLTAGE
SELECTOR
120V
240V
Medium
size
screw
driver
IMPORTANT
NOTICE
[For
U.S.A.
and
Canadian
models]
The
serial
number
for
this
unit
is
Jocated
on
the
rear
panel.
Please
write
this
serial
number
on
your
enclosed
warranty
card
and
keep
in
a
secure
area.
This
is
for
your
security.
SPEGIFICATIONS.
ii
dec
cvs
woe
ces
ae
ata
ais tee
ven
sais
sas
ones
9
TROUBLESHOOTING
...........cceececeer
eens
ee
eee
eee
10
QMPIONEER’
Question and Answer IconNeed help?

Do you have a question about the Pioneer SA-1060 and is the answer not in the manual?

Pioneer SA-1060 Specifications

General IconGeneral
BrandPioneer
ModelSA-1060
CategoryAmplifier
LanguageEnglish

Summary

Line Voltage Selector Switch

Important Notice for USA and Canadian Models

Safety Instructions

General Usage and Environmental Safety

Essential guidelines for operating the appliance safely, including placement, ventilation, and power handling.

Outdoor Antenna Grounding

Instructions for grounding outdoor antennas to prevent electrical hazards from surges and static.

Important Safety Alerts and Notices

Key warnings about electric shock risks and specific advice for UK users regarding plugs.

Connections

Connecting Speaker Wires

Step-by-step guide on how to strip and connect speaker wires to the unit's terminals.

Connecting Input/Output Cords

Instructions for connecting audio source cables, emphasizing correct plug insertion for L/R channels.

Panel Facilities

Rear Panel Overview

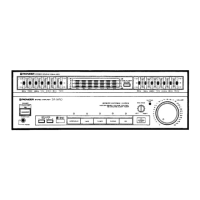
Details on rear panel terminals, AC outlets (switched/unswitched), power cord, and speaker impedance requirements.

Front Panel Controls

Power and Tone Controls

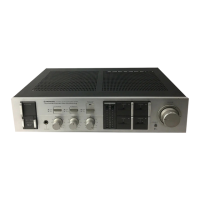
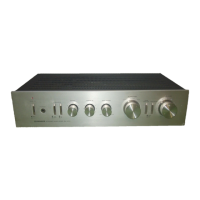
Explanation of the POWER switch, TREBLE and BASS tone controls for adjusting audio frequencies.

Function Selection and Volume

Details on selecting playback sources via FUNCTION switches and adjusting overall volume.

Speaker and Headphone Connections

Guide to using the PHONES jack and the SPEAKERS A selector switch for audio output management.

Additional Front Panel Functions

Speaker B and Balance Controls

Instructions for the SPEAKERS B selector switch and the BALANCE control for sound distribution.

Filter, Loudness, and Adaptor Switches

Guide to SUBSONIC filter, LOUDNESS, and ADAPTOR/TAPE 2 switches for enhanced playback.

Operations

Before Beginning Operations

Initial setup steps and control adjustments before operating the amplifier.

Operation Procedures

Step-by-step guide for turning on the unit, selecting sources, and adjusting volume.

Using Adaptor/Tape 2 Terminals

How to connect and use external components like adaptors or tape decks with the ADAPTOR/TAPE 2 inputs.

Recording Tapes

Guidance on recording audio from connected equipment onto tape, including using adaptor components.

Copying Tapes

Copying with Two Tape Decks

Procedure for copying audio from one tape deck to another using TAPE 1 and ADAPTOR/TAPE 2 terminals.

Copying with a Double Cassette Deck

Steps for copying tapes using a double cassette deck, including switch settings.

Specifications

Amplifier Section Specifications

Technical details of the amplifier's power output, distortion, and frequency response.

Input/Output and Tone Control Specifications

Specifications for input sensitivity, output levels, tone controls, and subsonic filter.

Miscellaneous and Furnished Parts

Details on power requirements, dimensions, weight, and included operating instructions.

Canadian Model Plug Warning

Important safety warning for Canadian models regarding polarized plugs and outlets.

Troubleshooting

No Power or No Sound Issues

Common causes and remedies for the unit not powering on or producing sound.

Speaker and Recording Problems

Solutions for issues related to sound from a single speaker, tape recording, and tape copying.

Related product manuals