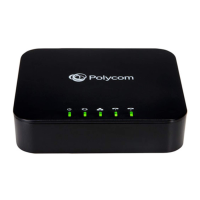
Quick Tips for Poly ATA 400 Series
3725-
49180-001A | PVOS-L ATA | September 2023
Interactive Voice Response
Use the Interactive Voice Response (IVR) system
from a phone connected to the PHONE port of
the Analog Telephone Adapter to access the
automated attendant.
Find the System IP Address
1. From a phone attached to the ATA device,
dial *** to access the IVR system.
2. Select 1 to hear the IP address. Make a note
of the IP address.
3. Optional: Press 0 to repeat the information.
4. Press ## or hang up to exit IVR.
Configure a SIP Line
Log In to the System Web Interface
1. Enter the IP address into your web browser
using the format http://000.000.0.0.
2. Enter the login credentials. The default
username and password are both admin.
Note: When you log in for the first time, you
must change the password from the default.
Configure a Service Provider
1. In the system web interface, go to Service
Providers > ITSP ProfileN > SIP.
2. In the Default column, clear the check box
for the ProxyServer parameter.
3. In the Value column, for ProxyServer, enter
the value from your service provider for the
host name or IP address for the SIP server.
4. Select Submit.
Configure a Voice Service
1. In the system web interface, go to Voice
Services > SPN Service.
2. Under SIP Credentials, clear the check
boxes in the Default column for
AuthUserName and AuthPassword.
3. In the Value column, enter the service
provider credentials for AuthUserName and
AuthPassword.
4. Select Submit.
5. Reboot your system when you complete your
changes.
The phone connected to the ATA device now
has a dial tone, and the LEDs are showing as
expected.
Update the Firmware
You can upgrade the firmware for your device
from the system web interface.
1. Download the firmware file and store it on a
computer that you can access with a web
browser.
2. In the system web interface, go to System
Management > Device Update.
3. In the Firmware Update section, select
Browse to search for and specify the path of
the firmware file.
4. Press the Update button to start the upgrade
process.
The process takes about 30 seconds to
complete. You MUST NOT disconnect the power
from the device during this procedure. If the new
firmware upgrade is successful, the device
reboots automatically and runs the new firmware.
Otherwise, the web page shows an error message
explaining why the upgrade failed.
Restore Factory Default
1. From a phone attached to the ATA device, dial
*** to access the IVR system.
2. Select 8 to restore the device to factory default
settings.
3. Press 1 to confirm the selection.
4. Optional: Press # to return to the device
configuration menu options.
5. Press ## or hang up to exit IVR.
Star Code Features
Use the star code features via the handset
connected to the PHONE port of the ATA. Star
codes are short sequences of digits where each
sequence serves as a command to the device to
perform a certain operation. A typical operation is to
set the value of one or more configuration
parameters.
Set Call Forward All
When you use Call Forward All, all calls are
immediately forwarded to the number you indicate
when you turn on the feature.
1. To enable Call Forward All, from a phone
attached to your Poly ATA device, dial *72.
You hear a prompt to enter the destination
number.
2. Enter the number followed by the # key.
You hear a confirmation tone.