2
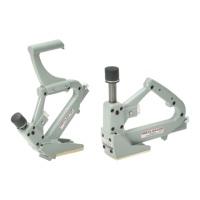
PORTAMATIC EVOLUTION 418A PNEUMATIC NAILER
The pneumatic nailer 418A is a professional precision tool specially
developed for the installation of 3/8" to 3/4" solid and engineered
hardwood flooring. It has been designed for easy maintenance where
major components can be accessed within seconds without the need of
any tool. Weighting only 8.7 pounds (4 kg), this ergonomically designed
tool makes the installation of hardwood floor very easy, allowing the
operator to set and nail the boards in the standing position. It uses
standard L type 18Ga Cleats in lengths of 1¾" (44 mm), 1½" (38 mm)
and 1¼" (32 mm). Read carefully these instructions before operating
this tool. It is important to understand warnings/cautions and the safety
measures to ensure safe use of this tool.
The 418A is built around the Primpact valve
engine, a breakthrough technology for
pneumatic tools.
Primpact main features are:
•Shortnoseandcompactvalvedesignwithanallaroundstrikingsurface
•High-speedactionandfewmovingparts,forapowerfulyetsoftstroke
and increased precision.
•Reciprocal striking system that regulates the depth of penetration
independently from the mallet impact
•Finelythreadedscrew-incartridgeassembly
SAFETY MEASURES
These important guidelines should always be followed to work safely
with the pneumatic nailer model 418A:
1. Read these instructions thoroughly before using this tool and keep it
handy for reference if necessary.
2. Always keep hands, feet or other body parts away from the nail
ejection area.
3. Never aim the tool in any direction other than the working area.
4. Always carry or manipulate the tool by its handle while the air supply
hose is connected.
5. Never hit the head cap of the actuator if the plastic base is not
sitting perfectly on the working surface.
6. Never leave the tool laying down on its side while the air supply hose
is connected; the tool should always be left on the floor, standing on
its plastic base.
7. Do not alter or remove safety.
8. Always disconnect the air supply hose when the tool is not in use or
when move to another work area.
9. Never service or repair the tool, clear obstructions or make
adjustments while the air supply hose is connected.
10. Only compressed air should be used to power this tool; do not
exceed 110 psi (7.6 bar).
11. Never use oxygen or any other compressed gas as a power source
for this tool.
12.AlwayswearOSHA-requiredZ-87safetyglasseswithsideshields.
13. Always wear proper ear and feet protection while the air supply
hose is connected.
14. Always remove cleats from the feeder channel before servicing tool.
DO NOT REMOVE OR ALTER SAFETY. NEVER DEPRESS
THE SAFETY CONTACT WITH YOUR HANDS WHEN TOOL IS
CONNECTEDTOAIR SUPPLY. EXTREME CAUTION IS ADVISED
WHENUSINGTHISTOOL.
CONNECTION & AIR SUPPLY SYSTEM
To ensure maximum performance and efficiency, and also a minimum of
care,the418Apneumaticnailerrequiresclean,dryair.Itisnecessaryto
use a filter and a pressure regulator.
This tool needs a detachable male coupler with 3/8" NPT male treads.
The use of a 3/8” (1 cm) diameter air supply hose is recommended. A
smaller hose or a hose longer than 50’ (15 m) could cause a pressure
drop when the tool is activated repeatedly.
ALWAYS USE A FREE-FLOW CONNECTION FOR THE
COMPRESSEDAIRSUPPLYTOPREVENTTHATTHETOOLSTAYS
CHARGEDAFTERDISCONNECTINGTHEAIRSUPPLYHOSE.
UNLOAD TOOL BEFORE CONNECTING AIR TO PREVENT
ACCIDENTALDISCHARGE.
AFTERMOVINGTOOLTOADIFFERENTWORKAREA,ORAFTER
ANY MAINTENANCETOTHETOOL,ALWAYS ENSURE PROPER
OPERATION BY ACTUATING TOOL SEVERAL TIMES WITHOUT
CLEATSOVERTHESUBFLOORING.
Dirt, dust, and other particles in the air supply can cause sluggish
operation or premature wear of many components of the tool. Drain
waterfromthe compressortankregularly.The compressorstart-stop
limits should be set to deliver an air pressure of at least 100 psi (7 bar)
at all time. Consult the compressor manual or dealer for instructions on
how to make this adjustment.
At 80 psi (5.5 bar) and 100 hits per minute, the tool consumes
approximately 3.8 cu.ft (110 ℓ) of air per minute at 70°F (21°C).
Higherairpressurewillincreasetheconsumptionofcompressedair.
The tool is designed to be operated with a compressed air pressure of
80 psi (5.5 bar). Occasionally, a higher pressure could be necessary, for
example to use the tool with different species of harder wood. In these
more difficult cases, the compressed air pressure can be increased up
to 100 psi (7.0 bar). It is very important not to exceed this maximum
pressure to prevent leaks, premature wear or damages to the tool.
Check the compressed air supply hose before connecting to ensure that
they are free from dirt or particles that can alter the performance of the
tool. Pay special attention to any air leaks. Do not use a compressed
airpressurehigherthan110psi(7.6bar).Higherpressurecancause
premature wear or damage to certain components. After assembly,
check all the connections to prevent the leaks and to have maximum
efficiency.
TOPREVENTACCIDENTALDAMAGETOTHEFINISHEDSURFACE
OF THE INSTALLED FLOOR, REST THE TOOL ONTO THE
SUBFLOORINGWHENCONNECTINGAIR,LOADINGTOOLWITH
NAILSORPERFORMINGANYMAINTENANCETOTHETOOL.
LOADING THE TOOL
Insert a row of 18Ga cleats inside the feeder channel and pull back
on the plastic tab gently until it engages behind the cleats. To release,
simplysqueezethetabwithyourthumbandindexandallowthespring
to recoil slowly. The clip must be released slowly to prevent damage.
The 418A uses standard L Type 18Ga Cleats in lengths of 1¾" (44 mm)
1½" (38 mm) and 1¼" (32 mm). Make sure that the proper type of
cleats is used.
USE ONLYTHE TYPE OF CLEATS IDENTIFIED ON THE FEEDER
CHANNEL. THE USE OF ANY OTHER TYPE OF CLEATS WILL
DAMAGETHETOOL. DO NOTATTEMPTTO USE 16GA LTYPE
CLEATSASJAMMINGANDDAMAGETOTHETOOLWILLOCCUR.
 Loading...