3
OPERATION
Unloadtoolandrestitontothesubooring,Connectthehoseandcycle
toolonceortwicewithoutnails.AfterloadingthetoolwithAROWOF
cleats,thePNEUMATICNAILERmodel418Aisreadyforuse.
Only use the 2.5 lbs (1.1 kg) hammer supplied with the tool. The use of
other type of hammers may affect performance. The rubber face of the
hammer can be used with care to help position the boards.
With the flooring firmly in place, position the tool onto the flooring,
with the resting block against the tongue. Apply downward pressure
to ensure proper seating of the cleat. Strike
the head cap with the hammer to activate the
tool,UseonlytheRUBBERFACEofthehammer
to activate the tool. Using the steel end will
damage the tool and void the warranty. If wood is
slightly twisted, hitting the tool with more force
will assist in pulling the board up snugly. NEVER
strike the head cap when the tool is not sitting on
the working surface.
OPERATING THE TOOL WHEN THE SAFETY CONTACT IS NOT
FULLY DEPRESSED WILL CAUSE PREMATURE WEAR OR
DAMAGETOTHEDRIVINGBLADE,PISTONANDCYLINDER.
Beitraw,factorynishedorengineered,hardwoodisanaturalmaterial
subject to various factors, such as humidity, subflooring, installation
procedure, type of tools, fasteners, etc. Installer should always
ensure optimal surface preparation, comply with all manufacturer’s
recommendations and conduct a pre-installation test prior beginning
any installation.
BEFORE STARTING AN INSTALLATION, FASTEN DOWN FEW
BOARDSTOASCERTAINTHATYOUAREUSINGTHERIGHTTOOL
ANDFASTENER.
Eye protection is recommended and should be worn by the
operator and other in working area. Accidental ejection of nails
or wood debris could cause severe eye injury.
In some environments, ear protection might be required, as
working condition may include exposure to high noise levels
which lead to hearing damage.
Wearing safety boots and safety hat is also highly recommended.
NOTE: All the personal protection equipments must meet
national standards.
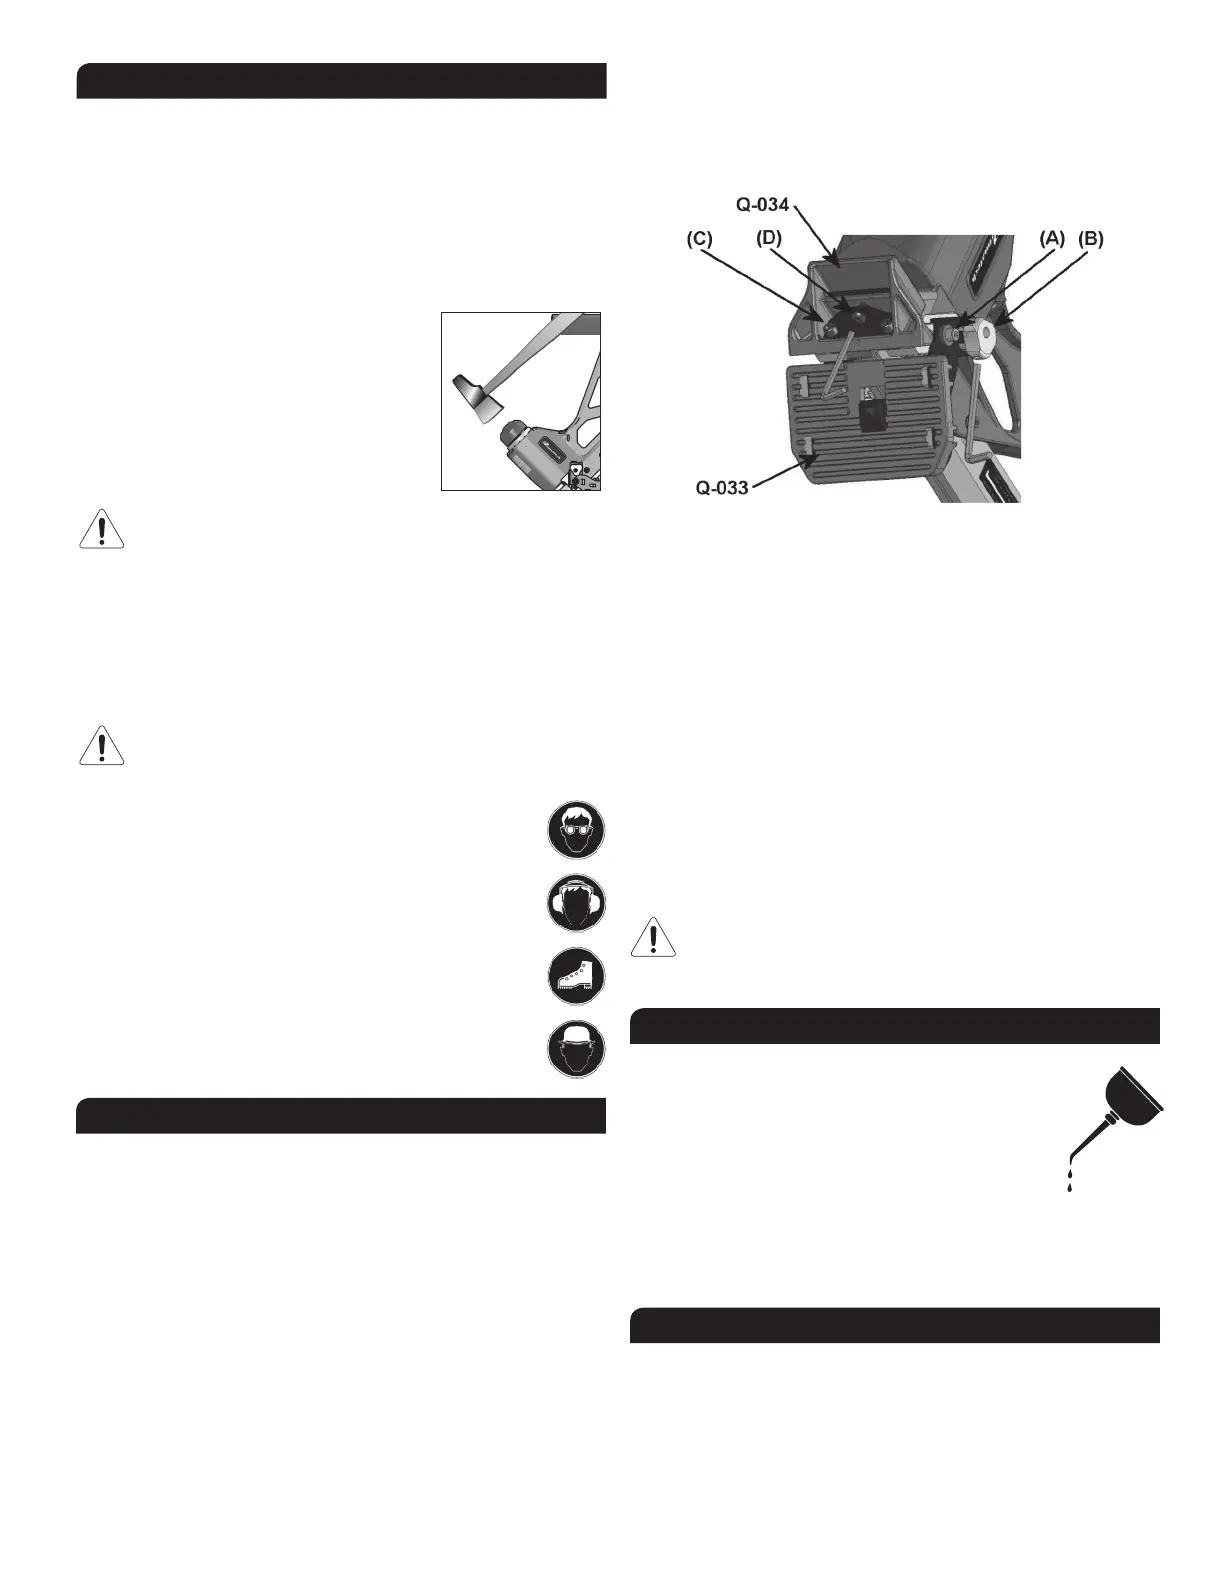
ADJUSTING FOR HARDWOOD THICKNESS
The 418A pneumatic nailer is fitted with a fully adjustable base, designed
to prevent contact with the top edge of the ooring.Since there is no
standard among manufacturers about the dimensions of the tongue, it is
important to adjust the nailer to fit the flooring prior any installation. The
418A also features a resting block which prevent damage to the top edge
of the flooring by positioning the tool against the tongue, preventing the
gate/foot assembly from contacting the board.
Step1:adjustingthebaseforooringthickness:
• UsingthesuppliedAllenwrench,loosenbutdonotremovescrews
(A); one on each side of the tool.
• With the tool in an upside down position, place a short piece of
flooring against the gate/foot assembly.
• EngagetheAllenwrenchinknob(B)asshown;rotatetomovethe
base up or down. Note that knob (B) has a rotation range of only
about 1/2 turn. Do not apply force when a limit is reached.
• Adjusttheheightoftheplasticbasetoobtainasmallgapbetween
the gate/foot assembly and the top side of the tongue of the sample
board. A gap of 1/32”, about half the thickness of the nail, should be
adequateformostsituations.
• Tightenbothscrews(A).
Step2:adjustingtherestingblockforthewidthofthetongue:
• UsingtheAllenwrench,loosenbyabout1/2turn―donotremovethe
two screws (C).
• Withtheshortpieceofooringstillagainstthegate/footassembly,
adjust the gap between the resting block and the tongue with screw
(D). A small gap of 1/32”, about half the thickness of the nail, should
beadequateformostsituations.
• Tightenbothscrews(C).
• Ensurethatscrew(D)isslightlytighten.Donotapplyforceonscrew
(D) once screws (C) are tighten.
After completing the adjustment procedure, proceed with the installation
of few boards. Carefully check for the proper positioning of the nail onto
the board. Check again after few more rows to insure that all parts are
secured in place. Tool may lose adjustment over time if this procedure
is not strictly followed.
BEFORE STARTING AN INSTALLATION, FASTEN DOWN FEW
BOARDS TO ASCERTAIN THAT YOU ARE USING THE RIGHT
FASTENERANDTHATTHETOOLISPROPERLYADJUSTED.
PREVENTIVE MAINTENANCE
Thistoolrequiresminimallubrication.Useonlydetergent-
freeoil.Fewdropsofoilweeklyintheairinletissufcient.
Other types of lubricant may degrade the seals.
Check periodically to make sure that all screws are tight.
Pay particular attention to the two screws holding the
feeder channel as well as the screws and nuts on the
feeder channel assembly who might loosen up over time.
Becarefulnottostripthethreadswhentightening.Theuseofanmedium
strength adhesive sealant such as the Loctite 242 is recommended for
those screws and nuts.
MAINTENANCE & REPAIR
Most adjustments to the tool can be made with the 3/16" Allen wrench
supplied with the tool. These can be conveniently stored above the
feeder channel.
Disassemblyofthetoolmustbedoneinacleanenvironment.Some
parts can be easily damaged if disassembled with improper tools or
by inadequate methods.Maintenance should only be performed by
trained personnel.
 Loading...