5
ASSEMBLY
• Many cover plate screws, water pipes and outlet boxes are not
properly grounded. To ensure proper grounding means that it
must be tested by a qualified electrician.
EXTENSION CORDS
Use proper extension cords. Make sure the extension cord is
in good condition. Use only 3‑wire extension cords that have
3‑prong grounding type plugs and 3‑pole receptacles which
accept the tool plug. When using an extension cord, make sure
to use one heavy enough to carry the current of the machine.
An undersized cord will cause a drop in the voltage, resulting in
loss of power and overheating. Use the table to determine the
minimum wire size (A.W.G.) Extension cord.
Extension Cord Length
Wire Size…………….. A.W.G.
Up to 25 ft…………… 18 gauge
NOTE: Using extension cords over 25 ft. long is
not recommended.
The following section is designed to give instructions on the
basic operations of this buffer.
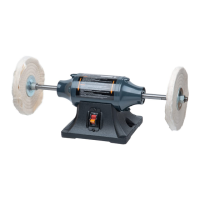
ON/OFF SWITCH
Refer to Figure 6
The buffer is equipped with a keyed switch to prevent
unauthorized use.
CAUTION
Remove the safety key whenever the buffer is not in use. Place
the safety key in a safe place and out of the reach of children.
1. To turn buffer ON, insert the safety key into the key slot in
the center of the switch.
2. Push safety key firmly into the slot and then place the ON/
OFF switch in the ON position to start the buffer.
3. To turn the buffer OFF, place the ON/OFF switch in the
OFF position.
4. When the buffer comes to a complete stop gently pull the
safety key forward and out. Place the key in a safe place out
of the reach of children.
Safety Key
Key Slot
Figure 6
BASIC OPERATION
Refer to Figure 7‑8
WARNING
To avoid kickback and other hazards, never buff on the sides,
top or rear of the cotton buffing wheels.
WARNING
To prevent serious injury from tool failure, do not use damaged
equipment. If abnormal noise or vibration occurs, have the
problem corrected before further use.
OPERATION
5
5. Stand to the side of the buffer, make sure the ON/OFF
switch is in the OFF position and plug in the tool.
6. Remain standing to the side of the buffer and place the ON/
OFF switch in the ON position to turn on the unit.
Figure 7
On/Off
Switch
7. Allow the buffing wheels to come up to a steady speed and
run for at least one minute before any buffing. NOTE: If
needed, apply buffing compound to the rim of the rotating
buffer wheel. DO NOT jam or force the compound bar into
the buffer wheel, cover the buffer wheel rim completely with
the compound material. Buffing compound is not needed for
the final polishing, use an clean cotton buffing wheel for the
final polishing.
8. Using two hands, firmly hold the workpiece and gently move
it into contact with the buffing wheel. Move the workpiece
back and forth across the lower front surface of the wheel to
buff the workpiece to the desired finish.
NOTE: The correct pressure must be applied to the workpiece
to provide the best finish. Too little pressure will result in no
significant change in the workpiece. Too much pressure may
slow down the action of the buffing wheel and cause uneven
marks on the workpiece and overheat the motor.
Figure 8
Wheel
Rotation
WORK
AREA ON
WHEEL
View is from the Right Side
OPERATION
5