EasyManua.ls Logo

Prepac EHW-0800-1 - User Manual

Prepac EHW-0800-1
20 pages
Print Icon
To Next Page IconTo Next Page
Loading...
Caution
Do not over
tighten any screw.
The last few turns
of each screw
should be done
very slowly or by
hand.
Required Tools
stud
finder
3/16th inch drill bit
CONTACT US FIRST
parts@prepacmfg.com
1-877-PREPAC1
1-877-773-7221
Mon - Fri 7am - 4pm PST
10am - 7pm EST
For help with assembly
If you have received a damaged or defective
part or are missing hardware.
We will process replacement parts in 2 business
days or less. Parts are shipped via UPS Ground or
mail.
Before you call please:
1) Record the following information from the
shipping label on the outside of the box.
You will need it for warranty purposes:
Ship To Name
Sales Order Number
2) Note the product model number.
3) Review the contents of your shipment to
determine what you are missing.
Traditional
Floating Desk
Model # EHW-0800-1
Online Option
Fill out the Replacement Parts Order form in the Product
Support section of our website: www.prepacmfg.com
Assembly Instructions
Prepac Manufacturing Ltd.
6705 Dennett Place
Delta, BC V4G 1N4
2 Person Installation Required
DATE STAMP
Total Maximum
Weight
100 lbs
LB-0745
2014-06-09
Scan the
QR code
to view an
installation
video for
this product
Question and Answer IconNeed help?

Do you have a question about the Prepac EHW-0800-1 and is the answer not in the manual?

Summary

Desk Parts Identification

Desk Hardware Identification

Upper Section Assembly

Step 1: Prepare Top Shelf with Cams and Dowels

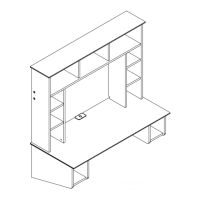
Inserts cams and green twister dowels into the Top Shelf (D3).

Step 2: Attach Upper Gables to Top Shelf

Connects Upper Gables (D2) to the Top Shelf (D3) using Confirmat Screws.

Step 3: Prepare Side Panels and Attach Rail Hooks

Inserts cams/dowels into side panels (D6, D11) and attaches rail hooks.

Step 4: Connect Side Panels and Prepare Small Shelves

Attaches side panels to the top shelf and prepares small upper shelves (D7).

Step 5: Attach Small Upper Shelves and Inner Side Panels

Connects small upper shelves (D7) and prepares inner side panels (D9, D10).

Step 6: Connect Inner Sides and Top Panel

Connects inner side panels (D9, D10) and inserts dowels into the top panel (D1).

Step 7: Attach Top Panel and Prepare Desktop

Attaches the top panel (D1) and prepares the desktop (D13) with dowels.

Step 8: Secure Desktop to Upper Structure

Attaches the desktop (D13) to the upper assembly using screws and bolts.

Lower Section Assembly

Step 9: Prepare Lower Sides and Bottom Stabilizer

Inserts cams into lower side panels (D12, D14) and bottom stabilizer (D16).

Step 10: Assemble Bottom Shelf and Stabilizer

Connects lower side panels (D12, D14) to bottom shelf (D15) and stabilizer (D16).

Step 11: Attach Small Bottom Shelves to Gables and Sides

Attaches small bottom shelves (D19) to bottom gables (D17, D18) and sides (D12, D14).

Final Assembly and Mounting

Step 12: Connect Upper and Lower Sections

Joins the assembled upper and lower desk sections together.

Step 13: Hanging the Desk on the Wall

Details the process for determining location and mounting the desk to the wall.

Finishing Touches

Step 14: Install Final Components

Installs final components like dowels, stabilizers, and cover caps.

Prepac EHW-0800-1 Specifications

General IconGeneral
Product NamePrepac EHW-0800-1
CategoryIndoor Furnishing
ColorWhite
Assembly RequiredYes
Number of Shelves2
MaterialComposite Wood

Related product manuals