Operation
Manual
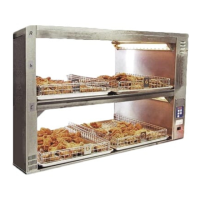
Dual Continuous Feed Toaster
DCFT-BKNA, -BKEU, -BKUK, -BKIN, -BKBR,
-BKCL, -BKEAC, -BKJP
355 EAST KEHOE BLVD. ~ CAROL STREAM, IL, 60188, USA
PHONE: 630-462-8800 ~ TOLL FREE: 1-800-PCASTLE
FAX 630-462-1460 ~ WWW.PRINCECASTLE.COM
525-299revB-EN 1 Printed in USA 03/31 © 2017
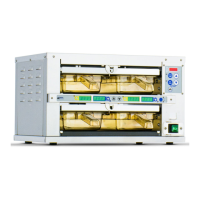
Product Identification
TABLE OF CONTENTS
Product Identification . . . . . . . . . . . . . . . . . . . . . . . . . . . . . . 1
Safety Information . . . . . . . . . . . . . . . . . . . . . . . . . . . . . . . . . 2
General . . . . . . . . . . . . . . . . . . . . . . . . . . . . . . . . . . . . . . . . . 2
Important . . . . . . . . . . . . . . . . . . . . . . . . . . . . . . . . . . . . . . . . 2
Electrical Specifications . . . . . . . . . . . . . . . . . . . . . . .. . . . . . 2
Installation . . . . . . . . . . . . . . . . . . . . . . . . . . . . . . . . . . . . . . . 2
Operation . . . . . . . . . . . . . . . . . . . . . . . . . . . . . . . . .. . . . . . . 4
Management Programming . . . . . . . . . . . . . . . . . . . . .. . . . . 5
Programming Diagram . . . . . . . . . . . . . . . . . . . . .. . . . . . . . 7
Daily Planned Maintenance . . . . . . . . . . . . . . . . . . . . .. . . . . 8
Troubleshooting . . . . . . . . . . . . . . . . . . . . . . . . . . . . . . . . . . 10
Exploded View and Parts List . . . . . . . . . . . . . . .. . . . . . . . . 11
Wiring Diagram . . . . . . . . . . . . . . . . . . . . . . . . . . . . . .. . . . . 13
Declaration of Conformity. . . . . . . . . . . . . . . . . .. .. . . . . . . . 14
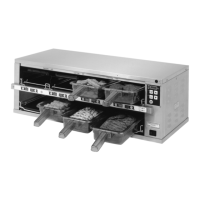
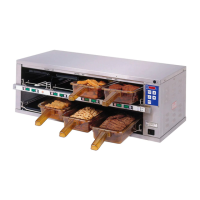
LCD DISPLAY
UP AND DOWN
SCROLL BUTTONS
PRINCE CASTLE
LOGO BUTTON
MODE BUTTON
INFORMATION
BUTTON
ON/OFF SWITCH
CONTROL PANEL
COMPRESSION
ADJUSTMENT
KNOBS
LIMITED WARRANTY
This product is warranted to be free from defects in material and/or
workmanship for a period of 2 years (repair parts) + 2 years (service,
labor) from date of original installation, not to exceed 30 months from
date of shipment from our factory. Any part or component which
proves to be faulty in material and/or workmanship within the
warranty period will be replaced or repaired (at the option of Prince
Castle, Inc.) without cost to the customer for parts or labor.
This warranty is subject to the following exceptions/conditions:
• Use of any non-genuine Prince Castle parts voids this
warranty and all work must be performed by an authorized
Prince Castle Service Agent.
• All labor shall be performed during regular work hours.
Overtime premium will not be covered.
• Travel charges are limited to 100 miles (200 kilometers) round
trip, 2 hours travel time, one trip per repair.
• Damage caused by carelessness, neglect, and/or abuse (e.g.,
using wrong current, dropping, tampering with or altering
electrical components, or improper cleaning) is not covered.
• Equipment damaged in shipment, by fire, flood or an act of
God is not covered.
• Damage to non-stick coated surfaces is not covered by this
warranty.
• Normal maintenance or adjustments including belt tension.