Do you have a question about the Printronix P8005 and is the answer not in the manual?
| Brand | Printronix |
|---|---|
| Model | P8005 |
| Category | Printer |
| Language | English |
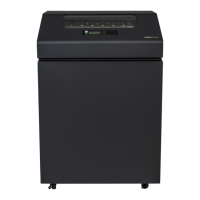
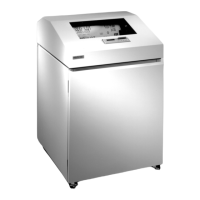
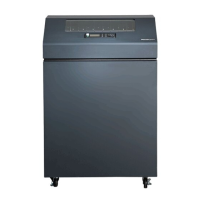
Introduces the P8000 Series Cartridge Ribbon Printer, highlighting its features and benefits.
Provides guidance on ordering correct replacement parts for the printer model.
Highlights critical maintenance principles to ensure optimal printer performance and prevent damage.
Details critical safety warnings for maintenance procedures, including power disconnection and handling components.
Outlines periodic cleaning procedures for the printer to maintain performance and reliability.
Explains how to clean the shuttle frame assembly for low and high speed models.
Lists aids available in the manual to help isolate printer malfunctions.
A logic tree to guide users through initial troubleshooting steps for printer issues.
Explains the three types of messages on the LCD and how fault messages are cleared.
Describes diagnostic options for specific error messages and capturing failure dumps.
Lists and explains ASCII fault messages, providing solutions for each.
Provides essential steps to prepare the printer before performing any maintenance or adjustment.
Details the steps to return the printer to normal operation after servicing.
Explains how to adjust the paper feed timing belt tension for optimal performance.
Describes the procedure for adjusting the platen open belt tension.
Details recommended platen gap settings and adjustment procedures for hammerspring assemblies.
Explains how to test and set the paper out sensor distance to prevent printing after running out of paper.
Describes how to check and adjust hammer phasing for proper vertical dot alignment.
Explains the process of loading printer firmware, including upgrades and replacements.
Details the procedure for downloading firmware using a web browser and the printer's IP address.
Explains how to download firmware using the Windows driver via the About/Help tab.
Describes downloading firmware using FILENAME.exe without manual download mode.
Provides steps for downloading firmware using a two-key power-up sequence.
Details the three-key download method for situations like new controller installation or corrupt flash memory.
Details how to reprogram the security key using an SPX module for enabling features.
Procedure for adjusting coil temperature, applicable after controller or shuttle frame replacement.
Helps identify and eliminate conditions causing paper jams or excessive motor tension.
Describes adjusting tractor belt tension to reduce first line print compression.
Checks for metallic debris and hammer coils shorting to the shuttle frame.
Tests the hammerbank power cable for shorts to ground or pin-to-pin.
Tests various cables for shorts to ground or pin-to-pin.
Explains three methods to set the printer's serial number: Factory menu, Webpage, or data stream.
Lists all replaceable components with their corresponding page numbers for removal and installation.
Procedure for removing and installing the controller board, including ESD precautions.
Procedure for removing and installing the Magnetic Pickup (MPU) assembly.
Details for removing and installing the paper feed motor assembly.
Instructions for removing and installing the platen, with detailed steps for shaft and pulley removal.
Procedure for reprogramming the security key using an SPX module.
Procedure for removing and installing the shuttle frame assembly, noting its weight and handling.
Details the shuttle frame assembly, which houses the hammerbank and shuttle drive motor.
Describes the hammerbank assembly, including the number of hammers and hammerspring assemblies.
Introduces the feature that monitors and communicates ribbon life status.
Describes the controller board's function, including DC and EC units, and their responsibilities.
Details the printer's power supply, its AC to DC conversion, and voltage levels.
Provides pin assignments for controller boards and power supplies.
Describes the mechanical operation of the power stacker, including its control panel.
Provides instructions for setting up the power stacker, including cable routing and elevator positioning.
Guides users through loading paper and starting the power stacker operation.
Lists common stacker problems and directs users to troubleshooting procedures.
Provides an initial inspection procedure for the stacker before troubleshooting.
Provides step-by-step instructions for removing the power stacker assembly from the printer.
Guides users through the installation of the power stacker assembly, cables, and control panel.
Lists procedures for replacing specific power stacker components.
Step-by-step guide for loading paper and setting up the tractors on the ZTP printer.
Explains how to position the paper out sensor for optimal performance and jam mitigation.
Procedure for setting the tear bar distance for accurate form tear-off.
Describes how to set the top of form position using the tear bar and TOF button.
Describes minimum paper specifications for optimal printer performance.
Details the license agreement for the printer's embedded software, including eCos and GNU GPL.