1. Download Project EV App.
2. Create user account
3. Add charger to serial number on the account.
4. Power charger up from the fuseboard – (This will emit hotspot for 1-2 minutes from
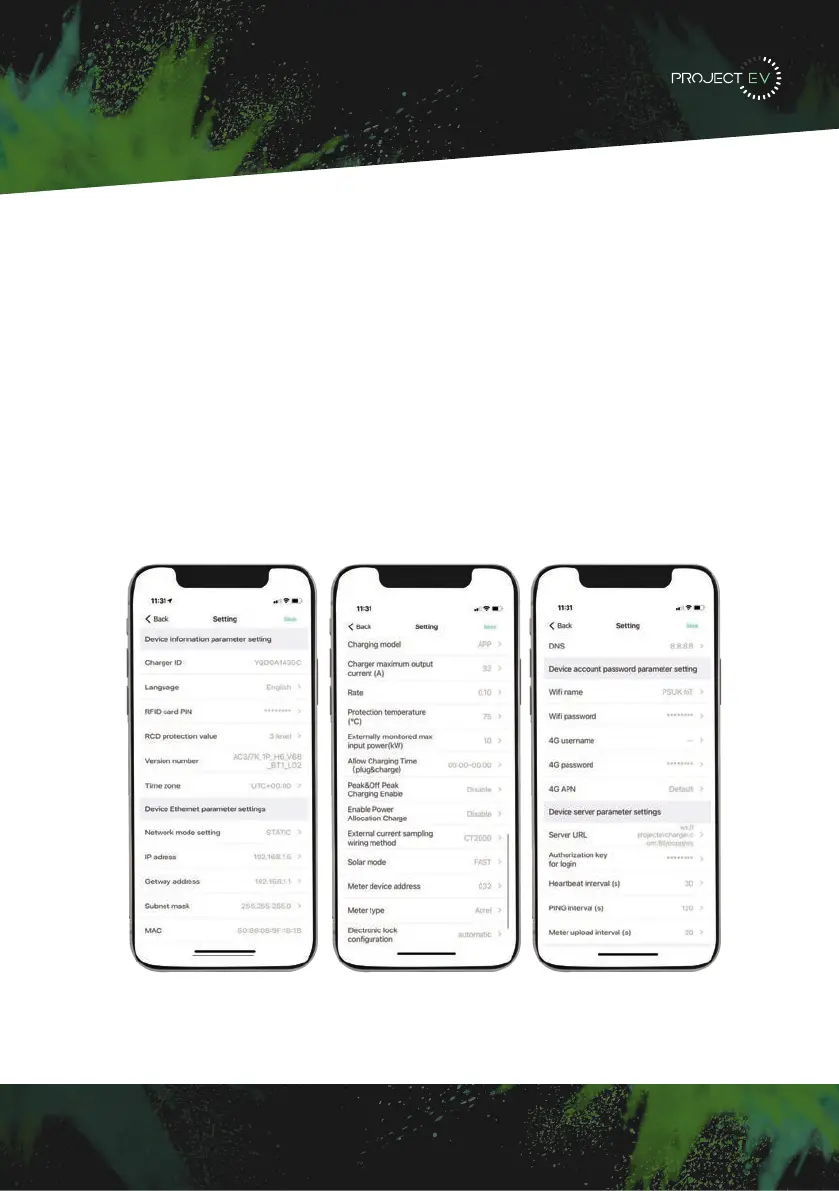
5. Press the WiFi symbol in top right of the App
6. Enter in the desired settings. (CAUTION: Any WIFI details are case sensitive).
5LJKWFOLFNRQ/RFDO$UHD&RQQHFWLRQDQGFOLFNRQ3URSHUWLHV
6HOHFW,QWHUQHW3URWRFRO9HUVLRQ7&3,3YDQGFOLFNRQ3URSHUWLHV
6HOHFW8VHWKHIROORZLQJ,3DGGUHVVDQGHQWHUWKH,3DGGUHVV6XEQHW0DVN'HIDXOW
*DWHZD\&OLFN2.DQGFORVHWKH/RFDO$UHD&RQQHFWLRQSURSHUWLHVZLQGRZ
F &KHFN ZKDW ZHE EURZVHU LV EHLQJ XVHG LW¶V VXJJHVWHG WR XVH )LUHIR[ RU ,( &KURPH
FDQQRWEHXVHGWRXSGDWHILUPZDUH
G &KHFNLI\RXKDYH LQSXW WKHFRPSOHWHFRQWHQWZKLFK LV KWWSLQWKH
DGGUHVVILHOGGRQRWOHDYHRXWWKHKWWSRUWKH³´
H 6RPHWLPHV\RXPD\QHHGWRUHVWDUWWKHFKDUJHUWRDFFHVVLWVSDUDPHWHUVHWWLQJSDJH
I ,I \RX KDYH FKDQJHG WKH FKDUJHU¶V ,3 WR RWKHU YDOXH DQG FDQQRW UHPHPEHU \RX FDQ
UHVWRUHWKHFKDUJHUWRIDFWRU\VHWWLQJE\ORQJSUHVVWKHUHVHWEXWWRQ7KHQ\RXFDQDFFHVV
LWXVLQJKWWS
3
OHDVHQRWH$IWHUUHVWRULQJWKHFKDUJHUWRIDFWRU\VHWWLQJ\RX¶OOQHHGWRUHVHWWKHFKDUJHU
,'DQGVHUYHUXUORWKHUZLVHWKHFKDUJHUZRQ¶WEHFRQQHFWHGWRWKHEDFNRIILFHVHUYHU
5HVHWEXWWRQ
(3). Right-click on Local Area Connection and click on Properties.
(4). Select Internet Protocol Version 4 (TCP/IPv4) and click on Properties.
(5). Select “Use the following IP address” and enter the IP address, Subnet Mask,
Default Gateway. Click OK and close the Local Area Connection properties window.
c. Check which web browser is being used, it’s suggested you use Firefox or IE.
Chrome cannot be used to update rmware.
d. Check if you have input the complete path, which is http://192.168.1.5:8080, in the
address eld, do not leave out the http:// or the“:8080”.
e. You may need to restart the charger to access its parameter setting page.
f. If you have changed the charger’s IP to another value but cannot remember it, you
can restore the charger to factory setting by pressing and holding the reset button.
Then you can access it using http://192.168.1.5:8080.
Please note: After restoring the charger to factory setting, you need to reset the
charger ID and server url, or the charger won’t be connected to the back-oce server.
32 33