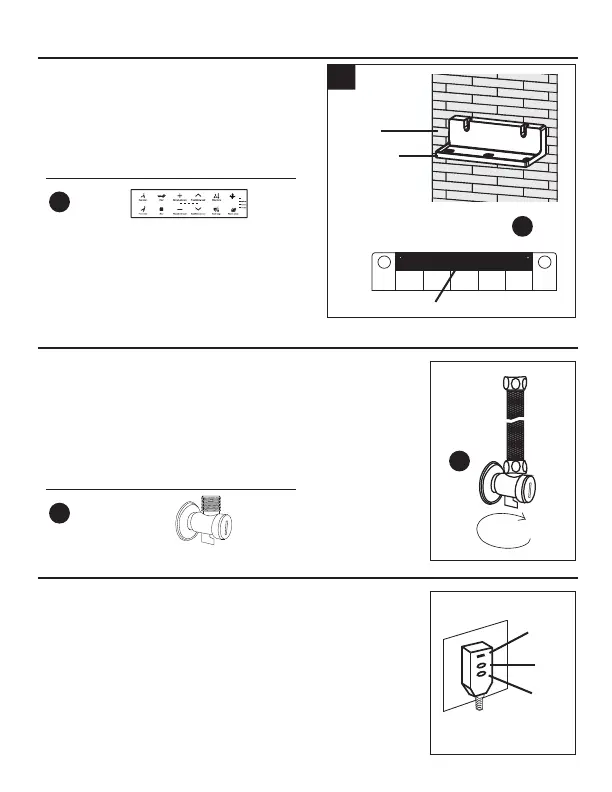
1. Tear the paper of the double-sided tape on the
back of the bracket, stick the bracket on the wall.
NOTE: Clean the installation position before
pasting. Strongly and evenly press the tape when
pasting. Ready for use after 15 minutes.
Parts Used
B
B
HH
Remote
1
REMOTE CONTROLLER INSTALLATION
4.
TURN ON WATER
5.
12
x 1
x 1
Double Sided Tape
1. Turn the water on by turning the knob on the supply angle
valve counter-clockwise until the valve is fully open.
2. Check all connections carefully and make sure that there is
no water leakage from any connection.
NOTE: If there is leaking from a connection, re-tighten the connection.
Hardware Used
HH
Angle Valve
LINK THE POWER
6.
1. Insert the power plug fully into the socket, and the power indication
lamp will turn on. The 120V electrical plug must be within 36-in of
the unit.
NOTE: When powering on for the first time, please press the test
button on the plug. If the power indicator goes out, it means current
leakage protection is working properly. Press the reset button
on the plug again. When the power indicator turns on, the power
supply to the toilet is resumed.
Wall
Remote
Controller
Bracket
Power
Indicator
Test
Button
Reset
Button
NOTE: The remote needs to be 15.75 to 39.37 in
from the toilet to work properly.
Fan
Fan