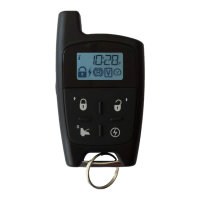
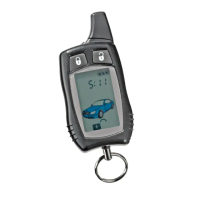
User Guide P.7
Remote advanced functions and MENU
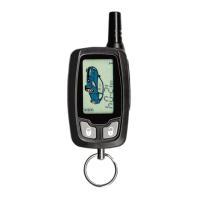
Display Description
PARK
(1)
Parking meter countdown
This version of the countdown feature is particularly useful for keeping track of
parking meter time: the user may quickly set up the countdown using the Parking
Menu. The transmitter will beep once, 5min before the Parking countdown reaches 0
and beeps 6 times once the countdown expires.
Through Advanced Options, first press to select MENU, then:
a. Choose PARK and press .
b. Set the time at which you want set the alarm. First set the hour, and
press . Then set the minutes and press .
c. Choose ON and wait. A flashing “P” will appear on screen to
confirm activation.
ALARM
(2)
Alarm Clock
The LCD remote control has a built-in alarm clock, which can be set up using the
Alarm Clock Menu. Once the programmed time is reached, the remote will beep 6
times every minute until a button is pressed.
Through Advanced Options, first press to select MENU, then:
a. Choose ALARM and press .
b. Set the time at which you want to set the alarm. First set the hour,
and press . Then set the minutes and press .
c. Choose ON and wait. A flashing “A” will appear on screen to
confirm activation.
CWM
(3)
Cold weather mode function:
Through Advanced Options, first press to select MENU, then:
a. Choose CWM and press .
b. Choose ON/OFF, then press and hold until
icon appears.
VALET
(4)
Valet function:
Through Advanced Options, first press to select MENU, then:
a. Choose VALET and press .
b. Choose ON/OFF, then press and hold until icon appears.
TSTART
(5)
Time start function:
This feature is used to remote start the car at a pre-programmed time. Once the pre-
programmed time is reached, the remote will send a start command to the car
module. (Note: For this feature to work, remote has to be within range of the vehicle).
Through Advanced Options, first press to select MENU, then:
a. Choose TSTART and press .
b. Set the time at which you want to remote start the vehicle. First set
the hour, and press . Then set the minutes and press .
c. Choose ON and wait. A flashing “T” will appear on screen to confirm
activation.
Guide de l’utilisateur P.7
Les fonctions avancées et MENU de la télécommande :
Affiche Description
STAT
(1)
Minuterie de stationnement
Cette minuterie est particulièrement utile pour garder trace du temps restant d’un
parcomètre : l’utilisateur peut rapidement régler la minuterie dans le menu « STAT ».
La télécommande sonnera 1 fois, 5 minutes avant la fin et 6 fois en atteignant zéro.
Dans les options avancées, appuyer sur pour choisir MENU, puis :
a. Sélectionner « STAT » et appuyer sur .
b. Régler le temps de l’alarme. D’abord l’heure, puis appuyer sur .
Ensuite les minutes, puis appuyer sur .
c. Sélectionner « ON » et attendre. Un « P » clignotant apparaitra à
l’écran pour confirmer l’activation.
ALARM
(2)
Réveille matin
La télécommande ACL est équipée d’un réveille matin intégré pouvant être réglé par
le menu « Alarme ». À l’heure convenue, la télécommande sonnera 6 fois à toutes
les minutes jusqu’à ce qu’une touché soit appuyée.
Dans les options avancées, appuyer sur pour choisir MENU, puis:
a. Sélectionner « ALARM » et appuyer sur .
b. Régler le temps de l’alarme. D’abord l’heure, puis appuyer sur .
Ensuite les minutes, puis appuyer sur .
c. Sélectionner « ON » et attendre. Un « A » clignotant apparaitra à
l’écran pour confirmer l’activation.
MTF
(3)
Fonction mode temps froid :
Dans les options avancées, appuyer sur pour choisir MENU, puis:
a. Sélectionner « MTF » et appuyer sur .
b. Sélectionner « ON/OFF », puis appuyer et maintenir la touche
jusqu’à ce que l’icône
apparaisse.
VALET
(4)
Fonction valet :
Dans les options avancées, appuyer sur pour choisir MENU, puis:
a. Sélectionner « VALET » et appuyer sur .
b. Sélectionner « ON/OFF », puis appuyer et maintenir la touche
jusqu’à ce que l’icône apparaisse.
H-DEM
(5)
Fonction minuterie de démarrage :
Cette fonction est utilisée pour démarrer le véhicule à distance à une heure
préprogrammée. À l’heure convenue, la télécommande envoie une commande de
démarrage au module du véhicule.
Dans les options avancées, appuyer sur pour choisir MENU, puis:
a. Sélectionner « H-DEM » et appuyer sur .
b. Régler l’heure à laquelle vous voulez démarrer le véhicule. D’abord
l’heure, puis appuyer sur . Ensuite les minutes, puis appuyer sur
.
c. Sélectionner « ON » et attendre. Un « T » clignotant apparaitra à
l’écran pour confirmer l’activation.