Do you have a question about the Pyronix CAR DEFENDER and is the answer not in the manual?
Instructions on how to remove the device cover to access internal components for setup or maintenance.
Guidance on selecting appropriate zone types for the device based on system requirements and intended use.
Procedure for placing the device into its holder and removing it safely.
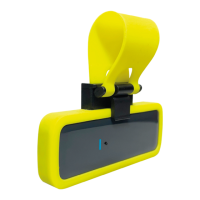
Step-by-step guide for securing the device holder onto a vehicle's steering wheel.
Method to permanently attach the device to a surface using screws.
Method to permanently attach the device using an adhesive pad.
Explanation of how and when the device's status LEDs automatically turn off.
Methods to reactivate the device's calibration and alarm LEDs after they have turned off.
General description of the multi-functional button and its primary detection modes.
Details on how to access and change the device's sensitivity settings for different detection modes.
Procedure to verify the currently configured detection mode using the device's LEDs.
Function to poll the system and check device connectivity and signal strength.
Details on the supplied batteries and their characteristics.
Important instructions for safely replacing the device's batteries.
Information regarding electrical product disposal and handling precautions.
Details on the product warranty period and terms.
The CARDEFENDER-WE is a wireless device designed for vehicle protection, capable of detecting shock and tilt. It can be installed in a holder and attached to a vehicle, or permanently fixed to a surface using screws or an adhesive pad. The device is portable and can be relocated when the control panel is disarmed.
The CARDEFENDER-WE acts as a security sensor, transmitting signals to a control panel when it detects shock or tilt. It uses a fully encrypted rolling code for transmission and operates on an 868MHz FM transceiver narrow band. The device offers multiple detection methods: shock only, tilt only, or a combination of tilt and shock. It features red, blue, and green LEDs for status indication and configuration.
| Brand | Pyronix |
|---|---|
| Model | CAR DEFENDER |
| Category | Automobile Accessories |
| Language | English |