TS-219P/e Series Turbo NAS
TS-219P/e Series Turbo NAS
English
繁體中文
简体中文 日本語
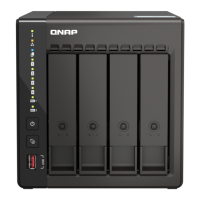
1. One Touch Copy Button
自動備份按鈕
自动备份按钮 ワンタッチコピーボタン
원터치 복사 버튼
2. USB 2.0
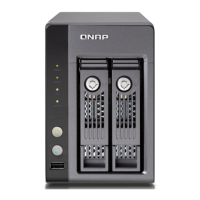
3. LED Indicators: HDD1, HDD2, LAN, eSATA
面板燈號:HDD1、HDD2、網路、eSATA
面板灯号:HDD1、HDD2、网络、eSATA
LED インディケータ:HDD1、HDD2、LAN、eSATA
LED 표시자: HDD1, HDD2, LAN, eSATA
4. Power Button
電源按鈕
电源按钮 電源ボタン
전원 버튼
5. Power Connector
電源接頭
电源接头
電源コネクタ
전원 커넥터
6. Giga LAN
7. USB 2.0 x 2
8. Password & Network Settings Reset Button
密碼及網路設定重置鈕
密码及网络设定重置钮
ケンジントンセキュリティスロット
구성 재설정 스위치
9. K-Lock Security Slot
安全鎖
安全锁
K-Lockセキュリティスロット
K-록 보안 슬롯
10. eSATA x 2
1. One Touch Copy Button Kopiertaste
Bouton copie intelligente Botón de Copia
Instantánea Botão de cópia automática um Toque
2. USB 2.0
3. LED Indicators: HDD1, HDD2, LAN, eSATA
LED-Anzeigen: HDD1, HDD2, LAN, eSATA
Voyants DEL: HDD1, HDD2, LAN, eSATA
Indicadores LED: Disco Duro1, Disco Duro2, LAN,
eSATA
Indicadores LED: HDD1, HDD2, LAN, eSATA
4. Power Button Einschaltknopf Bouton d'alimentation
Botón de Encendido Botão de Energia
5. Power Connector Stromanschluss Prise d'alimentation
Conector de Alimentación Tomada
6. Giga LAN
7. USB 2.0 x 2
8. Password & Network Settings Reset Button
Kongurations-Rückstellschalter Interrupteur de
réinitialisation Botón de Restablecimiento de la
Conguración Botão Reset para Congurar a
Senha e a Rede
9. K-Lock Security Slot Schlitz für Kensington-
Schloss Fente de sécurité K-Lock Ranura de
seguridad K-Lock Slot de segurança de trava K
10. eSATA x 2
Package Contents
包裝內容
包装内容
パッケージの内容の確認
패키지 내용물 확인
Package Contents Packungsinhalt Vériez le contenu de
l’emballage Comprobar los Contenidos del Embalaje Verificar os
Conteúdos na Embalagem
Install the Hardware
硬體安裝
硬件安装 ハードウェアの準備
하드웨어 설치
Install the Hardware Installieren der Hardware Installer le matériel
Instalar el Hardware Como Instalar o Dispositivo
System Conguration
系統設定
系统设定 システム設定
시스템 구성
System Conguration Systemkonfiguration Conguration du système Configuración del Sistema Conguração do Sistema
Hardware Illustration
硬體導覽
硬件导览 ハードウェアの取り付け
하드웨어 설명
Hardware Illustration Hardwareabbildung Illustration du matériel
Ilustración del Hardware Ilustração do Hardware
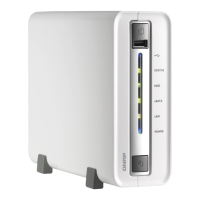
Turbo NAS
Turbo NAS
Flat head screw (for HDD) x 8
平頭螺絲(硬碟用) x 8
平头螺丝(硬盘用) x 8
皿頭ねじ (HDD用)×8
접시머리나사(HDD용) x 8
Flat head screw (for HDD) x 8
Flachkopfschraube (für
Festplattenlaufwerk) x 8
Vis à tête fraisée (pour disque
dur) x 8
Tornillo de cabeza plana (para la
unidad de disco duro) x 8
Parafuso de cabeça plana (para
HDD) x 8
Ethernet cable
RJ-45
網路纜線
RJ-45
网络缆线
イーサネットケーブル
이더넷 케이블
Ethernet Cable
Ethernet-Kabel
Câble Ethernet
Cable Ethernet
Cabo Ethernet
Adaptor
變壓器
变压器
アダプタ
어댑터
Hard disk lock
硬碟鎖
硬盘锁
ハードディスクロック
하드 디스크 잠금 열쇠
Adaptor
Adaptor
Adaptateur
Adaptador
Adaptador
Hard disk lock
Festplattenschlüssel
Verrou de disque dur
Candado para disco duro
Cadeado para Discos Rígidos
Power cord
電源線
电源线
電源コード
전원 코드
Power Cord
Netzkabel
Cordon d’alimentation
Cable de alimentación
Cabo de Alimentação
CD-ROM
CD-ROM
Quick Installation Guide
快速安裝指引
快速安装指引
クイックインストールガイド
빠른 설치 안내서
Quick Installation Guide
Schnellinstallationsanleitung
Guide d’installation rapide
Guía de Instalación Rápida
Manual de Instalação Rápida
P/N: 51000-022506-RS
P/N: 51000-022506-RS
All-in-one NAS Server
All-in-one NAS Server
V1.0
빠른 설치 안내서
한국어
d. QNAP Finder detects the Turbo NAS on the network and prompts
you to perform quick setup. Click “Yes” to continue.
QNAP Finder 會
偵測到網路上的 Turbo NAS 系統,並詢問是否進行快速設定,請按
「是」繼續。
QNAP Finder 会侦测到网络上的 Turbo NAS 系统,并
询问是否进行快速设定,请按「是」继续。QNAP Finder がネット
ワーク上のTurbo NASを検出すると、かんたん設定を実行するかど
うかを確認するウィンドウが表示されます。「確認」をクリック
して続行します。
QNAP Finder는 네트워크에서 터보 스테이션을
탐지하고 빠른 설정을 수행하려는지를 물을 것입니다. 계속 진행하
려면 "확인" 를 클릭합니다.
Note: If the server is not found, click “Refresh” to try again.
注意:若無法偵測到 Turbo NAS 系統,請按 「更新」按鈕再試一次。
注意:若无法侦测到 Turbo NAS 系统,请按「更新」按钮再试一次。
注意: Turbo NASが見つからない時はリフレッシュをクリックして
ください。
메모: Turbo NAS 를 찾을 수 없는 경우,"새로 고치기" 을 클릭하여 재
시도합니다.
e. You must enter the administrator name and password to perform
quick setup.
進行快速設定必須先輸入管理者帳號與密碼。
进行快速设定必须先输入管理者账号与密码。
パスワード・フィールドが表示されるので、管理者名とパスワー
ドを入力します。
빠른 설정을 수행하려면 관리자 이름 및 암호를 입력해야 합니다.
The default administrator name and password are:
請輸入預設的管理者名稱與密碼如下:
请输入预设的管理者名称与密码如下:
初期設定の管理者名とパスワードは以下の通りです:
기본 관리자 이름 및 암호는 아래에 표기한 대로 입니다:
Mac Users/
Mac使用者
/
Mac使用者
/
Macユーザー
/ Mac 사용자
a. Insert the NAS CD-ROM in your Mac and find the directory QFinder4Mac. Then
run QFinder4Mac.dmg.
將NAS光碟片放入光碟機中,點選Mac電腦上的光碟機,
找到QFinder4Mac的目錄,執行QFinder4Mac.dmg
。
将NAS光盘片放入光驱中,点选
Mac计算机上的光驱,找到QFinder4Mac的目录,执行QFinder4Mac.dmg。NASのCD-
ROMをMacに挿入すると、ディレクトリQFinder4Macが表示されます。その後、
QFinder4Mac.dmgを実行します。
Mac에 NAS CD-ROM을 삽입하고 QFinder4Mac
디렉토리를 찾으십시오. 그 다음에 QFinder4Mac.dmg을 실행하십시오.
b. Run QFinder.
執行QFinder。
执行QFinder。
QFinderを実行します。
QFinder를 실행하십시오.
Mac Users/ Unter Mac/ Utilisateurs Mac/ Usuarios de Mac/ Usuários Mac
a. Insert the NAS CD-ROM in your Mac and nd the directory QFinder4Mac. Then run
QFinder4Mac.dmg. Legen Sie die NAS CD-ROM in Ihren Mac ein. Suchen Sie den Ordner
QFinder4Mac. Führen Sie die Datei QFinder4Mac.dmg aus. Insérez le CD-ROM du NAS
dans votre Mac et trouvez le répertoire QFinder4Mac. Puis exécutez QFinder4Mac.dmg.
Inserte el CD-ROM NAS en su Mac y busque el directorio QFinder4Mac. Luego, ejecute
QFinder4Mac.dmg. Insira o CD-ROM do produto no seu Mac e procure o diretório Assistente
Mac.Em seguida execute QFinder4Mac.dmg.
b. Run QFinder.
Starten QFinder.
Exécutez QFinder.
Ejecute QFinder.
Executar QFinder.
Windows Users/
Windows使用者
/
Windows使用者
/
Windowsユーザー
/
Windows 사용자
Linux Users
/
Linux 使用者
/
Linux 使用者
/
Linux ユーザー
/
Linux 사용자
Windows Users/ Unter Windows / Utilisateurs Windows/
Usuarios de Windows/ Usuários de Windows
Linux Users/ Linux-Anwender/ Utilisateurs Linux/
Usuarios de Linux/ Usuários de Linux
Default administrator name: admin
Password: admin
Default administrator name: admin
Password: admin
a. Execute the product CD, a model selection menu is shown. Select your Turbo
NAS model.
產品光碟片放入光碟機後,會自動出現如下選單。請先選擇您的產品
型號。
产品光盘片放入光驱后,会自动出现如下选单。请先选择您的产品型号。
製品CDを起動させると、モデルを選択する画面が表示されます。該当するモデ
ルを選択してください。
제품 CD를 실행합니다, 모델 선택 메뉴가 표시될 것입니
다. 계속하려면 Turbo NAS 모델을 선택합니다.
b. Click “Install QNAP Finder”.
按「安裝 QNAP Finder」。
按「安装 QNAP Finder」。
「QNAP Finderのインストール」を選択してください。
계속하려면 “QNAP Finder 설치”를 선택합니다.
a. Connect the NAS to the PC directly. Turn on the NAS.
將Turbo NAS與PC對接後,開啟電源。
将Turbo NAS与PC对
接后,开启电源。NAS と PC を直接接続します。NASの電源を入れます。
NAS를 PC에 직접 연결합니다. NAS를
켭니다.
c. Follow the instructions to nish the conguration of the NAS.
依網頁指示執行快速安裝後,即可完成系統設定
。
依网页指示执行快速安装后,即可完成系统设定。説明に従い、NASの構成を完了します。
지침을 따라 NAS의
구성을 종료합니다.
b. Open a web browser and enter the IP address of the NAS: http://169.254.100.100:8080/ (Make sure the IP
address of your PC is congured to the same subnet, e.g. 169.254.100.1).
打開網頁瀏覽器,輸入NAS的IP位置
http://169.254.100.100:8080/ (請將PC的IP位置設於同網段,例如: 169.254.100.1)。
打开网页浏览器,输入NAS的IP
位置 http://169.254.100.100:8080/ (请将PC的IP位置设于同网段,例如: 169.254.100.1)。ウェブブラウザ
を開き、NASのIPアドレスを入力します。: http://169.254.100.100:8080/ (PCのIPアドレスが同じサブネット
に対して構成されているよう確認してください。例: 169.254.100.1)。
웹 브라우저를 실행한 다음 NAS의 IP
주소를 입력합니다: http://169.254.100.100:8080/ (PC의 IP 주소가 같은 서브넷으로 구성되어 있는지 확인합
니다(예: 169.254.100.1).)
a. Execute the product CD, a model selection menu is shown. Select your Turbo NAS model.
Führen Sie die Produkt-CD aus. Ein Modellauswahlmenü wird geöffnet. Wählen Sie Ihr
Turbo NAS-Modell aus.
Exécutez le CD, un menu de sélection des modèles apparaîtra. Sélectionnez votre modèle
de Turbo NAS.
Ejecute el CD del producto, se mostrará un menú de selección de modelo. Seleccione su
modelo de Turbo NAS.
Execute o programa contido no CD, um menu de opção para escolha dos modelos será
mostrado. Selecione o seu modelo para Turbo NAS.
b. Click “Install QNAP Finder”.
Wählen Sie „QNAP Finder installieren“.
Sélectionnez « Installer QNAP Finder ».
Seleccione “Install QNAP Finder”.
Selecione “Install QNAP Finder”.
a. Connect the NAS to the PC directly. Turn on the NAS. Schließen Sie den NAS direkt am PC an. Schalten Sie den NAS ein.
Reliez directement le NAS au PC. Allumez le NAS. Conecte el NAS al PC directamente. Encienda el NAS.
Conectar o NAS diretamento ao PC. Ligar o NAS.
c. Follow the instructions to nish the conguration of the NAS. Befolgen Sie die Anweisungen zur Fertigstellung der NAS-
Konguration. Suivez les instructions pour terminer la conguration du NAS. Siga las instrucciones para nalizar la
conguración del NAS. Siga as instruções para nalizar a conguração do NAS.
b. Open a web browser and enter the IP address of the NAS: http://169.254.100.100:8080/ (Make sure the IP address of your PC
is congured to the same subnet, e.g. 169.254.100.1). Öffnen Sie einen Webbrowser, geben Sie die IP-Adresse des NAS ein:
http://169.254.100.100:8080/ (Achten Sie darauf, dass die IP-Adresse Ihres Computers auf dasselbe Subnetz konguriert ist,
z. B. 169.254.100.1). Ouvrez un navigateur Internet et saisissez l’adresse IP du NAS : http://169.254.100.100:8080/ (Vériez
que l’adresse IP de votre PC est bien congurée sur le même sous-réseau, par ex.: 169.254.100.1). Abra un explorador
web e introduzca la dirección IP del NAS: http://169.254.100.100:8080/ (Asegúrese de que la dirección IP de su PC está
congurada para la misma subred, por ejemplo 169.254.100.1). Abrir o navegador da internet e digitar o endereço de IP do
NAS: http://169.254.100.100 :8080/ (Se certicar que o endereço de IP do seu PC está congurado para a mesma subnet, ex.
169.254.100.1).
c. Follow the instructions to install QNAP Finder. QNAP Finder will
run automatically.
If you are using Windows XP SP2, the following screen will be
shown. Click “Unblock”.
請依指示安裝,完成後 QNAP Finder 將會自動執行。若您的作
業系統為Windows XP SP2,會出現以下畫面,請選擇
「
解除封
鎖
」
。
请依指示安装,完成后 QNAP Finder 将会自动执行。若您的操
作系统为Windows XP SP2,会出现以下画面,请选择
「
解除封
锁
」
。
QNAP Finder をインストールします。インストールが完了する
と、自動でプログラムが起動します。Windows XP SP2 をお使
いの場合、ファイアウォールが働きますが、その際はブロック
を解除してください。
화면에 표시된 지침에 따라 QNAP Finder를 설치합니다. 그러
면 QNAP Finder가 자동으로 실행합니다.
Windows XP SP2를 사용하고 있는 경우, 다음 화면이 표시될
것입니다. “차단해제”를 선택하여 주십시오.
c. Follow the instructions to install QNAP Finder. QNAP Finder will run
automatically. If you are using Windows XP SP2, the following screen
will be shown. Click “Unblock”. Folgen Sie den Bildschirmanweisungen,
um QNAP Finder zu installieren. QNAP Finder wird dann automatisch
ausgeführt. Wenn Sie Windows XP SP2 verwenden, wird das folgende
Fenster angezeigt. Bitte wählen Sie „Freigeben“. Suivez les instructions
à l'écran pour installer QNAP Finder. QNAP Finder s'exécutera alors
automatiquement. Si vous utilisez Windows XP SP2, l'écran suivant
apparaîtra. Veuillez sélectionner « Débloquer ». Siga las instrucciones
de pantalla para Instalar QNAP Finder. Luego QNAP Finder se ejecutará
automáticamente. Si está usando Windows XP SP2, se mostrará la
siguiente pantalla. Por favor, seleccione “Unblock” (Desbloquear). Siga
as instruções apresentadas na tela para instalar o QNAP Finder.O QNAP
Finder irá rodar automaticamente. Se você estiver usando o Windows
XP SP2, a seguinte tela será mostrada. Por favor selecione a opção
desbloquear “Unblock”.
d. QNAP Finder detects the Turbo NAS on the network and prompts you
to perform quick setup. Click “Yes” to continue. QNAP Finder erkennt
die Turbo NAS im Netzwerk und fragt Sie, ob Sie die Schnelleinstellung
ausführen möchten.Klicken Sie auf Ja, um fortzufahren. QNAP Finder
détectera Turbo NAS dans le réseau et vous demandera si vous souhaitez
effectuer une conguration rapide. Cliquez sur Oui pour continuer. QNAP
Finder detectará la Turbo NAS en la red y le preguntará si quiere realizar
la conguración rápida. Haga clic en Sí para continuar. QNAP Finder irá
detectar o Turbo NAS através da rede e depois irá lhe perguntar se você
quer executar uma conguração do sistema de uma forma rápida “quick
setup”. Selecione a opção Yes para continuar.
Note: If the server is not found, click “Refresh” to try again. Hinweis: Falls die
Turbo NAS nicht gefunden wurde, dann klicken Sie bitte auf Aktualisieren, um
es neu zu versuchen. Remarque : Si Turbo NAS n'est pas trouvé, cliquez sur
Actualiser pour ré-essayer. Nota: Si Turbo NAS no se encuentra, haga clic
en Refresh (Refrescar) para intentarlo de nuevo. Nota : s o servidor não for
encontrado, selecione “Refresh” para tentar mais uma vez.
e. You must enter the administrator name and password to perform quick setup.
Sie müssen den Administratornamen und das Kennwort eingeben, um die
Schnelleinstellung auszuführen.
Vous devez entrer le nom et le mot de passe de l'administrateur pour
effectuer une conguration rapide.
Debe introducir el nombre y la contraseña del administrador para realizar la
conguración rápida.
Você deverá digitar o nome do administrador e a senha para executar a
conguração de modo mais rápido “quick setup”.
The default administrator name and password are:
Der Standard-Anmeldename und das Kennwort sind wie folgt:
Le nom et le mot de passe de l'administrateur par défaut sont comme suit:
El nombre y la contraseña del administrador por defecto son las siguientes:
O nome do administrador padrão e a senha são fornecidas logo abaixo:
10
10
1. Install a hard disk on each tray. Make sure the disk holes match the
holes at the base of the disk tray and lock the disk with four screws.
將硬碟底部用螺絲牢牢地鎖在抽取盒上。
将硬盘底部用螺丝牢牢地锁
在抽取盒上。固定してあるネジを緩め、ハードディスクトレイを引
き出しす。
각 트레이에 하드 디스크를 설치합니다. 디스크 구멍이 디
스크 트레이의 바닥에 있는 구멍과 일치하는지 확인합니다.
1. Install a hard disk on each tray. Make sure the disk holes match the
holes at the base of the disk tray and lock the disk with four screws.
Bauen Sie eine Festplatte in jedes Fach ein. Achten Sie darauf,
dass die Bohrungen an der Festplattte auf die Bohrungen am
Boden des Laufwerkfachs ausgerichtet werden. Befestigen Sie mit
vier Schrauben die Festplatte. Installez un disque dur sur chacun.
Assurez-vous d’aligner les trous de xations du disque aux trous de
xation du tiroir et xez avec 4 vis. Instale un disco duro en cada
bandeja. Asegúrese de que los agujeros de disco coinciden con los
de la base de la bandeja de disco y asegure el disco con los cuatro
tornillos. Instale um disco rígido em cada bandeja. Assegure-se que
os furos nos discos combinam com os furos na base da bandeja e
trave o disco rígido utilizando 4 parafusos.
2. Insert the disk trays to the Turbo NAS and push the disk trays to the
end.
插入硬碟抽取盒至末端。
插入硬盘抽取盒至末端。各トレイにハ
ードディスクを固定します。
디스크 트레이를 Turbo NAS에 끼우고
끝까지 미십시오.
2. Insert the disk trays to the Turbo NAS and push the disk trays to the
end. Schieben Sie die Laufwerkeinschübe bis zum Anschlag in
den Turbo NAS ein. Insérez les plateaux de disques dans le NAS
Turbo et enfoncez les plateaux de disques jusqu'au fond. Inserte
las bandejas de disco en el Turbo NAS y presione las bandejas de
disco hasta el nal. Insira as bandejas do disco no NAS. Pressione
as bandejas de disco até o nal. Aperte os parafusos nas bandejas.
3. Connect the network cable.
接上網路線。
接上网络线。ネットワーク
ケーブルを接続します。
네트워크 케이블을 연결합니다.
3. Connect the network cable. Verbinden Sie das Netzwerkkabel.
Branchez le câble réseau. Conecte el cable de red. Conectar o cabo
de rede local.
4. Connect the power cord and plug in the power cord to the socket.
接上電源接頭,並將電源線插入電源插座。
接上电源接头,并将电源
线插入电源插座。電源コードとアダプターをつなぎ、本体に接続し
ます。
전원 코드를 연결하고 전원 코드의 플러그를 소켓에 꽂습니다.
4. Connect the power cord and plug in the power cord to the socket.
Schließen Sie das Netzkabel an und verbinden es mit einer
Steckdose. Branchez le cordon d’alimentation et branchez-le sur
une prise. Conecte el cable de alimentación y enchufe el cable
de alimentación en la toma de corriente. Conectar o cabo de
alimentação na tomada.
5. Turn on the server. The server beeps once. Please wait for one
minute until the server beeps another time. The server has started up
successfully.
按下電源按鈕啟動系統,系統會發出一嗶聲開始啟動。
請等待約一分鐘,直到聽到系統發出另一嗶聲,表示開機完成。
按下
电源按钮启动系统,系统会发出一哔声开始启动。请等待约一分钟,
直到听到系统发出另一哔声,表示开机完成。 電源ボタンを押しま
す。一度、ビープ音が鳴ります。その後、約1分で再びビープ音が鳴
れば、Turbo NAS が起動します。
Turbo NAS을 켭니다. 서버에서 비
프음이 한 번 울립니다. 서버에서 비프음이 또 한번 울릴 때까지 잠시 기
다립니다. 서버가 시작되었습니다.
5. Turn on the server. The server beeps once. Please wait for one
minute until the server beeps another time. The server has started
up successfully. Schalten Sie den Server ein. Der Server gibt einmal
einen Piepton ab. Bitte warten Sie für ungefähr eine Minute, bis der
Server noch einmal einen Piepton abgibt. Das bedeutet, dass der
Server erfolgreich gestartet wurde. Mettez en marche le serveur.
Le serveur bipera une fois. Patientez environ une minute jusqu’à
un deuxième bip. Le serveur a démarré avec succès. Encienda
el servidor. El servidor emitirá un pitido una sola vez. Por favor,
espere durante un minuto aproximadamente hasta que el servidor
vuelva a emitir un pitido. El servidor se ha iniciado con éxito. Ligue
o servidor. O servidor irá apitar uma vez. Por favor espere por um
minuto até o servidor apitar mais uma vez. O servidor inicializou
com sucesso.
Flat Head Screw
硬碟螺絲
硬盘螺丝
皿ネジ
접시머리나사
Flat Head Screw
Tellerkopfschrauben
Vis à tête fraisée
Tornillos de cabeza plana
Parafuso de Cabeça
Hub/Switch/
Router
Laptop
PC
1
1
3
3
System Administration
系統管理
系统管理 システム管理
시스템 관리
6
System Administration Systemverwaltung Administration du
système Administración del Sistema Gerenciamento do Sistema
6
System Shutdown
系統關機
系统关机
システム・シャットダウン
시스템 종료
7
System Shutdown Ausschalten des Systems Fermeture du
système Apagado del Sistema Desligar o Sistema
7
Map Network Drive
設定網路資料夾
设定网络数据夹 ネットワークドライブをマップ
네트워크 드라이브 맵핑
5
Map Network Drive Netzwerklaufwerk abbilden Associer un lecteur réseau Asignar Unidad de Red Mapear Unidade de Rede
5
4
4
2
2
For system administration, click “Administration”.
請點選「系統管理」進入系統設定畫面。
请点选「系
统管理」进入系统设定画面。システム管理を行う時は
「管理」をクリックします。
시스템 관리는 "관리" 링
크를 클릭하십시오.
For system administration, click “Administration”. Bitte klicken
Sie auf den Link „Administration“ für die Systemverwaltung.
Pour l'administration du système, veuillez cliquer sur le
lien «Administration». Para la administración del sistema,
por favor, haga clic en el enlace "Administration". Para
gerenciamento do sistema, por favor selecione o link
“Administration”.
You must enter the administrator name and password
to login the system administration page.
進入系統管理
時必須先輸入系統管理者的帳號及密碼。請輸入正確的
帳號及密碼,然後按下「確定」。
进入系统管理时必
须先输入系统管理者的账号及密码。请输入正确的账号
及密码,然后按下「确定」。管理者のユーザー名とパ
スワードを入力してログインします。
그런 다음에 관
리자 이름 및 암호를 입력하여야만 시스템 관리 웹 페
이지에 들어갈 수 있습니다.
You must enter the administrator name and password to
login the system administration page. Sie müssen den
Administratornamen und das Kennwort eingeben, um die
Systemverwaltungs-Webseite zu öffnen. Vous devez ensuite
entrer le nom et le mot de passe de l'administrateur pour
entrer dans la page Web de l'administration du système.
Luego debe introducir el nombre y la contraseña del
administrador para entrar en la página web de administración
del sistema. Voce deverá digitar o nome do administrador
e a senha para entrar na página web de gerenciamento do
sistema.
Abnormal shutdown will lead to longer startup time for checking disk data in the next bootup. The checking process may take up to several
minutes depending on the hard disk capacity.
非正常的關機方式會造成在下次開機程序中硬碟進行資料檢查,此過程會導致較長的開機時間. 檢查的時間會因硬碟容量的大小而有差
異,過程可能需時數分鐘之久。
非正常的关机方式会造成在下次开机程序中硬盘进行数据检查,此过程会导致较长的开机时间. 检查的时间会因硬盘容量的大小而有差
异,过程可能需时数分钟之久。
不正なシャットダウンが行われると、次に起動する際、ディスク・データをチェックするため起動に時間がかかります。ハードディス
クの容量により、チェックには数分を要することがあります。
비정상적으로 종료하면 다음 부트 과정에서 디스크 데이터를 확인하기 위해 더 많은 시간이 소요될 수 있습니다. 확인하는 과정에서 하드
디스크 용량에 따라 수분이 걸릴 수 있습니다.
Abnormal shutdown will lead to longer startup time for checking disk data in the next bootup. The checking process may take up to several
minutes depending on the hard disk capacity.
Ein falsches Ausschalten kann dazu führen, dass der nächste Startvorgang viel länger dauert, da die Daten auf der Festplatte geprüft
werden. Je nach Festplattekapazität kann der Prüfvorgang bis zu einigen Minuten dauern.
Une fermeture anormale ralentira considérablement le prochain processus de démarrage pour vérier les données sur le disque. Le
processus de vérication peut durer jusqu'à plusieurs minutes, en fonction de la capacité du disque dur.
Un apagado anormal hará que el siguiente proceso de encendido sea mucho más largo para comprobar los datos del disco. El proceso
de comprobación puede llevar varios minutos dependiendo de la capacidad del disco duro.
Encerramento anormal do sistema fará com que o próximo processo de inicialização leve mais tempo para vericar as informações do
disco. O processo de vericação pode levar vários minutes dependendo da capacidade do disco rígido
Technical Support
技術支援
技术支持 テクニカル・サポート
기술 지원
Should you have any questions about the product, please feel free to contact us.
威聯通®提供貼心的線上支援及即時通客戶服務,您可以透過以下方法聯絡我們:
威联通
®
提供贴心的在线支持及实时通客户服务,您可以透过以下方法聫络我们:
製品に関するご質問は下記までお願いします。
제품에 관한 문의 사항은 당사에 연락하여 주십시오.
On-line Support: http://www.qnap.com/
MSN: q.support@hotmail.com
Skype: qnapskype
Forum: http://forum.qnap.com
Technical Support Technische Unterstützung Assistance
Technique Soporte Técnico Suporte Técnico
Should you have any questions about the product, please feel free to contact us.
Wenden Sie sich bitte an uns, wenn Sie Fragen zu dem Produkt haben.
Si vous avez des questions concernant le produit, n'hesitez pas à nous contacter.
Si tuviera alguna pregunta acerca del producto, por favor, no dude en ponerse en contacto con nosotros.
Se você tiver qualquer pergunta a respeito do produto, por favor sita –se a vontade para contactar-nos.
On-line Support: http://www.qnap.com/
MSN: q.support@hotmail.com
Skype: qnapskype
Forum: http://forum.qnap.com
To power off the system, press the front power button for 4 seconds until the system beeps once. The system will
start to shut down and turn off all the LEDs. Do not unplug the power cable directly to turn off the system.
關機時,
請連續按壓前方電源按鈕4秒直到系統發出一聲嗶的聲響,此時系統會開始關機作業,並且關閉前方面板的所有
LED燈號。請不要以直接拔去電源插頭的方式關閉系統。
关机时,请连续按压前方电源按钮4秒直到系统发出一声
哔的声响,此时系统会开始关机作业。并且关闭前方面板的所有LED灯号。请不要以直接拔去电源插头的方式关闭
系统。電源を切る時は正面の電源ボタンを4秒間押し、ビープ音がするのを確認してください。システムの終了
作業が開始され、全てのLEDが消灯します。完全にシステムが終了するまで電源コードを抜かないでください。
시스템의 전원을 끄려면, 시스템이 비프음을 한 번 울릴 때까지 4초 동안 앞 전원 버튼을 누르십시오. 시스템이 종
료하기 시작하고 종료되면 LED가 모두 꺼집니다. 시스템을 끄기 위해 직접 전원 케이블의 플러그를 뽑지 마십시
오.
To power off the system, press the power button for 4 seconds until the system beeps once. The system will start to shut
down and turn off all the LEDs. Do not unplug the power cable directly to turn off the system. Um das System auszuschalten,
drücken Sie bitte den Stromschalter vorne für 4 Sekunden, bis das System einmal einen Piepton abgibt. Das System startet
den Ausschaltvorgang. Alle LEDs erlöschen, nachdem der Vorgang abgeschlossen ist. Bitte das Netzkabel nie herausziehen
ohne vorher das System auszuschalten. Pour mettre le système hors tension, veuillez appuyer sur le bouton Marche/ Arrêt pendant
4 secondes, jusqu'à ce que le système émette un bip sonore. Le système commencera alors la procédure d'arrêt jusqu'à extinction
de tous les témoins LED. Para apagar el sistema, por favor, pulse el botón de Encendido de la parte frontal durante 4 segundos
hasta que el sistema emita un pitido. El sistema comenzará a apagarse, y cuando nalice todos los LEDs quedarán apagados.
Por favor, no desenchufe directamente el cable de alimentación para apagar el sistema. Para desligar o sistema, por favor
pressione o botão frontal de energia por 4 segundos até o sistema apitar uma vez. O sistema irá apagar, e todas as luzes LED
também irão se apagar. Por favor não desligue o cabo de alimentação diretamente para desligar o sistema.
Hub/Switch/
Router
Laptop
PC
V1.0
Português (Brasil)
Guia de Instalação Rápida
f. The rst page of the Quick Setup Wizard will be shown. Click “Next”
to continue and complete the conguration.
接下來便進入快速設定
精靈的首頁,請點選「下一步」,並繼續依步驟指示完成所有設定
程序。
接下来便进入快速设定精灵的首页,请点选「下一步」,
并继续依步骤指示完成所有设定程序。クイックセットアップウィ
ザードの最初のページが示されます。[次へ]をクリックして続行
し、構成を完了します。
빠른 설치 마법사의 첫 페이지가 표시됩
니다. “다음” 을 클릭하면 설치가 계속되어 구성이 완료됩니다.
Note: Make sure you have installed a hard disk on the NAS.
注意:請先確認您已經正確地安裝硬碟並鎖上螺絲。
注意:请先确认您已经正确地安装硬盘并锁上螺丝。
注意:NASにハードディスクを取り付けていることを確認してください。
참고: NAS에 하드 디스크가 설치되었는지 확인하십시오.
g. Follow the on-screen instructions to complete the conguration.
Please wait patiently when changing the system settings. The NAS
will restart after changing the settings.
依循螢幕上的指示完成設定
步驟,更改設定並進行變更後,Turbo NAS會重新啟動,之後即成功
地完成Turbo NAS的快速設定。請按『完成』繼續。
依循屏幕上的
指示完成设定步骤,更改设定并进行变更后,Turbo NAS会重新启
动,之后即成功地完成Turbo NAS的快速设定。请按『完成』继续。
オンスクリーンの指示に従って構成を完了します。システム設定
を変更するときは、気長にお待ちください。設定の変更後、NAS
が再起動します。
화면에 표시되는 지시사항을 따라 구성을 완료
하십시오. 시스템 설정이 변경될 때까지 기다리십시오. 설정이 변
경되면 NAS가 다시 시작됩니다.
Note: The conguration process may take up to twenty minutes if
you are using a hard disk drive with capacity larger than 500GB.
注意: 硬碟格式化的時間將視您的硬碟容量大小有所不同. 如果您所
使用硬碟容量是大於500GB, 格式化的過程可能需要到20分鐘的時
間。
注意: 硬盘格式化的时间将视您的硬盘容大小有所不同。如果
您所使用硬盘容量是大于500GB, 格式化的过程可能需要到20分钟的
时间。注意:500GB以上容量のあるハードディスクドライブを使用
している場合、設定プロセスが完了するまで約20分かかります。
참고: 용량이 500GB 이상인 하드 디스크 드라이브를 사용하는 경
우, 구성하는 데 최대 20분이 걸릴 수 있습니다.
h. After the quick setup completes, click “Finish”.
快速設定完成後,
請按「完成」。
快速设定完成后,请按「完成」。クイックセット
アップが完了したら、[終了] をクリックします。
빠른 설치가 완
료되면, “끝내기”를 클릭합니다.
To map the share folder on the NAS as your network drive, check
the option “Continue to map network drive for me” and proceed to
the following steps.
NAS提供數個網路資料夾,方便資料共用和存
取。若您要啟用網路資料夾服務,請勾選「繼續設定連線網路磁碟
機」,並依循以下步驟繼續設定。
NAS提供数个网路资料夹,方便
资料共享和存取。若您要启用网路资料夹服务,请勾选「继续设定
连线网路磁盘驱动器」,并依循以下步骤继续设定。ネットワーク
ドライブとしてNASに共有フォルダをマップするには、[引き続き
ネットワークドライブをマップする] オプションにチェックを入
れ、次のステップに進みます。
NAS에서 공유 폴더를 네트워크 드
라이브로 맵핑하려면, 옵션 “네트워크 드라이브 맵핑 계속” 을 선
택하고 다음 단계로 넘어가십시오,
The NAS provides several default network shares. Select the network share to map as network drive and click “Map
Network Drive”.
Turbo NAS 提供數種預設的網路資料夾以供分享及存取,選擇您所想要設定成為網路磁碟機的分享
資料夾並點選「連線網路磁碟機」。
Turbo NAS 提供数种预设的网络数据夹以供分享及存取,选择您所想要设定成
为网络磁盘驱动器的分享数据夹并点选「映射网络驱动器」。NASは、デフォルトのネットワーク共有を複数用意
しています。ネットワーク共有を選択してネットワークドライブとしてマップし、[ネットワーク ドライブの割
り当て] をクリックします。
NAS는 몇 가지 기본 네트워크 공유를 제공합니다. 네트워크 드라이브로 맵핑하려는
네트워크 공유를 선택한 다음 “네트워크 드라이브 연결” 을 클릭합니다.
Qdownload, Qmultimedia, Qusb, and Qweb are the default network shares for the use of Download Station,
Multimedia Station, external USB storage device (auto-copy function), and Web Server respectively. Qrecordings
is the default network share for the use of the Surveillance Station.
Qdownload、Qmultimedia、Qusb、Qweb是NAS
系統預設資料夾,為Download Station、Multimedia Station、USB Auto-copy和Web Server所使用,您亦可自由存放資
料。 Qrecordings是Surveillance Station(監控中心)專用的網路資料夾。
Qdownload、Qmultimedia、Qusb、Qweb是NAS
系统预设资料夹,为Download Station、Multimedia Station、USB Auto-copy和Web Server所使用,您亦可自
由存放资料。Qrecordings是Surveillance Station(监控中心)专用的网络文件夹。 Qdownload、Qmultimedia、
Qusb、Qwebはをれぞれダウンロードステーション、マルチメディアステーション、外部USBストレージデバイ
ス(自動コピー機能)、Webサーバーを使用するためのデフォルトのネットワーク共有です。Qrecordingsは
Surveillance Stationの使用におけるデフォルトのネットワーク共有です。
Qdownload, Qmultimedia, Qusb,
Qweb 은 각각 다운로드 스테이션, 멀티미디어 스테이션, 외장 USB 저장 장치(자동 복사 기능) 및 웹 서버의 사
용을 위한 기본 네트워크 공유입니다. Qrecordings는 Surveillance Station의 사용을 위한 기본설정 네트워크 공
유입니다.
Enter the default user name and password.
輸入使用者帳號及密碼。
输入使用者账号及密码。
デフォルトのユーザー名とパスワードを入力します。
기본 사용자 이름과 암호를 입력합니다.
Select the drive letter for the connection and click “Finish”.
選擇磁碟機代號並點選「完成」。
选择磁盘驱动器代号并点
选「完成」。接続用のドライブ文字を選択し、[Finish] (終
了)をクリックします。
연결에 대한 드라이브 문자를 선택한
다음 “끝내기” 를 클릭합니다.
Upon successful connection, you can start to use the
network share as a local drive in Windows Explorer.
連線成
功後,您可以開始使用Turbo NAS的分享檔案夾。 如同您電
腦主機上的硬碟般, 您可以在檔案總管點選並存取該分享檔案
夾。
联机成功后,您可以开始使用Turbo NAS的分享档案夹。
如同您计算机主机上的硬盘般, 您可以在档案总管点选并存取
该分享档案夹。接続が成功したら、Windows Explorerでロー
カルドライブとしてネットワーク共有の使用を開始できま
す。
연결이 성공적으로 끝나면, 이제 Windows Explorer에
서 네트워크 공유를 로컬 드라이브로 사용할 수 있습니다.
f. The rst page of the Quick Setup Wizard will be shown. Click “Next” to
continue and complete the conguration. Die erste Seite des Quick Setup
Wizard (Schnelleinstellungsassistenten) wird angezeigt. Klicken Sie zum
Fortsetzen auf „Weiter“ und schließen die Konguration ab. La première
page de l'Assistant d'installation rapide s'afche. Cliquer sur « Suivant »
pour continuer et terminer la conguration. Se mostrará la primera página
del Asistente para la Conguración Rápida. Haga clic en “Siguiente” para
continuar y completar la conguración. A primeira página do Assistente
de Instalação Rápida será mostrada. Clique “Seguinte” para continuar e
completar a conguração.
Note: Make sure you have installed a hard disk on the NAS.
Hinweis: Vergewissern Sie sich davon, dass Sie eine Festplatte in den NAS eingebaut haben.
Remarque : Assurez-vous d'avoir installé un disque dur sur le NAS.
Nota: Asegúrese de haber instalado un disco duro en el NAS.
Nota: Assegure-se de haver instalado o disco duro no NAS.
g. Follow the on-screen instructions to complete the conguration. Please
wait patiently when changing the system settings. The NAS will restart after
changing the settings. Befolgen Sie zum Abschließen der Konguration die
Anweisungen auf dem Bildschirm. Bitte haben Sie etwas Geduld, während
die Systemeinstellungen geändert werden. Der NAS startet nach den
Einstellungsänderungen neu. Suivre les instructions à l'écran pour terminer
la conguration. Veuillez patienter lorsque vous modiez les paramètres du
système. Le NAS redémarre après modication des paramètres. Siga las
instrucciones que aparecen en pantalla para completar la conguración. Por
favor, espere pacientemente cuando esté cambiando las conguraciones
del sistema. El NAS se reiniciará después de cambiar las conguraciones.
Siga as instruções sobre a tela para completar a conguração. Espere
pacientemente ao mudar as congurações do sistema. O NAS se reiniciará
depois de mudar as congurações.
Note: The conguration process may take up to twenty minutes if you are using a hard disk
drive with capacity larger than 500GB.
Hinweis: Der Kongurationsvorgang kann bis zu 20 Minuten dauern, wenn Sie eine
Festplatte mit einer Kapazität von über 500 GB nutzen.
Remarque: Le processus de conguration peut prendre jusqu'à vingt minutes si vous
utilisez un disque dur d'une capacité supérieure à 500GB.
Nota: El proceso de conguración puede llevar hasta veinte minutos si está usando un
disco duro con una capacidad mayor de 500GB.
Nota: O processo de conguração pode levar até vinte minutos se você estiver usando
uma unidade de disco duro com capacidade maior que 500GB.
h. After the quick setup completes, click “Finish”. Klicken Sie nach Abschluss
der Schnelleinrichtung auf „Fertigstellen“. Une fois l'installation rapide
terminée, cliquer sur « Terminer ». Cuando se haya completado la
conguración rápida, haga clic en “Finalizar”. Depois de completar a
conguração rápida, clique “Terminar”.
To map the share folder on the NAS as your network drive, check the
option “Continue to map network drive for me” and proceed to the following
steps. Damit Sie den Freigabeordner auf dem NAS als Netzwerklaufwerk
abbilden können, setzen Sie ein Häkchen bei der Option „Abbilden des
Netzwerklaufwerkes für mich fortsetzen“ und vollziehen die nachfolgenden
Schritte. Pour associer le dossier partagé sur le NAS en tant que lecteur
réseau, cocher l'option « Poursuivre en associant un lecteur réseau pour
moi »et passer aux étapes suivantes. Para asignar la carpeta de recursos
compartidos del NAS como su unidad de red, marque la opción “Continuar
asignando la unidad de red para mi” y continúe con los siguientes pasos.
Para mapear a pasta de compartilhamento no NAS como sua unidade de
rede, marque a opção “Continuar a mapear a unidade de rede para mim” e
proceda com os seguintes passos.
The NAS provides several default network shares. Select the network share to map as network drive and click “Map Network
Drive”. Das NAS bietet mehrere Standardnetzwerkfreigaben. Wählen Sie eine Netzwerkfreigabe aus, die als Netzwerklaufwerk
abgebildet werden soll und klicken auf „Netzlauferk verbinden“. Le NAS fournit plusieurs partages réseau par défaut. Choisir
le partage réseau à associer en tant que lecteur réseau et cliquer sur « Connecter un lecteur réseau ». El NAS proporciona
varios recursos compartidos de red por defecto. Seleccione el recurso compartido de red que quiere asignar como unidad de
red y haga clic en “Conectar a unidad de red”. O NAS proporciona diversos compartilhamentos de rede padrão. Selecione o
compartilhamento de rede para mapear como unidade de rede e clique “Mapear unidade de rede”.
Qdownload, Qmultimedia, Qusb, and Qweb are the default network shares for the use of Download Station, Multimedia Station,
external USB storage device (auto-copy function), and Web Server respectively. Qrecordings is the default network share for the
use of the Surveillance Station. Qdownload, Qmultimedia, Qusb und Qweb sind Standardnetzwerkfreigaben zur Nutzung von
Download Station, Multimedia Station, externer USB-Speichergeräte (Funktion zum automatischen Kopieren) bzw. Web Server.
Qrecordings ist die Standardnetzwerkfreigabe zur Nutzung der Surveillance Station. Qdownload, Qmultimedia, Qusb et Qweb
sont les partages réseau par défaut pour les utilisations respectives en tant que station de téléchargement, station multimédia,
dispositif de stockage externe USB (fonction de copie automatique), et serveur Web. Qrecordings est le partage réseau par
défaut pour l’utilisation de l’option Surveillance Station. Qdownload, Qmultimedia, Qusb, y Qweb son los recursos compartidos de
red por defecto para poder usar la Estación de Descarga, la Estación Multimedia, el dispositivo de almacenamiento USB externo
(función de copia automática) y el Servidor Web, respectivamente. Qrecordings es el recurso compartido por defecto para la
utilización de la Surveillance Station. Qdownload, Qmultimedia, Qusb, e Qweb são os compartilhamentos de rede padrão para
o uso da Estação de Descarregamento, Estação de Multimedia, dispositivo de armazenamento USB externo (função de auto-
cópia), e Servidor de Web respectivamente. Qrecordings é o compartilhamento de rede padrão da Surveillance Station.
Enter the default user name and password.
Geben Sie den Standardbenutzernamen und das Kennwort ein.
Saisir le nom d'utilisateur et le mot de passe par défaut.
Introduzca el nombre de usuario y la contraseña por defecto.
Entre o nome e a senha do usuário padrão.
Select the drive letter for the connection and click “Finish”. Wählen Sie
den Buchstaben des Laufwerkes für die Verbindung und klicken auf
„Fertigstellen“. Choisir la lettre de lecteur pour la connexion et cliquer
sur « Terminer ». Seleccione la letra de unidad para la conexión y
haga clic en “Finalizar”. Selecione a letra da unidade para a conexão
e clique “Terminar”.
Upon successful connection, you can start to use the network
share as a local drive in Windows Explorer. Nach erfolgreichem
Verbindungsaufbau können Sie mit der Nutzung der Netzwerkfreigabe
als lokaler Datenträger im Windows Explorer beginnen. Une fois la
connexion réussie, vous pouvez commencer à utiliser le partage
réseau comme lecteur local dans Windows Explorer. Cuando se
haya conectado con éxito, puede comenzar a usar el recurso
compartido en red como una unidad local en Windows Explorer.
Depois de conectar corretamente, você poderá começar a usar o
compartilhamento de rede como uma unidade local no Windows
Explorer.