Do you have a question about the Quoizel Inglenook TFIK8407VA and is the answer not in the manual?
Turn off electricity, consult an electrician if in doubt, and read all instructions before installation.
Disconnect power before bulb replacement and avoid subjecting glass parts to shock.
Remove excess oil film from new Tiffany shades with a paper towel.
Use lemon oil-based polish for cleaning and mineral oil for soldered joints.
Identify and inspect all parts before installation; contact customer service for missing or damaged items.
Attach the Crossbar Assembly to the Outlet Box using mounting screws.
Fit the backplate to the Crossbar Assembly and adjust screws for a snug fit.
Connect wires using connectors and tape, then carefully place into the Outlet Box.
Align backplate holes with mounting screws and attach the fixture body.
Install bulb and apply exterior grade caulk around the backplate for drainage.
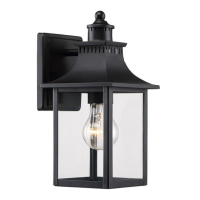
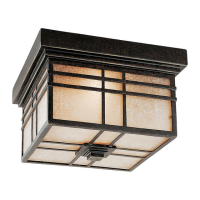
This document provides assembly and maintenance instructions for a Quoizel outdoor light fixture, model TFIK8407VA, designed in a Valiant Bronze finish. The fixture is intended for outdoor use and features a classic lantern-style design with glass panels.
The Quoizel TFIK8407VA is an outdoor wall-mounted light fixture designed to provide illumination for exterior spaces. It functions by housing a standard medium base bulb, which, when powered, emits light through its glass panels. The fixture is designed to be hardwired into an existing electrical system, allowing it to be controlled by a wall switch or other electrical controls. Its primary function is to enhance the aesthetic appeal and safety of outdoor areas by providing reliable lighting.
The fixture is designed for straightforward installation and use. It accommodates a single A19 Medium Base bulb with a maximum wattage of 100W, or an alternate 23W CFL bulb, offering flexibility in light output and energy efficiency. The assembly process involves attaching a crossbar assembly to an existing outlet box, connecting electrical wires, and then securing the fixture body to the crossbar. The backplate of the fixture is designed to sit flush against the wall, and the instructions emphasize the importance of applying exterior-grade caulk around the top and sides of the backplate to prevent moisture intrusion, while leaving the bottom uncaulked for drainage. This feature ensures the fixture's durability and proper functioning in outdoor environments.
The design allows for the fixture to be mounted in a specific orientation, as indicated by an arrow on the assembly diagram, ensuring the intended aesthetic and light distribution. The overall dimensions of the fixture are provided to help users plan its placement effectively. The fixture's robust construction and weather-resistant design make it suitable for various outdoor settings, such as porches, patios, or entryways.
Maintenance for the Quoizel TFIK8407VA primarily involves bulb replacement and general cleaning. To replace the bulb, users must first disconnect power at the circuit breaker and allow the existing bulb to cool before removal. The new bulb is then inserted and screwed snugly into place.
For cleaning, the instructions provide specific guidance for Tiffany-style shades, although this particular model features glass panels. For general cleaning of the fixture's metal and glass components, a gentle approach is recommended. The instructions advise against using harsh chemicals or abrasive materials that could damage the finish or glass. For the metal finish, a soft, damp cloth is typically sufficient.
The document also highlights a common characteristic of Tiffany-style shades, which may be relevant if the glass panels have a similar finish or if the user has other Tiffany-style fixtures. It mentions that a new Tiffany lamp shade often has an oil film for protection during shipment, which can be gently wiped away with a paper towel. For general cleaning of Tiffany shades, a gentle lemon oil-based furniture polish applied to a soft cloth is suggested. If a white powder appears on soldered joints (not directly applicable to this model's glass panels but relevant for general metal care), it's identified as a normal oxidation process, and a small amount of lemon oil or mineral oil can restore the appearance.
The emphasis on proper caulking during installation is also a key maintenance feature, as it prevents water damage and prolongs the life of the fixture. By following the caulking instructions, users can minimize the need for future repairs related to moisture intrusion. The fixture's design with easily accessible components for bulb replacement further simplifies ongoing maintenance.
Overall, the Quoizel TFIK8407VA is designed for ease of installation, reliable outdoor lighting, and straightforward maintenance, ensuring its longevity and continued aesthetic appeal in various outdoor settings.
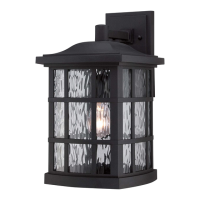
| Style | Traditional |
|---|---|
| Material | Aluminum |
| Finish | Vintage Aluminum |
| Height | 22 inches |
| Width | 16 inches |
| Bulb Type | E12 Candelabra |
| Dimmable | Yes |
| Category | Outdoor Light |
| Bulb Wattage | 60W |
| Fixture Type | Outdoor Wall Lantern |
| Type | Outdoor Light |
| Glass | Clear Seeded |
| Safety Rating | Wet |
| Voltage | 120 Volts |