Do you have a question about the Quoizel MBH8407K and is the answer not in the manual?
Read all warnings and cautions before installation to ensure safe and proper handling of the fixture.
Identify and inspect all parts before beginning installation to ensure all components are present and undamaged.
Unscrew lock screw, remove cage, glass shade, and tab. Place glass shade into cage and secure. Align fixture hood to cage and secure.
Pass supply wires through crossbar assembly. Attach crossbar to outlet box using green ground screw and outlet box screws.
Place backplate and fixture body onto crossbar assembly and secure with mounting balls. Adjust mounting screws for a snug fit.
Use standard wire connectors to join wires, twisting until tight. Wrap connections with electrical tape and stuff into outlet box.
Position backplate and fixture body onto crossbar assembly. Align holes and secure with mounting balls, tightening until snug.
Insert bulb snugly. Apply exterior grade caulk over top and sides of backplate for moisture drainage, avoiding the bottom.
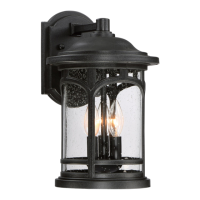
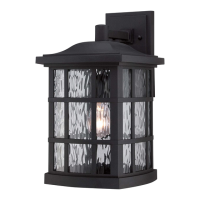
This document provides assembly instructions for the Quoizel MBH8407K outdoor wall lantern, a lighting fixture designed for exterior use. The fixture is intended to be mounted on a wall and provides illumination for outdoor spaces.
The Quoizel MBH8407K is an outdoor lighting fixture that uses a single A19 medium base bulb with a maximum wattage of 100W. Its primary function is to provide ambient or task lighting for exterior areas such as porches, patios, or entryways. The fixture features a classic lantern design with a matte black finish, a glass shade, and a protective cage. It is designed to be hardwired into an existing electrical outlet box. The assembly process involves securing a crossbar assembly to the outlet box, connecting electrical wires, attaching the fixture body and backplate, installing the bulb, and applying a silicone sealant to protect against moisture. The fixture's design ensures that it can only be mounted in a specific orientation, as indicated in the diagrams, which is crucial for proper installation and aesthetic alignment.
The MBH8407K is designed for straightforward installation by a licensed professional electrician, though the instructions are detailed enough for a DIY enthusiast with proper tools and safety precautions. Before beginning installation, users are advised to turn off electricity at the circuit breaker or main fuse box to prevent electrical shock. The estimated assembly time is between 30-45 minutes, assuming all parts are present and in good condition. The fixture's design allows for easy bulb replacement, though users must disconnect power and allow the bulb to cool before attempting removal. The inclusion of an alternate shorter mounting screw provides flexibility for installations where a standard mounting screw might be too long, ensuring a snug fit against the wall. The fixture's backplate and body are secured with mounting balls, which allow for minor adjustments to ensure the fixture sits flush against the wall. The final step of applying an exterior grade caulk around the backplate is a critical feature for outdoor use, preventing moisture from entering the electrical components and ensuring the longevity of the fixture. The instructions specifically advise against caulking the bottom of the backplate to allow for proper moisture drainage.
Maintaining the Quoizel MBH8407K involves basic cleaning and periodic checks. For general cleaning, users can refer to the Quoizel website for product-specific cleaning tips. Regular cleaning of the exterior surface and glass shade will help maintain the fixture's aesthetic appeal and ensure optimal light output. The matte black finish is durable but may benefit from occasional wiping with a soft, damp cloth to remove dirt and grime. The glass shade can be cleaned with a mild glass cleaner. It is important to avoid abrasive cleaners or harsh chemicals that could damage the finish or the glass. The silicone sealant applied during installation is crucial for moisture protection and should be inspected periodically for any cracks or deterioration. If the sealant shows signs of wear, it should be reapplied to maintain its protective barrier. When replacing the bulb, users should always ensure the power is off and the old bulb has cooled to prevent burns. The fixture is designed for easy access to the bulb by removing the cage and glass shade, as detailed in the initial assembly steps. Should any parts become damaged or go missing, Quoizel customer service can be contacted for replacement parts, ensuring the fixture can be maintained and repaired rather than fully replaced. The robust construction and thoughtful design, including moisture drainage provisions, contribute to the fixture's overall durability and ease of long-term maintenance in an outdoor environment.
| Category | Outdoor Light |
|---|---|
| Fixture Type | Wall Mount |
| Style | Traditional |
| Material | Metal |
| Extension | 8.5 inches |
| Number of Bulbs | 1 |
| Dimmable | Yes |
| Voltage | 120 volts |
| Safety Rating | Wet |
| Light Source | Incandescent |
| Lumens | 800 |
| Color Temperature | 2700K |
| Glass | Clear Seeded |