EasyManua.ls Logo

Quoizel MHE8406K - User Manual

Default Icon
6 pages
Print Icon
To Next Page IconTo Next Page
Loading...
Warnings and Cautions
Turn off electricity at circuit breaker or main fuse box before installation. Consult a licensed electrician if in doubt.
These instructions are provided for your safety. It is very important you read them completely before installing
the fixture. We strongly recommend that a licensed, professional electrician perform the installation.
Disconnect fixture from power source before replacing bulbs. Make sure bulbs are given sufficient time to cool
before removal. Do not subject glass parts to any shock while in operation or shattering may result.
Assembly Instruction Sheet #IS-MHE8406
For Styles MHE8406K and MHE8406VN
6 CORPORATE PARKWAY
GOOSE CREEK SC 29445
www quoizel com
,.
..
Part
Description
Quantity
A Crossbar
1pc.
2 pcs.
2 pcs.
2 pcs.
B
C
D
E
F
Hex Nut
Lock Washer
Package Contents
A
B
C
D
E
Mounting Screw
G
1pc.
2 pcs.
Lock Ball
Fixture Loop
F
H
I
1pc.
G
H
I
Fixture Body
1pc.
4 pcs.
Panel
Cage
J
J
2 pcs.
Lock Screw
Thank you for purchasing a Quoizel product.
Need assistance with parts or assembly? Call Quoizel customer service at 1-631-273-2700
or visit us on-line at www.quoizel.com
1of6
Pleasegoto forproductcleaningtips.Gotothe selection.
(1)MediumBase100WMaximum,AlternateBulb(1)23WCFL.
20-30minutes
Identifyandinspectallpartsbeforebeginninginstallation.Checkpackagecontentlistanddiagrams
belowtobesureallpartsarepresent.Ifanypartsaremissingordamaged,donotattempttoassemble,install,or
operatethefixture.Contactcustomerserviceforreplacementparts.
www.quoizel.com Care+Maintenance
LightSource:
EstimatedAssembly Time:
Preparation:
ToolsRequired:Flatheadscrewdriver,Phillipsscrewdriver, pliers, wire cutters, wire strippers, electrical tape, safety
glasses.
2015 Quoizel Inc.
September2015
K
Alternate Mounting Screw
2 pcs.
K
Rev.A
Question and Answer IconNeed help?

Do you have a question about the Quoizel MHE8406K and is the answer not in the manual?

Summary

Warnings and Cautions

Electrical Safety and Installation Advice

Turn off electricity before installation. Consult a licensed electrician if unsure.

Fixture and Bulb Handling Precautions

Disconnect power before replacing bulbs and allow cooling. Avoid shock to glass parts.

Package Contents

Component Identification and List

Check package contents against the list and diagrams for all parts.

Assembly Steps

Attach Fixture Loop to Fixture Body

Thread the Fixture Loop onto the Nipple on top of the Fixture Body.

Secure the Flat Scroll

Rotate the Flat Scroll and pull its end into the Fixture Loop.

Attach Panels to Cage

Insert Panels into the Cage slots and secure top tabs.

Attach Cage with Panels to Fixture Body

Align Cage slots with Fixture Hood studs and secure with Lock Screw.

Mount Fixture to Crossbar

Attach Mounting Screws, Lock Washers, and Hex Nuts to the Crossbar.

Attach Crossbar to Outlet Box

Secure the Crossbar to the Outlet Box using Outlet Box Screws.

Make Wire Connections

Connect white, black, and ground wires using standard connectors.

Attach Fixture Body to Mounting Screw

Place Fixture Body backplate over mounting screws and thread Lock Balls.

Install Bulb

Insert a standard screw base bulb, maximum 100 watts.

Apply Silicone Sealer

Caulk around the top and sides of the backplate, avoiding the bottom.

Overview

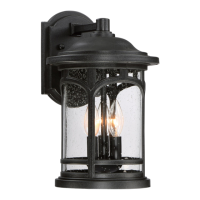
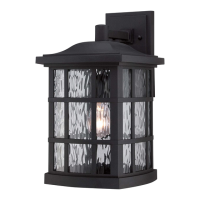
This document is an assembly instruction sheet for the Quoizel outdoor wall lantern, specifically for styles MHE8406K (Mystic Black finish) and MHE8406VN (Veneto finish). It provides comprehensive guidance for installing and maintaining the fixture.

Function Description:

The Quoizel MHE8406 series is an outdoor wall lantern designed to provide illumination for exterior spaces. It features a decorative design with a flat scroll, a fixture body, glass panels, and a cage, all intended to be mounted to an outdoor outlet box. The fixture is designed to house a single medium base bulb, offering ambient lighting for outdoor environments.

Important Technical Specifications:

  • Light Source: The fixture uses one (1) medium base bulb with a maximum wattage of 100W. An alternate bulb option is one (1) 23W CFL. Bulbs are not supplied with the fixture.
  • Dimensions:
    • Overall width (from the wall): 7.5 inches
    • Overall height: 15.5 inches
    • Fixture body width (at the widest point): 7 inches square
    • Backplate dimensions: 6 inches high x 4.5 inches wide
    • Glass panel height: 6.5 inches
  • Finishes: Available in Mystic Black (MHE8406K) and Veneto (MHE8406VN).
  • Replacement Part: Clear Seedy Glass Panel (Part Number G3778PA), with 4 required per fixture.
  • Electrical: Designed for standard household electrical connections. Requires connection to an outlet box.
  • Outdoor Rating: The fixture is designed for outdoor use and requires the application of exterior-grade caulk during installation to ensure proper moisture drainage and weather resistance.

Usage Features:

  • Decorative Design: The lantern features a classic outdoor aesthetic with a decorative flat scroll and a caged glass enclosure, suitable for enhancing the curb appeal of a home.
  • Easy Bulb Replacement: The design allows for straightforward access to the socket for bulb installation and replacement.
  • Versatile Bulb Options: Supports both incandescent (up to 100W) and CFL (23W) medium base bulbs, offering flexibility in lighting choice.
  • Secure Mounting: The fixture is designed to be securely mounted to an outdoor outlet box using a crossbar, mounting screws, lock washers, hex nuts, and lock balls, ensuring stability and safety.
  • Glass Panels: The clear seedy glass panels provide a diffused light output and contribute to the fixture's aesthetic.

Maintenance Features:

  • Cleaning: Users are directed to www.quoizel.com for product cleaning tips, specifically under the "Care + Maintenance" section.
  • Bulb Replacement: Disconnect the fixture from the power source and allow bulbs sufficient time to cool before removal to prevent injury.
  • Parts Replacement: The manual lists a replacement part (Clear Seedy Glass Panel) and provides contact information for customer service (1-631-273-2700) or online support (www.quoizel.com) for assistance with parts or assembly.
  • Weather Sealing: The installation process includes a critical step to apply exterior-grade silicone sealer around the backplate to protect against moisture, ensuring the longevity and proper functioning of the outdoor fixture. It explicitly states not to caulk the bottom of the backplate to allow for moisture drainage.
  • Pre-installation Inspection: Users are advised to identify and inspect all parts before beginning installation to ensure all components are present and undamaged, preventing issues during assembly. If parts are missing or damaged, contact customer service for replacements.

Installation Process Overview:

The installation involves several steps:

  1. Attach Fixture Loop: Thread the fixture loop onto the nipple on top of the fixture body.
  2. Fix Flat Scroll: Rotate the flat scroll to the top of the fixture and pull its end into the fixture loop.
  3. Attach Panels to Cage: Insert glass panels into the slots at the bottom of the cage and fold tabs at the top to secure them.
  4. Attach Cage to Fixture Body: Align slots and holes, then secure the cage to the fixture hood with lock screws.
  5. Attach Mounting Screws to Crossbar: Thread mounting screws (with lock washers and hex nuts) into the crossbar.
  6. Attach Crossbar to Outlet Box: Secure the crossbar to the outdoor outlet box using outlet box screws (not supplied).
  7. Make Wire Connections: Connect the supply wires (white, black/red, ground) from the outlet box to the corresponding fixture wires using wire connectors and electrical tape.
  8. Attach Fixture Body to Mounting Screw: Place the backplate over the mounting screws and secure with mounting balls, applying caulk into the threads of the mounting balls.
  9. Install Bulb: Insert the appropriate medium base bulb (max 100W incandescent or 23W CFL).
  10. Apply Silicone Sealer: Apply exterior-grade caulk around the top and sides of the backplate, leaving the bottom unsealed for drainage.

Safety Precautions:

  • Always turn off electricity at the circuit breaker or main fuse box before installation.
  • Consult a licensed electrician if in doubt about electrical connections.
  • Read instructions completely before installing.
  • Wear safety glasses during installation.
  • Do not subject glass parts to shock to prevent shattering.

Quoizel MHE8406K Specifications

General IconGeneral
BrandQuoizel
ModelMHE8406K
CategoryOutdoor Light
LanguageEnglish

Related product manuals