EasyManua.ls Logo

Quoizel MBH8409PN - User Manual

Quoizel MBH8409PN
2 pages
Print Icon
To Next Page IconTo Next Page
Loading...
Package Contents
1of2
B
Crossbar Assembly
x1
Figure 3
STEP 2 Install Crossbar Assembly-
.
A. Pass the supply wires through the Crossbar Assembly (B). Attach
the Crossbar Assembly (B) to the Outlet Box with the head of the
Green Ground Screw facing you. Secure it with Outlet Box Screws
(not included). Tighten until snug
Note: Use the Alternate Shorter Mounting Screw (C) if your
installation requires a shorter mounting screw.
STEP 3 Test Fit the Backplate to the Crossbar Assembly-
A. Remove the mounting balls from the Crossbar Assembly (B). Place
the backplate and Fixture Body (A) onto the Crossbar Assembly (B)
and secure with mounting balls. Note: The backplate and Fixture
Body (A) should be snug against the wall and held tight with the
mounting balls. If it is not, adjust the length of the mounting screws
or alternate short mounting screws on the Crossbar Assembly (B)
by unscrewing the preassembled hex nut and lock washer and then
screwing the mounting screws or alternate short mounting screws
in or out of the crossbar until the correct length is achieved. Once
A
Fixture Body
x1
Pleasegoto forproductcleaningtips.Gotothe selection.
Flatheadscrewdriver,Phillipsscrewdriver,pliers,wirecutters,wirestrippers,electricaltape,safetyglasses.
(3)B10CandelabraBaseBulbs60WMaximum
30-45minutes
Identifyandinspectallpartsbeforebeginninginstallation.Checkpackagecontentlistanddiagramsbelowtobesureallpartsare
present.Ifanypartsaremissingordamaged,donotattempttoassemble,install,oroperatethefixture.Contactcustomerserviceforreplacement
parts.
www.quoizel.com Care+Maintenance
ToolsRequired:
LightSource:
EstimatedAssemblyTime:
Preparation:
Fixturecanonlybemountedinthedirectionindicatedonpage2.
Warnings and Cautions
Assembly Instruction Sheet #IS-MBH8409PN_R1
For Style MBH8409PN
6 CORPORATE PARKWAY
GOOSE CREEK SC 29445
www quoizel com
,.
..
Turn off electricity at circuit breaker or main fuse box before installation. Consult a licensed electrician if in doubt.
These instructions are provided for your safety. It is very important you read them completely before installing the fixture. We strongly
recommend that a licensed, professional electrician perform the installation.
Disconnect fixture from power source before replacing bulbs. Make sure bulbs are given sufficient time to cool before removal.
C
Alternate
Mounting
screw
x2
Mounting Screw
or Alternate Short
Mounting Screw
Supply Wires with
Ground Wire
B
Outlet Box Screws
(not included)
Outlet Box
Figure 2
Hex Nut and
Lock Washer
A
Mounting Ball
B
Mounting Screw
or Alternate Short
Mounting Screw
Backplate
2017 QuoizelInc.
Thank you for purchasing a Quoizel product.
Need assistance with parts or assembly? Call Quoizel customer service at 1-800-645-3184
or visit us on-line at www.quoizel.com
RevisedDate:2017-8-03
Figure 1
Fixture Hood
Cage
Tab
Glass Shade
Lock Screw
the backplate and
Fixture Body (A) is
secure, remove the
mounting ball and
Fixture Body (A) and
proceed to Step 4.
STEP 1 Instal Shade-
A.
A Remove the Styrofoam from
inside of the shade.
B. Place Glass Shade into the Cage, secure by place the Tab into the
Cage press on the Glass Shade.
C. Align the label “A” on the bottom of the fixture hood to the label “A”
on the top edge of the cage. Place the fixture hood onto the top
edge of the cage and secure with lock screws. Hand tighten until
snug with screwdrivers.
Unscrew the Lock Screw, remove the Cage, the Glass Shade and
the Tab from the Fixture Body ( ).
Label “A”
Label “A”
Question and Answer IconNeed help?

Do you have a question about the Quoizel MBH8409PN and is the answer not in the manual?

Summary

Safety and Preparation

Warnings and Cautions

Provides essential safety advice regarding electricity and professional installation.

Preparation and Parts Check

Instructions for inspecting all parts and preparing for the installation process.

Assembly Steps

Install Shade Assembly

Steps for attaching the glass shade and cage to the fixture body.

Install Crossbar Assembly

Instructions for mounting the crossbar assembly to the outlet box.

Test Fit Backplate to Crossbar

Procedure to test fit the backplate and fixture body before final mounting.

Wiring and Final Assembly

Wire Connections

Guide for making secure electrical wire connections using connectors and tape.

Install Fixture Body

Instructions for securing the backplate and fixture body onto the crossbar assembly.

Install Bulb and Apply Sealant

Steps for bulb installation and applying exterior caulk for weather sealing.

Overview

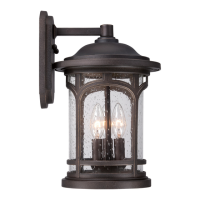
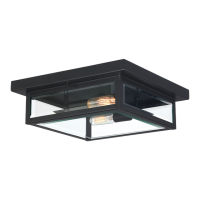
The Quoizel MBH8409PN is an outdoor wall-mounted lantern designed for residential use, featuring a Palladian Bronze finish. This fixture is part of Quoizel's product line and is identified by the style number MBH8409PN.

Function Description:

The primary function of the Quoizel MBH8409PN is to provide ambient and accent lighting for outdoor spaces, such as porches, patios, or entryways. It is designed to be hardwired into an existing electrical system and mounted directly to an outdoor wall. The fixture utilizes candelabra base bulbs to emit light, which is diffused through a glass shade, creating a decorative and functional light source. The design incorporates a cage-like structure around the glass shade, contributing to its aesthetic appeal and providing protection for the bulb.

Important Technical Specifications:

  • Style Number: MBH8409PN
  • Finish: Palladian Bronze
  • Light Source: Requires (3) B10 Candelabra Base Bulbs.
  • Maximum Wattage: Each bulb should not exceed 60W.
  • Dimensions:
    • Width: Approximately 9 inches in diameter.
    • Height: Approximately 14.5 inches.
    • Extension from wall: Approximately 10 inches.
    • Backplate Diameter: Approximately 5.5 inches.
  • Mounting: Designed for wall mounting, with the fixture intended to be oriented in a specific upward direction as indicated in the instructions.
  • Electrical Connection: Hardwired, requiring connection to standard household supply wires (white, black/red, and ground).

Usage Features:

  • Aesthetic Design: The Palladian Bronze finish and lantern-style design with a decorative cage and glass shade contribute to an elegant and traditional outdoor aesthetic.
  • Easy Bulb Replacement: Bulbs are accessible by removing the cage and glass shade, allowing for straightforward replacement when needed.
  • Directional Mounting: The fixture is designed to be mounted in a specific upward direction, which is important for both aesthetic and functional reasons, ensuring proper light distribution and water drainage.
  • Outdoor Rating: As an outdoor fixture, it is designed to withstand various weather conditions, though proper sealing with exterior grade caulk is recommended during installation to prevent moisture intrusion.

Maintenance Features:

  • Cleaning: For product cleaning tips, users are directed to the Quoizel website (www.quoizel.com) under the "Care + Maintenance" section. This suggests that specific cleaning instructions or products may be recommended to maintain the finish and appearance of the fixture.
  • Bulb Replacement: The design allows for easy access to the bulbs for replacement. It is crucial to disconnect the fixture from the power source and allow bulbs to cool sufficiently before attempting replacement to prevent injury.
  • Sealing: The installation instructions emphasize the importance of applying exterior grade caulk around the top and sides of the backplate to prevent moisture from entering the electrical box. However, it explicitly states not to caulk the bottom of the backplate to ensure proper moisture drainage, which is a critical maintenance consideration for outdoor fixtures.
  • Inspection: Before installation, users are advised to identify and inspect all parts for any missing or damaged components. This proactive step helps ensure the longevity and proper functioning of the fixture.
  • Professional Installation Recommendation: Quoizel strongly recommends that a licensed, professional electrician perform the installation. This ensures that the wiring is done correctly and safely, minimizing potential electrical issues and extending the life of the fixture.
  • Customer Support: Quoizel provides customer service via phone (1-800-645-3184) and online (www.quoizel.com) for assistance with parts or assembly, indicating a commitment to supporting product maintenance and troubleshooting.

Installation Process Overview:

The installation process involves several steps:

  1. Shade Installation: Attaching the glass shade into the cage and then securing the cage to the fixture body using lock screws.
  2. Crossbar Assembly Installation: Securing the crossbar assembly to the outlet box on the wall, ensuring the ground screw faces outwards. The instructions note the option to use shorter mounting screws if needed.
  3. Test Fit Backplate: Temporarily attaching the fixture body and backplate to the crossbar assembly with mounting balls to adjust the length of the mounting screws for a snug fit against the wall.
  4. Wire Connections: Connecting the fixture's wires (white, black, and ground) to the corresponding supply wires from the outlet box using standard wire connectors and electrical tape.
  5. Fixture Body Installation: Permanently securing the backplate and fixture body to the crossbar assembly using mounting balls.
  6. Bulb Installation and Sealing: Inserting the bulbs into the sockets and applying exterior grade caulk around the top and sides of the backplate, leaving the bottom unsealed for drainage.

The estimated assembly time is 30-45 minutes, and basic tools such as screwdrivers, pliers, wire cutters, wire strippers, electrical tape, and safety glasses are required. The fixture's design emphasizes both ease of assembly and long-term durability through proper installation and maintenance practices.

Quoizel MBH8409PN Specifications

General IconGeneral
BrandQuoizel
ModelMBH8409PN
CategoryOutdoor Light
LanguageEnglish

Related product manuals