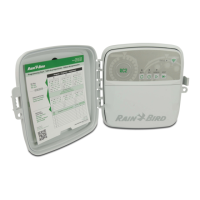
The Rain Bird RC-4C, RC-7C, RC-1260C, and RC-7A are series of irrigation controllers designed for wall mounting in sheltered areas, providing automatic and semi-automatic control over landscape irrigation systems. These controllers are built for durability and ease of use, offering various features for scheduling and system management.
Function Description
The primary function of these controllers is to automate the watering of landscapes by managing multiple irrigation stations. They allow users to set specific watering schedules based on time of day and day of the week, ensuring efficient water distribution. The controllers operate by sending electrical signals to system control valves, opening and closing them according to the programmed schedule. A built-in transformer provides the necessary 26.5 VAC output for the station valves. The system also includes a circuit breaker to protect against current overload, automatically resetting once the issue is resolved.
Usage Features
The controllers feature several interactive components for programming and monitoring:
-
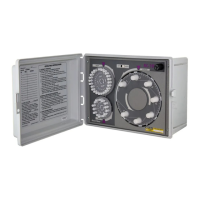
HOUR DIAL with 23 CYCLE START PINS (A): This dial allows users to schedule automatic watering "Starts" on any hour, excluding midnight (which is reserved for day changeover). It features 23 captive pins that can be pushed in or pulled out to activate or deactivate a start time. Embossed characters clearly indicate AM/PM, noon, and midnight for easy identification.
-
DAY DIAL with 14 SCHEDULING PINS (B): This calendar dial enables scheduling irrigation for specific days within a two-week period. Each of the 14 captive pins represents a 24-hour period starting at midnight. Embossed characters adjacent to each day of the week facilitate scheduling.
-
STATION SELECTOR/INDICATOR DIAL (C): This dial serves multiple purposes. It contains the timing controls for each station and automatically rotates during a watering cycle, displaying the current active station at the top under a station pointer. A "REST" position indicates when the system is off and not watering. This dial can also be used for manual selection of any station for semi-automatic operation.
-
STATION TIME CONTROL KNOBS (D): Individual knobs are provided for each station to adjust watering duration. Timing is adjustable from 3 to 60 minutes (6 to 60 minutes for the RC-1260C model). A small white arrow on each knob moves along a timing scale on the Station dial (C), providing a visual indication of the set time. The scale is marked in 5-minute graduations, and the knob's ratchet action allows for precise 1-minute adjustments. An "OFF" position on each knob allows users to omit a station from the watering schedule, causing the controller to "rapidly advance" through omitted stations to the next timed one.
-
OPERATIONAL MODE SWITCH (E): This 2-position switch controls the system's operating mode. The "AUTO" position activates automatic irrigation as scheduled and allows for "timed" watering of manually selected stations. The "OFF" position is used for system shutdown during rainy weather or maintenance, eliminating controller output to the valves without interrupting the internal clock operation.
-
CIRCUIT BREAKER RESET BUTTON (F): A built-in circuit breaker protects the controller from damage due to current overload. This button allows users to reset the breaker after the source of the trouble has been remedied.
-
CURRENT STATION INDICATOR (G): This indicator identifies the station currently being operated by the controller.
-
CURRENT TIME INDICATOR (H): This indicator displays the current time on the controller's internal clock.
-
CURRENT DAY INDICATOR (I): This indicator shows the current day according to the watering schedule.
Setting the Controller:
To set the clock, the MODE switch should be in the OFF position. The HOUR dial is rotated clockwise to align the current time with the TIME pointer, observing AM/PM numerals. For precise adjustment, users can push in the pin for the upcoming hour and slowly rotate the dial until a "click" is heard. The DAY dial is rotated to align the current day with the DAY pointer. Finally, the STATION dial is rotated counterclockwise to the "REST" position.
Scheduling Automatic Operation:
Before setting the automatic schedule, ensure HOUR and DAY pins are in the "out" position. Users push in pins on the DAY dial for desired watering days (each pin represents a 24-hour period starting at midnight). Then, pins on the HOUR dial are pushed in for desired start times. Multiple starts can be scheduled within a day. Station timing is set using the STATION TIME CONTROL KNOBS, with the first mark (square dot) representing approximately 3 minutes. The small white arrow indicates the set time, and ratchet notches allow for 1-minute increments. The "OFF" position omits a station from the schedule.
Semi-Automatic Operation:
The controller can be operated in a semi-automatic mode by rotating the STATION dial counterclockwise to position the desired station just ahead of the Station pointer. The system will then advance to the selected station's timing zone, operate for the set duration, and then proceed through the remaining stations in sequence until it returns to the "REST" position.
Rain Shutdown:
For temporary system shutdown due to rain, repairs, or other work, the MODE switch can be moved to the "OFF" position. This stops controller output to the valves without affecting the internal clock, preventing both automatic and semi-automatic operation.
Master Valve and Pump Start Capability:
The controllers support master valve wiring, connecting to the controller's black Master Valve lead and the common output. If a master valve is not used, the black Master Valve lead should be taped to prevent shorting. The RC series controllers can also activate an optional 24-volt AC relay for pump motors using the "MASTER VALVE" and "VALVE COMMON" connections, enabling pump start capability.
Maintenance Features
The Rain Bird RC series controllers are designed for years of trouble-free service and generally require no preventative maintenance or lubrication. In the event of trouble, users are advised to consult the troubleshooting chart provided in the manual for possible remedies. If the issue persists or is isolated to the controller mechanism, the entire panel assembly can be removed from the cabinet and returned to a local distributor for repair. Technical support is also available via a toll-free phone number.