EasyManua.ls Logo

Rain Bird RC-4C - User Manual

Rain Bird RC-4C
9 pages
To Next Page IconTo Next Page
Loading...
1
RC-4C
RC-7C
RC-1260C
RC-7A
Instruction
Manual
RC-7A
(The RC-4C and RC-1260C Controllers have similar controls and features.)
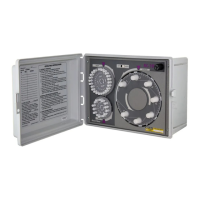
DESCRIPTION OF CONTROLS Refer to Figure 1
A. HOUR DIAL with 23 CYCLE START PINS: The HOUR dial contains 23 pins for
scheduling automatic "Starts" on any hour (except midnight - which is day changeover
time). Embossed characters provide quick identification for each hour, AM or PM,
noon and midnight. Captive type pins are designed for simple push-pull operation.
B. DAY DIAL with 14 SCHEDULING PINS: The calendar DAY dial contains 14 cap-
tive pins for scheduling irrigation everyday or any day within a two week range. Each
pin represents a 24 hour period beginning at midnight. Embossed characters are on
the dial, adjacent to each day of the week.
C. STATION SELECTOR/INDICATOR DIAL: The STATION selector/indicator dial
contains the timing controls for each of the stations. The dial automatically rotates dur-
ing a watering cycle with the current station appearing at the top under the station
pointer. REST indicates the system is off and no watering is taking place. The dial is
also used for manual selection of any station for semi-automatic operation.
Figure 1

Questions and Answers

Rain Bird RC-4C Specifications

General IconGeneral
Number of Zones4
Stations4
DisplayLCD
Rain Sensor InputYes
Battery BackupNo
Cycle and SoakNo
Manual WateringYes
Weather ResistantNo

Summary

Description of Controller Components

Hour Dial with Cycle Start Pins

Hour dial with 23 pins for scheduling automatic starts on any hour, excluding midnight.

Day Dial with Scheduling Pins

Calendar dial with 14 pins for scheduling irrigation daily or within a two-week range.

Station Selector;Indicator Dial

Dial for station timing controls, manual selection, and status indication.

Additional Controller Features

Station Time Control Knobs

Individual timing controls for each station, adjustable from 3 to 60 minutes.

Operational Mode Switch

2-position switch for automatic, timed, or rainy weather shutdown.

Circuit Breaker Reset Button

Button to reset the built-in circuit breaker protecting against overload.

Current Station Indicator

Indicator identifying the current position of controller operation.

Current Time Indicator

Indicator showing the current time on the controller clock.

Current Day Indicator

Indicator showing the current day of the watering schedule.

Installation Guide

Controller Mounting

Details on wall mounting the controller cabinet in sheltered areas.

Electrical Connections

Valve Output Wiring

Wiring instructions for connecting station valves to output leads and common.

Master Valve Wiring

Instructions for connecting a master valve to the controller.

Main Power Wiring

Connecting the 120V AC supply to the controller.

Pump Start Capability

Using the controller with pump start relays for pump motors.

Electrical System Checkout

System Checkout Procedure

Procedure to verify the controller and system are functioning correctly before final setup.

Setting the Controller Clock

Controller Clock Setting

Steps to set the correct time and day on the controller clock.

Automatic Operation Scheduling

Automatic Operation Scheduling

How to program watering schedules using HOUR and DAY dials.

Semi-Automatic Operation

Semi-Automatic Operation

Operating the controller in semi-automatic mode by manually selecting stations.

Rain Shutdown

Rain Shutdown Procedure

How to temporarily shut down the system using the OFF position.

Maintenance

Maintenance Information

Information on the controller's design for trouble-free service and maintenance.

Troubleshooting

Troubleshooting Common Issues

Common difficulties, possible causes, and remedies for controller issues.

Related product manuals