Fig.6
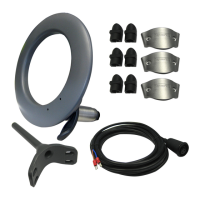
DISHED WHEEL
METAL WHEELS
To attach the drive unit to the wheel:
l Place the drive unit with the clamping
face uppermost i.e. drive motor and
gearbox tube downwards.
0 Position one spacer at each of the
three attachment positions (if the
wheel is dished).
0 Remove the.wheel and place it on top
of the drive unit making sure the face
which is nearest the pedestal is
downwards.
l Place the clamps over the spokes and
lightly tighten the bolts supplied
(Fig. 7).
Fig.7
FIXING BOLT
SPOKE
CLAMP
\
\
DRIVE UNIT
SPACER (IF REQUIRED)
WOODEN WHEELS
A separate attachment kit is available
from your Autohelm stockist for use with
wooden wheels (Catalogue number
D119).
MOUNTING THE PEDESTAL BRACKET
The pedestal bracket pin should be cut to
length to suit the pedestal as follows:
l Replace the wheel and measure the
distance between the backplatc of
ttre
drive unit and the pedestal (dimension
A Fig. 8).
If
the wheel is slightly bent,
Fig.8
3
u
the distance will change with the
wheel position. The smallest distance
should! be
me,asured.
The mounting
pin should be cut 11 mm (0.40in)
longer.than dimension A (Fig. 9).
Fig.9
I*..‘!?
t
““”
)I
CUT HERE
Remove any burrs and place the plast.*&,
cap supplied over the cut end.
l Slide the wheel forward and place the
pin end with the plastic cap in the slot
(Fig. 10)
l Remove the wheel and mark round the
inside of the four holes.
Fig.10
DRIVE UNIT
BACK PLATE
SLOT
l Drill four 4.0mm (5/32in) diameter
holes with the drill bit supplied
(Fig. 12).
Fig.12
PEDESTAL
BRACKET
PIN
l Return the wheel to its normal position
and with the pin mid-way in the slot,
carefully mark round the bracket to
record its position (Fig. 1 1).
l Attach the bracket and lightly tighten
the screws.
l Replace the wheel making sure the pin
locates in the bracket. Turn the wheel
to confirm the bracket is correctly
positioned. If the wheel is slightly bent,
or the wheel drive slightly off centre,
the pin will move up and down in the
slot of the backplate. Provided the pin
does not reach the end of the slot this
movement is acceptable.
l Fully tighten all four screws.
A

 Loading...