Do you have a question about the ReadiVac EAZE and is the answer not in the manual?
The safety alert symbol warns of potential personal injury hazards.
Never remove or tamper with warning labels or safety devices on the vacuum.
Read the manual carefully before operating. Use only as described and manufacturer's recommended charger.
Do not vacuum hazardous materials like lead-based paint to avoid bodily injury.
Do not use or store near flammable liquids or combustible materials.
Do not pick up burning or smoking items like cigarettes or hot ashes.
Do not incinerate the product, as batteries can explode in fire.
Do not put objects into openings or block airflow. Keep body parts away from openings.
Do not use the vacuum without the filter in place; it's a fire hazard.
Do not allow children to use the product as a toy. Keep them supervised.
Do not pull the charging cord, keep it away from heat, and grasp the plug, not the cord.
Do not handle the charger plug with wet hands. Turn off controls before charging.
Do not leave the vacuum plugged in if not used for 30 days or more.
Do not charge outdoors or on wet surfaces to reduce electric shock risk.
Do not use with a damaged cord or plug. Contact service if unit malfunctions.
Do not drop or throw the unit. This can cause damage and hazardous conditions.
Use extra care when cleaning on stairs or ladders to prevent falls.
Product may expose you to chemicals known to cause cancer. See www.P65Warnings.ca.gov.
Intended for indoor household use on light dry dust and debris only, not for liquids.
Do not vacuum flammable vapors or dust, or use near combustible liquids or gases.
Do not vacuum anything that is smoking or burning, such as hot ashes.
Never vacuum toxic materials as vapors or dust can cause health hazards.
Do not vacuum materials like plaster or cement that can harden with water.
Product is not a toy. Keep children and pets away. Never use on pets.
Never use a damaged vacuum or AC adapter. Contact service for issues.
Do not mutilate or incinerate battery packs; dispose according to local laws.
Do not plug/unplug the AC adapter with wet hands.
Do not place or drop the product into water. Unplug immediately if it falls in water.
Do not charge if the power cord is cut or wires are exposed.
Keep adapter cord and product away from heated surfaces.
Do not unplug by pulling the cord. Grasp the charger plug, not the cord.
Do not put stress on the adapter cord where it connects to the product.
Do not use extension cords or outlets with inadequate current carrying capacity.
Do not operate if damaged. Do not repair yourself; contact service.
Do not immerse the adapter cord, plug, or appliance in water or other liquids.
Not for persons with reduced capabilities unless supervised or instructed by a responsible person.
Do not operate the vacuum cleaner while charging to avoid heat damage.
Use only as described in this manual.
If battery liquid contacts skin or eyes, wash immediately with water and seek medical attention.
Locate charger indoors in a cool, dry area, away from weather.
Keep your work area well lighted for safety.
Use only manufacturer's recommended attachments for safety and warranty.
Do not charge the vacuum cleaner outdoors.
Do not use outdoors or on wet surfaces. Keep product within 40°C (104°F).
Unplug electrical appliances before vacuuming them.
Do not touch the rotating parts of the power brush when in operation.
Do not put objects into openings or block airflow. Keep clear of dust, lint, hair.
Do not vacuum metal objects like screws, nails, or tacks.
Empty the dust container after each use to maintain airflow and performance.
Keep hair, clothing, fingers away from openings and moving parts.
Never place the vacuum nozzle near your face, especially eyes and ears.
Do not use without a filter; it voids the warranty. Keep fingers out of fan chamber during servicing.
Be careful when using the product on stairs to prevent falls.
Keep vacuum cleaner terminals free of objects to avoid burns from inserted metals.
Only use the provided AC/DC charger. Incorrect ones can cause injury and void warranty.
Do not store outdoors or in vehicles, as heat can cause batteries to explode.
Failure to follow safeguards may result in personal injury or death.
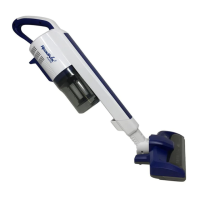
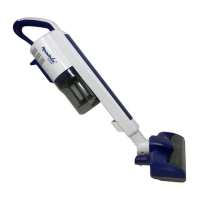
Diagram showing components like Handle, Motor Housing, Nozzle, Filters, and Dust Container.
Diagram showing accessories like Extension Tube, Stand Base, Floor Brush, Crevice Tool, and Small Brush.
Ensure the vacuum cleaner is fully charged before initial use.
Full charge takes 4-6 hours. Red LED indicates charging, Blue LED indicates fully charged.
Charge the vacuum cleaner in an environment ranging from 50°F to 104°F (10°C to 40°C).
If not used for over 1 month, fully charge the vacuum cleaner before storage.
Li-ion batteries are hard-wired. Tampering voids warranty and can cause injury/explosion.
Use only the AC/DC Charging Adapter provided with the product.
Do not use the machine to vacuum while it is being recharged.
Place vacuum on Stand Base and connect Charger Cord Pin to Recharging Port.
Plug the charger into the wall socket. Red LED indicates charging, Blue LED indicates complete.
Unplug charger from socket first, then remove cord pin from port after recharging.
Press power switch to cycle between High, Medium, Eco modes. Long press to turn OFF.
Flashing Blue LED means low battery. Flashing Red LED means battery has run out.
LED lights indicate status: Pink=High, Red=Medium, Blue=Low, No Light=Off.
Red LED indicates charging. Blue LED indicates fully charged. Red & Blue flashing indicates issue.
High: 1 press. Medium: 1 more press (or 2 if off). Low: 1 more press (or 3 if off).
Battery pack temperature may rise during continuous use; allow to cool before recharging.
Charger temperature may be slightly higher than usual during recharging; this is normal.
Unplug the AC/DC wall charger adapter from the socket if not used for a long time.
Floor brush attaches with a click. LED lights on nozzle will light up during use.
LED blinks red, unit shuts down if hair jams floor brush. Remove and clean brush regularly.
Insert Crevice Tool securely. It attaches with a click.
Extension tube attaches with a click. Push Release Button to detach.
Illustration shows connecting Extension Tube with Power Brush.
Illustration shows connecting Extension Tube with Crevice Tool and Small Brush.
LED blinks red, unit shuts down if object jams floor brush. Remove and clean brush.
Insert the Eaze into the Stand Base properly. Store Crevice Tool in the Crevice Holder.
Clean Dust Container and filters regularly. Turn off unit and unplug if charging.
Press blue Release Button on bottom to remove Dust Container from vacuum.
Grip filter handle to remove Outer Filter from dust container. Check EPA Filters.
Dust may spill during filter removal. Empty over a waste bin for cleanliness.
Illustration shows disposing of accumulated dust.
Restore filter handle to original position and attach Dust Container to main body.
Align protrusion on main body with hole in Dust Container, push until it clicks securely.
Ensure Dust Container is securely installed with a 'click' sound, or it may drop off.
Wipe the machine body with a dry soft cloth. Use diluted neutral detergent for tough dirt.
Clean parts with a dry soft cloth. Dispose dust, wash container with warm water. NEVER wash Floor Nozzle.
Remove Outer Filter, then EPA Filter. Clean surface debris with a soft brush. Rinse filters and ensure completely dry.
Do not use a stiff brush on filters; it can cause damage. Never machine wash or dry filters.
Push protrusions to remove EPA filter. Install new filter, ensuring Seal Ring is present.
Lint/hair can cause overload shutdown. LED flashes RED, unit stops. Remove and clean brush.
Turn off machine, release floor brush. Rotate brush by hand and remove hair/string.
Slide Release Knob down, open brush door, and remove Bristle Brushroller.
Remove all debris/hair from brushroll ends. Cut tangled hair. Ensure white end cap rotates freely.
Install Bristle Brush in reverse order: black drive end first, then white end cap. Ensure cover is secure.
Specifications include 18V batteries, dimensions for handheld/stick modes.
DC 18V motor. Adapter input AC 100-240V, output DC 22V 500mA.
Li-Ion 2000mAh battery, 4-6 hr recharge, 160W power consumption.
Weights: 1.2kg (Handheld), 1.9kg (Stick). Dust Cup Capacity: 300 ml.
Unit for household use only. Commercial use voids regular warranty.
One-year limited warranty for defects in materials/workmanship for original purchaser.
Contact for RA number. Returns must have RA number visible. Customer pays shipping.
Warranty excludes damage from accident, abuse, misuse, neglect, or improper maintenance.
Consumer warranty applies to US/Canada. Product has no warranty if used outside these regions.
Limited warranty replaces all other warranties. No liability for consequential damages.
| Brand | ReadiVac |
|---|---|
| Model | EAZE |
| Category | Vacuum Cleaner |
| Language | English |