Water heater connection to the water supply system
IMPORTANT note that in ALL cases the DIELECTRIC JUNCTIONS MUST be
connected to the heater before any other connection is made. This is very
important as they prevent an electrolytic reaction occurring and safeguard
the heater against potential aggressive corrosion.
Only the use of copper pipe is recommended for connection to the heater. If
any other material is used it must be able to withstand 90°C at 8 bar
pressure for long periods.
When water is heated it expands. In a small unvented water heater of this type
the expansion can normally be accommodated back into the cold water mains, as
indicated in the water regulations.
This heater requires a minimum of 1.7metres of pipe prior to the nearest
cold water draw off. (see diagram 5).
IMPORTANT. If the mains supply to the unit is in excess of 6.0 bar a pressure
reducing valve will be required to prevent the pressure relief valve from
discharging all the time.
IMPORTANT. DO NOT fit any stop-cocks or non-return valves within the distance
required for expansion. The 1.7metre distance is for 15mm pipe this can be
approximately halved for 22mm pipe.
Where the this is not possible the installer will need to fit a set of cold water
controls. Which comprises of a pressure reducing valve (set at 3.5 bar), a non-
return valve and expansion vessel charged to 3.5 bar, the expansion is then
accommodated in the vessel.(see diagram 6)
All connections are ½"BSP. Fasten the dielectric junctions to both Hot and Cold
connections.
Fit Pressure relief valve in the cold water feed to the unit close to the inlet (blue)
and install the pipework from the valve to drain via a tundish.
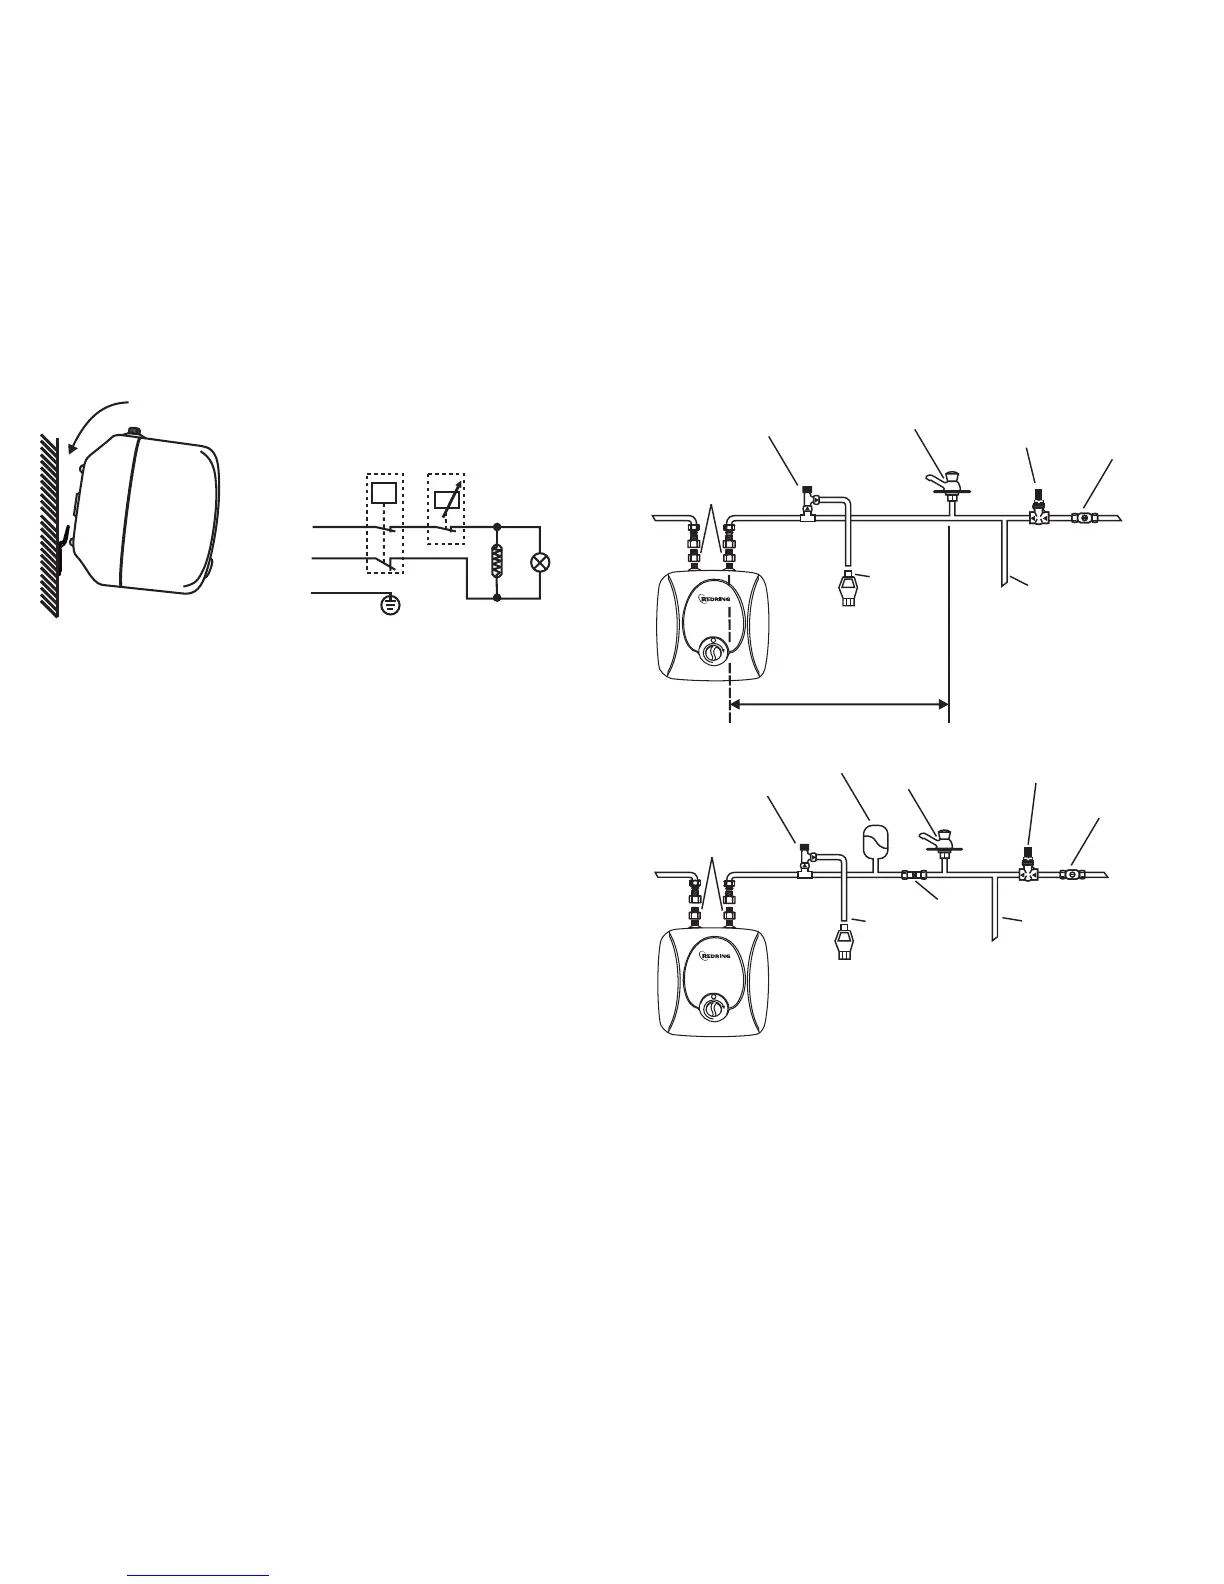
Hook unit on the wall bracket (diagram 3)
ATTENTION! Don’t place objects, which are not
waterproof under the appliance under any
circumstances.
L
E
N
7
3
4
Dielectric
Junctions **
Hot
Cold
Pressure relief valve
(6 bar) **
Nearest cold water
draw-off
Pressure reducing valve
(3.5 bar) if mains
is > 6bar *
Isolating valve
for service
Cold
water
mains
Supply to other parts
of plumbing system
Discharge
to drain
via tundish*
1.7m of 15mm pipe
is required for expansion
** Supplied with unit
* Not included
Pressure relief valve
(6 bar) **
Nearest cold water
draw-off
Pressure reducing valve
(3.5 bar) *
Isolating valve
for service
Cold
water
mains
Dielectric
Junctions **
Hot
Cold
Supply to other parts
of plumbing system
Discharge
to drain
via tundish*
Expansion vessel
(charge set to 3.5bar)
Non-return
valve *
*
** Supplied with unit
* Not included
HIGH
LOW
HIGH
LOW
PERIODIC MAINTENANCE
In hard water areas, with normal use lime scale will be deposited upon the heating element’s surface.
Over time, this builds up and lessens the heat exchange between the heating element and water,
which could make the system run hotter and the thermostat may switch on and off more frequently.
Redring recommends preventive maintenance of your water heater at least every EVERY year by a
qualified technician - protective maintenance must include cleaning and inspection of the anode
protector, replacing it if necessary.
In order to clean the appliances use a damp cloth. Do not clean with abrasive or detergents that
contain solvents . Do not pour water over the appliance.
8
5
6
Typical installation with
expansion allowed in the
incoming pipework
Typical installation where the expansion
cannot be accommodated
in the incoming pipework
 Loading...