04
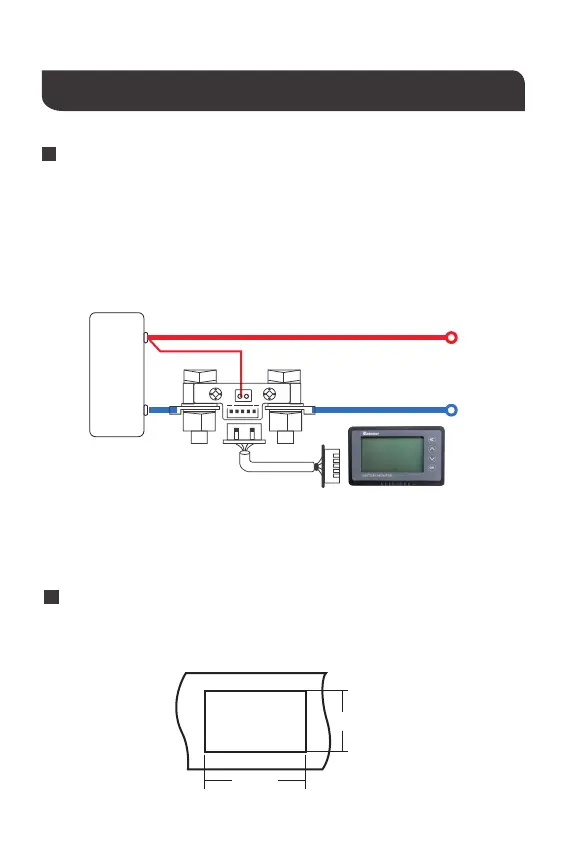
Attention: Please connect as shown. The shunt must be series connected to the negative
circuit, DO NOT connect to the positive circuit.
The Renogy Battery Monitor is fixed by tabs, so it is easy to install. First, open a rectangular
orifice on your equipment panel according to the size. Then put The Renogy Battery
Monitor into the rectangular orifice, and make sure the tabs are locked.
Mounting
Installation
First, connect the Shunt in series to the negative circuit of your battery. B- of shunt connects
to B- of the battery. P- of shunt connects to P- of output and C- of charge.
Then take a wire of 0.3-0.75 mm². One end of the wire connects to positive of battery,
another end connects to B+ of Shunt (either one is ok).
Finally connect the Shunt to the Renogy Battery Monitor by the shielded wire and the
screen of the Renogy Battery Monitor display should turn on.
Connection/Setup
Connection diagram of Shunt/Sampler:
B- P-
P+(output+)
C-(charge-)
P-(output- )
Sampler
B+
B+
Battery
B-
+
-
Shielded wire
Panel
94mm
57mm
⑤
⑥
④
③
⑧
⑨
①
⑦
②

 Loading...