Do you have a question about the Reolink Go PT Plus and is the answer not in the manual?
Lists the numbered physical components of the Reolink Go PT Plus camera.
Identifies and describes the various ports and status LEDs on the camera.
Explains the meaning of different LED status light behaviors for network connection.
Outlines the initial steps for setting up the camera, including SIM activation and app setup.
Provides step-by-step instructions for inserting the SIM card into the camera.
Details the process of connecting the camera to a mobile network after SIM insertion.
Guides users through the initial setup of the camera using the Reolink mobile application.
Provides instructions for mounting the camera in various locations such as walls, ceilings, or trees.
Details the physical parameters and general operational specifications of the solar panel.
Step-by-step guide on choosing a location, mounting the bracket, and connecting the solar panel.
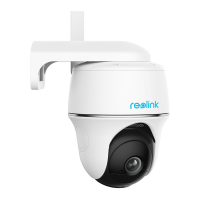
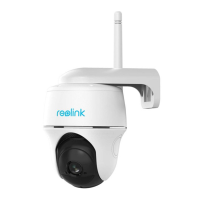
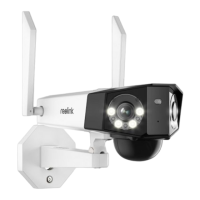
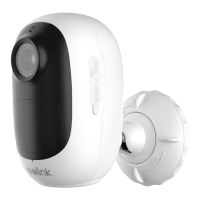
The Reolink Go PT Plus is a 100% wire-free outdoor surveillance camera designed for use with 4G LTE and 3G networks, eliminating the need for Wi-Fi or complex wiring. It offers an expansive viewing angle with 355° pan and 140° tilt capabilities, making it an ideal security solution for large areas such as warehouses or wooded locations.
Setting up the camera involves a few straightforward steps. First, you'll need to activate your SIM card, ensuring it supports WCDMA and FDD LTE, and disable any PIN codes on it using a smartphone or by contacting your network carrier. It's important not to insert IoT or M2M SIM cards into your smartphone. Once the SIM card is ready, rotate the camera lens to remove the rubber cover, then insert the SIM card. The SIM card slot is located above the SD card slot; ensure the gold contacts face down and the trimmed corner is pushed fully into the camera. If you're also inserting an SD card, its gold contacts should face up. After inserting the cards, firmly press the rubber cover back into place to ensure waterproof performance.
To connect to the mobile carrier network, turn on the camera. A red LED will illuminate solidly for a few seconds before turning off. Subsequently, a blue LED will flash briefly and then become solid before turning off, accompanied by a voice prompt "Network connection succeeded," indicating a successful connection. If the connection fails, various status light patterns and voice prompts will guide you through troubleshooting. For instance, a solid red LED that then flashes indicates the camera cannot recognize the SIM card or there's a PIN code. A red LED that flashes slowly about once per second means the camera cannot register with the mobile carrier network. A red LED that flashes quickly three times in one second suggests a data call failure or a need to input the APN. If the red LED flashes, then a blue LED flashes and goes off completely, the network connection has failed. If the red LED flashes, then a blue LED flashes and becomes solid, the network connection has succeeded.
The camera can be set up using the Reolink App. Begin by tapping the "+" icon in the top right corner to add a camera. You can then scan the QR code on the back of the camera or manually input the 16-digit UID number. Next, create a login password and name your camera. You'll then select the installation scene (indoor or outdoor) and finally tap "Finish" to complete the initialization.
When installing the camera, note that battery cameras are not designed for 24/7 continuous recording; they wake up when motion events are triggered or when accessed via the app or client to conserve battery. The camera detects events using a PIR motion sensor, so proper installation is crucial to reduce false alarms and save battery power. Avoid pointing the camera at frequently moving objects, strong light sources, heat sources, or mirrors. Also, avoid placing it too close to strong signal interference.
There are three primary installation methods. For wall mounting, drill holes using the provided template and screw the security mount to the wall. If needed, use the included drywall anchors. Then, screw the antenna onto the camera. For optimal network connection, it's recommended to install the antenna upward or horizontally. Finally, screw the camera onto the security mount and adjust its direction. For ceiling mounting, pull the button on the security mount and unscrew the bracket to separate its two parts. Install the bracket base on the ceiling with screws, then align the camera with the bracket and turn it clockwise to lock it in position. For installation with a loop strap, which is suitable for strapping the camera to a tree, thread the provided strap through the slots of the plate and fasten it to the tree. Then, attach the camera to the plate as you would for wall or ceiling mounting. It's recommended to install the camera upside down to prevent water from flowing into the microphone hole.
The Reolink Solar Panel is an optional accessory designed to charge Reolink battery-powered cameras. It converts sunlight into electricity, offering a cost-effective and environmentally friendly charging solution. The more direct and stronger the sunlight, the more electricity it produces. When installing the solar panel, choose a location that receives the most sunlight throughout the year. The panel only needs a few hours of direct sunlight daily to sufficiently power your camera, though energy production is affected by weather, seasons, and geographic location. Mount the bracket using the provided template and screws, then slot the solar panel into the bracket, ensuring it's secure. Loosen the adjustment knob on the bracket to adjust the panel's angle for maximum direct sunlight, then re-tighten the knob. Finally, connect the solar panel to the camera using the micro USB cable.
For maintenance of the solar panel, ensure it is not blocked, as even a small obstruction can drastically reduce its energy harvesting efficiency. Avoid installing the solar panel completely horizontally, as dust and debris can accumulate easily; an angular installation is advised. Regularly wipe the solar panel to remove dust or debris. The batteries should be charged in temperatures between 0°C and 45°C (32-113°F), as the solar panel will not charge the camera below 0°C (32°F). Ensure the camera is fully plugged in and that the waterproof wire cover protects the interface between the camera and the solar panel.
| Type | IP security camera |
|---|---|
| Remote viewing | Yes |
| Placement supported | Indoor & outdoor |
| Connectivity technology | Wireless |
| Form factor | Spherical |
| Mounting type | Wall |
| Product color | White |
| Tilt angle range | 0 - 140 ° |
| Angle of rotation | 355 ° |
| Sensor type | - |
| Number of lenses | 1 |
| LED type | IR |
| Night vision distance | 10 m |
| Number of illumination LEDs | 6 |
| Total megapixels | 4 MP |
| Maximum resolution | 2048 x 1080 pixels |
| Audio system | 2-way |
| 4G standard | LTE |
| SIM card type | NanoSIM |
| Mobile network generation | 4G |
| Power source type | Battery |
| Internal memory | 32000 MB |
| Compatible memory cards | MicroSD (TransFlash) |
| Maximum memory card size | 128 GB |