Do you have a question about the Resource ALTEA Work 90 and is the answer not in the manual?
Ensures proper assembly and installation by a licensed contractor or trained professional.
Installation must be performed by at least two people for safety and proper assembly.
Secure the wall bed in four locations using appropriate hardware, selecting anchors suited to wall composition.
Ensure all hardware is properly tightened, and no parts are left loose or unstable.
Warranties are valid only if the product is properly assembled and installed by a trained professional.
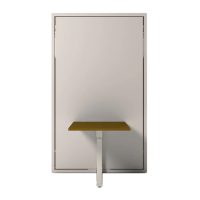
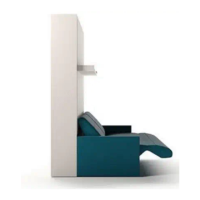
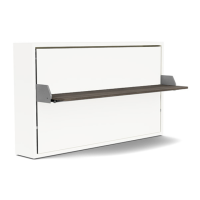
Illustrates the Altea 90/120 Work in closed and open bed configurations with key dimensions.
Details recommended weight and dimensions for Altea 90 and 120 mattresses.
Lists and illustrates the numbered parts of the Altea 90/120 Work system.
Lower levers and verify symmetric retraction of locking pins; adjust cables if necessary.
Detailed steps for loosening, adjusting, and locking the cable using specific wrenches.
Detailed list of all parts with their respective codes and quantities.
List of tools needed for assembly, including Allen wrenches of various sizes.
Visual guide to all structural hardware components (A-I) with their quantities and usage.
Notes on required personnel (2 people) and wall anchor selection for solid concrete walls.
Steps 1-4 detail connecting panels using hardware A and B and initial securing.
Step 5 shows how to attach the back panels using hardware C.
Step 6 illustrates attaching mounting brackets (D) using hardware E.
Step 7 details installing the optional wand light fixture before the headboard.
Step 8 explains how to level the structure using adjustable feet and a level.
Step 9 details attaching the unit securely to the wall using metal angle mounting brackets.
Step 10 describes installing the mattress bar and metal base plate before inserting the bed base.
Step 11 shows attaching the base plate using hardware F and I.
Step 12 illustrates inserting the bed base into the assembled structure.
Step 13 shows the operation of the closing mechanism with a "clack" sound.
Step 14 details securing the bed base using hardware G.
Lists additional structural hardware components (A-E) with quantities.
Steps 15-17 cover attaching the desk mechanism and initial connection.
Steps 18-19 show aligning the desk and connecting it using hardware B.
Steps 20-21 detail lowering the desk mechanism and securing it with hardware C.
Steps 22-25 cover final adjustments and securing of the desk using hardware D.
Instructions for operating the desk, including latch engagement and disengagement.
Step 1 details opening the bed, requiring the table to be in the open position.
Step 2 shows the process for closing the bed, including safety latch engagement.
Warning against opening the bed when the table is in a vertical position.
Warning against closing the bed when the table is attached.
Step 26 emphasizes cleaning and drying the back panel surface before installation.
Step 27 shows removing the protective film from the attachment points.
Step 28 instructs to apply pressure to the headboard in velcro areas for at least 30 seconds.
Step 29 shows opening the bed to place the mattress and secure it with straps.
Steps 1-4 detail the process of opening the wall bed, including releasing safety latches.
Steps 1-4 describe closing the wall bed, including removing bedding and engaging safety latches.
| Brand | Resource |
|---|---|
| Model | ALTEA Work 90 |
| Category | Indoor Furnishing |
| Language | English |