EasyManua.ls Logo

RIDGID R2720 - User Manual

RIDGID R2720
20 pages
Print Icon
To Next Page IconTo Next Page
Loading...
OPERATOR’S MANUAL
3 in. x 21 in. BELT SANDER
VARIABLE SPEED
DOUBLE INSULATED
R2720
SAVE THIS MANUAL FOR FUTURE REFERENCE
Your belt sander has been engineered and manufactured to our high standard for dependability, ease of operation, and
operator safety. When properly cared for, it will give you years of rugged, trouble-free performance.
WARNING:
To reduce the risk of injury, the user must read and understand the operator’s manual before using this product.
Thank you for buying a RIDGID product.
Question and Answer IconNeed help?

Do you have a question about the RIDGID R2720 and is the answer not in the manual?

Summary

Introduction

General Safety Rules

Work Area Safety

Guidelines for maintaining a safe work environment.

Electrical Safety

Precautions for safe electrical connections and usage.

Personal Safety

Guidelines for operator's personal protection and alertness.

Service

Procedures and requirements for tool servicing.

Specific Safety Rules

Safety Precautions

Specific guidelines to prevent injury during operation.

Symbols

Service

Warning

Electrical

Double Insulation

Explanation of double insulation safety feature.

Electrical Connection

Proper connection to power supply.

Extension Cords

Guidelines for selecting and using extension cords.

Features

Product Specifications

Technical specifications of the belt sander.

Know Your Belt Sander

Familiarization with tool features and safety rules.

Dust Collection Bag

Description of the dust collection system.

Belt Tension Release Lever

Function of the belt tension release lever.

Adjustable Front Handle

Adjusting the front handle for operation.

Power Cord

Information about the power cord.

Lighted Plug

Function of the lighted plug.

Ergonomic Design

Design considerations for handling and comfort.

Assembly

Unpacking

Steps for unpacking the tool and checking contents.

Packing List

List of items included with the tool.

Operation

Applications

List of intended uses for the belt sander.

Selecting Sanding Belts

Guidance on choosing the correct sanding belts.

Setting the Belt Sander Speed

Chart and advice for setting belt speed.

Variable Speed

Explanation of the variable speed control dial.

Proper Hand Placement

Recommended hand positions for safe operation.

Turning On;Off the Sander

Instructions for activating and deactivating the tool.

Soft Start Feature

Description of the soft start motor function.

To Install;Change Sanding Belt

Procedure for replacing the sanding belt.

To Adjust Front Handle

Steps to adjust the front handle position.

Locking on the Sander

How to engage the lock-on feature for continuous operation.

Operating the Sander

Techniques for using the sander on a workpiece.

To Adjust Sanding Belt Tracking

How to align the sanding belt for optimal performance.

Dust Bag

Instructions for installing, removing, and emptying the dust bag.

Maintenance

General Maintenance

General cleaning and care of the tool.

Lubrication

Information on the tool's lubrication requirements.

Brush Replacement

Procedure for replacing worn carbon brushes.

Timing Belt Replacement

Steps to replace the internal timing belt.

Warranty

3 Year Limited Service Warranty

Details of the 3-year limited warranty coverage.

90-Day Satisfaction Guarantee Policy

Policy for customer satisfaction within 90 days.

How to Obtain Service

Instructions on how to get the tool serviced.

What Is Not Covered

Exclusions from the warranty coverage.

Additional Limitations

Legal limitations and disclaimers related to the warranty.

Overview

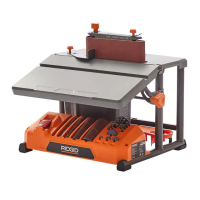
This document is an operator's manual for a RIDGID 3-inch x 21-inch Variable Speed Double Insulated Belt Sander, model R2720. It provides comprehensive instructions for safe operation, assembly, maintenance, and troubleshooting, ensuring users can effectively utilize the tool for various sanding tasks.

The belt sander is engineered for dependability, ease of operation, and operator safety, designed to provide years of rugged, trouble-free performance when properly cared for. It is suitable for sanding wood, metals, plastics, and other materials, as well as smoothing rough boards, chamfering, rounding edges, and removing rust, paint, varnishes, and stains.

Usage Features:

The sander incorporates several features to enhance user experience and performance:

  • Switch Trigger: To turn the sander ON, the switch trigger is depressed. Releasing it turns the sander OFF.
  • Lock-On Button: This feature allows the user to lock the switch trigger in the ON position, enabling extended periods of operation without continuously holding the trigger. If the lock-on feature is engaged and the sander is accidentally disconnected from power, it should be disengaged immediately. Users are advised not to lock the switch trigger if sudden stops might be necessary.
  • Variable Speed Control Dial: The sander features a variable speed control dial, ranging from A (slowest) to F (fastest). This allows the operator to adjust the belt speed from 800 to 1,500 feet/min, optimizing it for different materials and desired finishes. A chart is provided in the manual to guide proper speed selections for various applications.
  • Soft Start Feature: This function ensures the motor gradually ramps up to the selected top speed. If the sander is stopped and reactivated, it will gradually return to the previous speed setting once the switch trigger is pressed again.
  • Tracking Knob: This knob allows for easy adjustment of the sanding belt's tracking. Proper adjustment ensures the belt runs correctly on the rollers, preventing it from running off the sander or contacting internal parts.
  • Adjustable Front Handle: The front handle can be adjusted using a supplied hex key, providing comfort and ease of operation in different positions and at various angles.
  • Proper Hand Placement: For optimal control and safety, the sander is designed for two-handed operation, with a stationary rear handle and an adjustable front handle. Users are instructed to hold the front handle with the left hand and the rear handle with the right hand, keeping hands clear of the sanding belt.
  • Lighted Plug: The power cord features a lighted plug, which helps users easily identify live tools.
  • Ergonomic Design: The tool's design prioritizes comfort and ease of operation, accommodating different positions and angles during use.

Sanding Belt Selection and Operation:

Selecting the correct size and type of sanding belt is crucial for achieving a high-quality finish. Aluminum oxide, silicon carbide, and other synthetic abrasives are recommended for power sanding. Generally, coarse grit removes more material, while fine grit produces a better finish. The manual advises starting with a coarse grit for rough surfaces, then progressing to medium and finer grits until the desired uniform finish is achieved.

When operating the sander, workpieces should be clamped or secured to prevent movement. Before placing the sander on the work surface, the switch trigger should be squeezed to allow the motor to reach maximum speed. The sander is then lowered to the work surface with a slight forward motion, guided by the front handle and controlled by the rear handle, moving slowly over the work. Allowing the sander to remain in one place will result in an uneven surface. The sander's weight is designed to provide the proper pressure on the sanding belt; excessive pressure can lead to uneven work, clogged belts, premature belt wear, reduced removal rate, motor damage, and irregular belt tracking. The front roller is not designed for contour sanding, as this can cause tracking irregularities and damage the roller.

Maintenance Features:

The manual outlines several maintenance procedures to ensure the sander's longevity and performance:

  • General Maintenance: Users are advised to avoid using solvents when cleaning plastic parts, as most plastics are susceptible to damage from commercial solvents. Clean cloths should be used to remove dirt, dust, oil, and grease. Brake fluids, gasoline, petroleum-based products, and penetrating oils should not come into contact with plastic parts, as they can damage or destroy plastic, potentially leading to serious injury.
  • Dust Collection Bag: The sander includes a dust collection bag that attaches to the exhaust hole, minimizing dust during operation. For efficient collection, the bag should be emptied when half full. The manual provides instructions for installing, removing, and emptying the dust bag. A critical warning is issued against using the dust collection bag when sanding metal, as this creates a fire hazard. Additionally, collected sanding dust from surface coatings like polyurethanes and linseed oil can self-ignite, so frequent emptying of the dust bag and proper storage are emphasized.
  • Belt Tension Release Lever: This lever facilitates quick and easy changes of sanding belts. To install or remove a belt, the tension release lever is lifted to release tension, and then lowered to secure the new belt. Users must ensure the sanding belt's arrow (if present) points in the direction of rotation (clockwise when viewed from the open side of the sander) to prevent hazardous conditions.
  • Brush Replacement: The belt sander is equipped with externally accessible brushes. The manual provides instructions for checking and replacing brushes, advising replacement of both brush assemblies if either has less than 1/4 inch of carbon remaining. Brushes should be reassembled securely but not overtightened.
  • Timing Belt Replacement: Instructions are given for replacing the timing belt, which involves removing the dust bag, sanding belt, and belt cover. The old timing belt is removed, and a new one is installed over the small pulley first, then pressed onto the large pulley while turning it. The belt cover and screw are then reassembled and tightened. A warning states that the sander should never be operated without the belt cover in place.
  • Lubrication: All bearings in the tool are pre-lubricated with a high-grade lubricant for the life of the unit under normal operating conditions, meaning no further lubrication is required by the user.

Safety Information:

The manual emphasizes reading and understanding all instructions to reduce the risk of electric shock, fire, and serious injury. It covers work area safety, electrical safety, and personal safety, including wearing eye protection, dust masks, and hearing protection. It also advises against operating power tools while tired or under the influence of drugs, alcohol, or medication. Users are warned to keep hands and fingers clear of moving parts, dress properly, and avoid overreaching. Regular inspection of power tool cords and extension cords for damage is also highlighted.

RIDGID R2720 Specifications

General IconGeneral
TypeRandom Orbit Sander
Power SourceCorded
Voltage120V
Dust CollectionYes
Variable SpeedYes
Orbit Diameter3/32 inches
Pad Size5 inches
Cord Length8 feet
Weight3.5 lbs

Related product manuals