Do you have a question about the RIDGID R41121 and is the answer not in the manual?
Guidelines for user awareness, alertness, and common sense during operation, including fatigue and impairment.
Ensures a clean, well-lit workspace, keeping children and bystanders away, and avoiding explosive atmospheres.
Rules for safe use of power tools concerning plugs, cords, avoiding wet conditions, and using GFCI protection.
Advice on using the correct tool, maintenance, proper footing, and avoiding loose clothing.
Specific safety instructions for operating the miter saw, including workpiece support, blade contact, and cutting techniques.
Further safety precautions including extension cord use, polarized plugs, eye protection, and tool maintenance.
Defines hazard levels (DANGER, WARNING, CAUTION, NOTICE) and their associated risk implications.
Explains common symbols used on the tool for operation, safety alerts, and technical specifications.
Explanation of double insulation as a safety feature in electric power tools, eliminating the need for grounding.
Details power supply requirements (120V AC, 60Hz) and precautions for connecting the tool.
Guidance on selecting and using appropriate extension cords based on length and wire gauge for safe operation.
Lists technical details like blade diameter, arbor hole, speed, input, and cutting capacities.
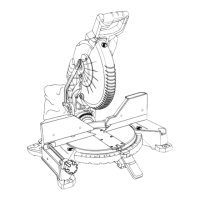
Introduction to the saw's features and safety rules for familiarization before use.
Details the included 10-inch blade and its cutting capacity based on angles.
Explains the function and operation of the bevel lock knob for securing the saw at desired bevel angles.
Describes the adjustment screws for making fine adjustments at specific bevel angles (0°, 33.9°, 45°, 48°).
Information on the provided handle for convenient and safe transport of the miter saw.
Details the function of the electric brake for quick blade rotation stoppage after switch release.
Explains the LED system that casts a shadow for precise cut alignment and predicts blade kerf.
Describes the miter lock lever used to securely lock the saw at desired miter angles.
Lists the preset miter angles (0°, 15°, 22.5°, 31.6°, 45°) for quick angle setting.
Details the protective lower blade guard and its automatic retraction over the blade during cuts.
Explains the spindle lock button for safely locking the spindle during blade installation or removal.
Describes the function and adjustability of the sliding miter fences for workpiece support and clearance.
Information on the switch trigger and how to lock it for preventing unauthorized use.
Instructions for safely removing the saw from its packaging and placing it on a work surface.
Details on securely mounting the saw to a workbench or stand using the base's four mounting holes.
Description of the included blade wrench and its dual function as a hex key and Phillips screwdriver.
Instructions for installing and using the dust collection bag on the exhaust port.
Information on the work clamp for securing the workpiece to the fence and preventing creep.
Step-by-step guide for safely installing or replacing the saw blade, including washer and bolt instructions.
Procedure for cutting a slot in the throat plate to allow for blade clearance at various angles.
Instructions on how to safely lock and unlock the saw arm for transport and operation.
Procedure for aligning the saw blade perpendicular to the fence using a square.
Procedure for aligning the saw blade perpendicular to the miter table at 0° and 45° angles.
Lists the intended uses of the miter saw, including wood and plastic cutting, miters, and bevel cuts.
General guidance and warnings for performing cuts, including workpiece clamping and angle settings.
Explains the LED system that casts a shadow for precise cut alignment and predicts blade kerf.
Detailed steps for making miter and cross cuts, including setting angles and securing the workpiece.
Instructions for performing bevel cuts, setting angles, and ensuring workpiece stability.
Guide for making compound cuts, combining miter and bevel angles for complex shapes.
Advice on using supports for long workpieces to prevent sagging and ensure stability during cuts.
Guidance on using clamps for securing wide workpieces to the miter table for safe cutting.
Instructions on creating and attaching an auxiliary fence for added workpiece support and accuracy.
Provides a chart of miter and bevel angle settings for various compound cut applications.
Detailed instructions for accurately cutting crown molding using compound miter techniques.
Method for nesting crown molding against the fence for specific cuts, with variations for size.
Properly positioning warped material to avoid pinching the blade and prevent kickback.
Notes on factory pivot adjustments and when to seek authorized service center repair.
Ensures the saw arm rises freely; describes issues requiring service center attention.
Instructions for adjusting the bevel pivot for smooth movement and seeking service if tight or loose.
Procedure for setting and checking the 45° bevel angle accuracy using a square.
Procedure for setting and checking the 0° bevel angle accuracy against the miter table.
Instructions for adjusting the tension and security of the miter lock lever for proper table locking.
Guide for checking brush wear and replacing carbon brushes when they are worn below 1/4 inch.
Instructions for cleaning the LED lens to maintain brightness and accuracy of the cut line shadow.