Do you have a question about the RIDGID R7111 and is the answer not in the manual?
Rules for maintaining a clean, well-lit, and safe work environment, avoiding hazards.
Guidelines for safe use of the power tool with electrical connections and cords.
Precautions for user alertness, protective equipment, and safe handling of the tool.
Guidelines for safe servicing of the power tool by qualified personnel.
Detailed safety instructions for operating the power tool, including handling and environmental factors.
Explanation of symbols related to electrical units like Volts, Amperes, Hertz, and Watt.
Meaning of symbols indicating tool operation, safety alerts, and specific warnings.
Defines signal words like DANGER, WARNING, CAUTION and their associated risk levels.
Important warnings regarding tool servicing and the necessity of reading the manual.
Explanation of the double insulation feature and its safety benefits for the user.
Details on connecting the tool to the correct power supply (voltage, frequency, AC/DC).
Recommendations for selecting and using appropriate extension cords for the power tool.
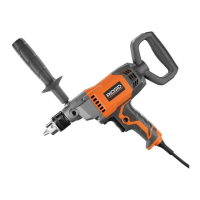
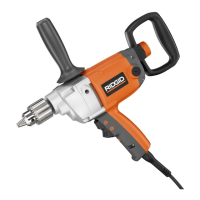
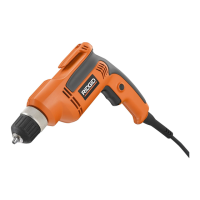
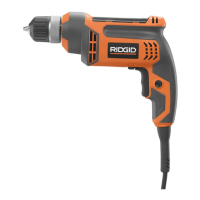
Technical specifications of the drill, including chuck size, speed, input, and weight.
Guidance on understanding the tool's features and safety rules before operation.
Instructions on using the auxiliary handle for better control and comfort during operation.
How to use the selector to change the drill bit rotation direction (forward/reverse).
Description of the lighted plug feature for identifying live tools.
Explanation of the lock-on button for continuous drilling.
Information on the variable speed trigger for controlling drill speed.
Steps for safely removing the tool and accessories from the packaging and checking for damage.
List of items included with the 1/2 in. Drill, such as chuck key and manual.
Critical warnings regarding damaged parts, modifications, and connecting to power supply.
Essential safety precautions to avoid carelessness and eye injury during tool operation.
List of tasks the drill can perform, such as drilling in wood, metal, and plastics.
Instructions on how to turn the drill ON and OFF using the switch trigger.
Details on how trigger pressure controls the drill's speed for different tasks.
How to use the selector lever to control the drill's forward and reverse rotation.
Step-by-step guide on how to insert and secure drill bits using the chuck key.
Instructions for safely removing drill bits from the chuck using the chuck key.
Guidance on adjusting and utilizing the auxiliary handle for better grip and control.
How to engage the lock-on feature for continuous operation and how to disengage it.
General steps for operating the drill, including securing material and applying pressure.
Tips for drilling wood, including speed, bit selection, and drilling through holes.
Guidance for drilling metal, including speed, pressure, lubrication, and bit selection.
Critical warnings about using correct parts, safety equipment, and avoiding chemical damage.
Instructions for cleaning the tool, avoiding solvents, and handling abrasive materials.
Information that the tool is pre-lubricated for its lifetime and requires no further lubrication.
Detailed steps on how to safely remove the drill chuck using a hex key and mallet.
Steps to fix a loose chuck by tightening the chuck screw and spindle connection.
List of recommended accessories such as high speed bits, wood boring bits, and hole saws.
Warning against using unrecommended accessories to prevent injury.
Details of the 3-year warranty, including what is covered and what is excluded.
Policy for returning the tool within 90 days for refund or exchange if dissatisfied.
Instructions on how to contact authorized service centers for repairs or support.
Specific exclusions from the warranty, such as misuse, abuse, or unauthorized repairs.
Legal disclaimers regarding implied warranties and limitations on damages.
Information on contacting nearest RIDGID authorized service centers for parts and service.
Instructions for recording the tool's model and serial numbers for service and parts orders.
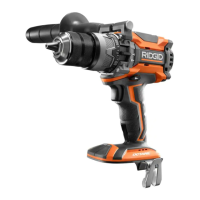
This document is an operator's manual for a RIDGID 1/2 inch Double Insulated Drill, model R7111.
The RIDGID R7111 is a 1/2 inch double-insulated drill designed for various drilling applications. It is engineered for dependability, ease of operation, and operator safety, aiming to provide years of rugged, trouble-free performance. The drill is suitable for drilling in wood, ceramics, plastics, fiberglass, laminates, and metals, as well as for mixing paint. Its double-insulated design eliminates the need for a grounded power cord, enhancing user safety by isolating exposed metal parts from internal motor components with protective insulation.
The manual includes comprehensive safety rules, emphasizing the importance of reading and understanding the operator's manual before use. It highlights warnings regarding electric shock, fire, serious injury, work area safety, electrical safety, personal safety (including wearing eye protection, avoiding loose clothing, and maintaining balance), and proper power tool use and care. Symbols are used throughout the manual to indicate various safety alerts and instructions, such as "DANGER," "WARNING," and "CAUTION." The "Double Insulated" designation is a key safety feature, eliminating the need for grounding.