Do you have a question about the Rinnai Sapphire and is the answer not in the manual?
Heater must be installed by an authorized person according to local regulations and Rinnai instructions.
Approved by Australian authorities; no part modifications are permitted.
Step-by-step guide for starting the heater, including button operation and safety checks.
Instructions on how to engage additional burners to increase heat using control buttons.
Explanation of how the fan starts, stops, and adjusts speed based on heat exchanger temperature.
Procedure for reducing heat by releasing control buttons from rear to front.
Instructions for safely switching off the heater by returning all buttons to the OFF position.
Guide on how to remove, clean, and replace the fan filter for optimal performance.
Instructions for cleaning the heater's exterior casing with a soft, damp cloth.
Key safety warnings regarding clearances, flammable materials, and child supervision.
Details on the product warranty, including terms for parts and labour.
Explanation of the overheat switch function and troubleshooting steps.
Describes the flame failure device that cuts gas supply if the flame is extinguished.
Details the automatic fan switch operation for efficient heating and cooling.
Safety advice on not placing items on the heater and avoiding aerosol use nearby.
Steps for unpacking the heater, checking for damage, and verifying gas type.
Lists items found in the product packaging, such as instructions and mounting hardware.
Key requirements for heater placement, ventilation, and power point proximity.
Details on connecting the inlet union/copper elbow for the gas supply.
Instructions for removing the inlet union to access internal components.
Guidance on running the gas supply pipe and connecting it securely.
Specifies dimensions and location for gas connection in twin skin flue setups.
Instructions for installing in a 75mm cavity wall using twin skin flue system.
Details on cutting the correct wall opening size for ventilation and fitment.
Options for routing gas supply through the wall or floor for the flue system.
Cutting away obstructions and fitting the housing into the prepared wall opening.
Lowering and securing the twin skin flue assembly into the housing.
Fitting the flue support and sealing plate for proper flue termination.
Installing the flue adapter, cowl, and ensuring correct roof clearance.
Positioning the elbow into housing and fitting rear and top spacers.
Placing the heater, fitting wall clips, and securing it to the wall.
Connecting the gas supply to the heater and ensuring it's secure.
Procedure for checking for gas escapes using a manometer or soapy water.
Sealing the fireplace with fireproof material and ensuring a firm base.
Ensuring the flue is clear of debris and has minimum clearance from obstructions.
Removing existing dampers and fitting an approved flue cowl with correct clearance.
Procedure for testing the heater after installation, checking flame and controls.
Guide on how to check and adjust burner pressure using a manometer.
Explaining the unit's operation, care, and fan filter replacement to the customer.
Technical details of the Rinnai Sapphire 24 heater, including input and components.
List of Rinnai Australia and New Zealand service and sales contact information.
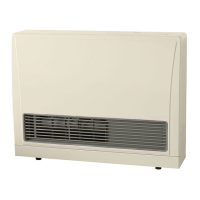
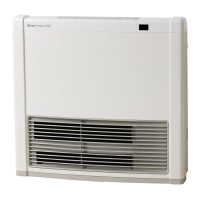
This document describes the Rinnai Sapphire 24 Flued Gas Space Heater, providing both customer operating information and installation instructions.
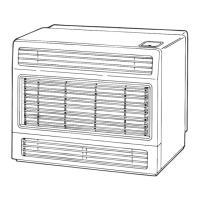
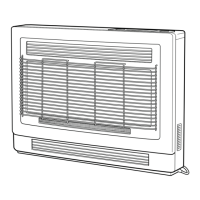
The Rinnai Sapphire 24 is a fan-assisted, radiant convection space heater designed for efficient heating of living spaces. It operates on natural gas, towns gas, or propane, utilizing a surface combustion system with a jewel cut plaque burner design for maximum efficiency and aesthetic appeal. The heater features a forced convection and natural draught flue system, ensuring safe and effective removal of combustion byproducts.
The core function of the Sapphire 24 is to convert gas into heat, which is then distributed throughout the room. It achieves this through a combination of radiant heat from its burner plaques and convection heat, circulated by a large capacity fan. The fan plays a crucial role in circulating warm air effectively, ensuring even heat distribution.
The heater incorporates several safety devices to ensure reliable and secure operation. An electronic automatic ignition system simplifies startup, while a flame failure device automatically cuts off the gas supply if the flame is extinguished, preventing gas leaks. An overheat switch protects the unit by cutting off the gas if the heater exceeds a predetermined temperature, which could be caused by obstructions, a blocked fan filter, or a power cut. The fan switch automatically turns the fan on when the heat exchanger warms up and off when it cools down, preventing cold draughts and enhancing efficiency.
The control system allows for three heat settings: Ignition/Low, Medium, and High, corresponding to different burner patterns and heat outputs. This provides flexibility in managing the room temperature and energy consumption. The fan speed is also automatically controlled, running at a lower speed for low and medium heat settings and a higher speed for the high setting, optimizing comfort and efficiency.
Operating the Rinnai Sapphire 24 is designed to be straightforward, with controls conveniently located under a cover on the top right-hand side of the heater.
Ignition: To ignite the heater, firmly press the front control button. This action activates the built-in safety device and initiates the electronic spark, lighting the center burner. It is important to hold the button down for approximately 15 seconds to allow the burner to establish itself. The spark will continue as long as the button is held. After 15 seconds, release the button. If the burner does not remain alight, release the button to return it to the "OFF" position, wait 30 seconds, and then repeat the ignition procedure. It's crucial that the ignition button is in the "OFF" position before attempting re-ignition. Upon successful ignition, the heater will be at its lowest setting with one burner alight.
Increasing Heat: To increase the heat output, press the control buttons in order from front to rear. Each press will ignite additional burners, progressively increasing the heat from Ignition/Low to Medium, and then to High. There is no need to hold the buttons for 15 seconds when increasing the heat.
Decreasing Heat: To decrease the heat, simply release the control buttons in order from rear to front until the desired setting is reached.
Turning Off: To turn the unit off, press and release the buttons in order from back to front until all three buttons are in the "OFF" (UP) position. Ensure all burners are extinguished. The fan will continue to run until the heat exchanger cools down, then it will stop automatically.
Automatic Fan Operation: The fan starts automatically once the heat exchanger has warmed up, preventing cold draughts. Its speed is also automatically regulated: at low and medium heat settings, the fan runs at a low speed, and at the high setting, it runs at a high speed. This intelligent control ensures optimal comfort and efficiency. After the heater is turned off, the fan will continue to operate until the heat exchanger is cool, then it will stop automatically.
Safety Precautions:
The Rinnai Sapphire 24 requires minimal maintenance to ensure it remains in good condition and operates efficiently.
Fan Filter Cleaning: To protect the fan from lint and dust, the Sapphire 24 is equipped with a fan filter located inside the bottom louvre opening, just below the lowest louvre.
Outer Case Cleaning: The outer case of the heater should be cleaned with a soft, damp cloth.
General Maintenance Advice:
Troubleshooting (Pre-Service Check List): The manual includes a pre-service check list to help users identify and potentially resolve common issues before calling for service. This can help avoid unnecessary service calls, which may be chargeable even if the unit is under guarantee. Common issues and their remedies include:
Safety Device Checks:
Rinnai Australia maintains a service network with trained and equipped personnel to provide the best service for Rinnai appliances. Contact numbers for service are provided in the manual.
| unit voltage | 240 V |
|---|---|
| frequency | 50 Hz |
| natural gas pressure | 0.98 kPa |
|---|---|
| propane gas pressure | 2.15 kPa |
| natural gas consumption | 21 MJ/h |