Congratulations! You have the best in suspension components on your bicycle! This manual contains important
information about the safe operation and maintenance of your shock. To insure that your RockShox shock performs
properly, we recommend that you have your fork installed by a qualified bicycle mechanic. We also urge you to
follow our recommendations to help make your bicycling experience more enjoyable and trouble-free.
I NSTALLATION
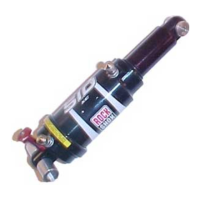
It is extremely important that your RockShox SID rear shock is installed correctly by a qualified bicycle mechanic with proper
tools. Consult your bicycle manufacturer’s instructions for proper installation of your SID shock.
P ERFORMANCE T UNING
By adjusting the air pressure, the SID rear shock can be tuned for your particular weight, riding style, and terrain. You may
benefit by making tuning adjustments to suit your specific needs. When tuning suspension, always make one change at a time
and write it down. This allows you to understand how each change affects your ride.
Setting Sag
Sag is the amount of shock travel that is used as the rider sits stationary on the bike. Typically, sag is 15 to 30 percent of all
available wheel travel. Check with your bicycle manufacturer to determine the rear wheel travel and recommended sag for your
particular bike before setting sag. For the SID rear shock you will be changing the air spring rate to set sag.
Adjusting main chamber air pressure determines the spring rate, or stiffness, of the shock. The more air you put in, the firmer
your shock will be. Maintain air pressure between 100 and 250 psi.
Selecting Air Pressure (Spring Rate):
1. Depressurize the main and opposing air chamber by removing the air cap and depressing the valve core stems.
2. Because every bike is different, a good starting point is to pressurize the main air chamber to an air pressure equaling your body weight.
N
OTE: AS BICYCLE DESIGNS DIFFER SIGNIFICANTLY, YOUR BICYCLE MAY REQUIRE DIFFERENT PRESSURES OR SET UP TECHNIQUES. THESE INSTRUCTIONS ARE INTENDED AS A GUIDELINE ONLY.
3. Without sitting on the bike, measure the distance from the floor to the seat (rear height). Write it down.
4. While you sit in a normal riding position, have a friend measure the same distance. The difference between the two measurements is sag. Determine what percentage
of total wheel travel this sag represents.
5. If the sag is less than your bicycle manufacturer’s recommendation, a lower air pressure should be used. If the sag is greater than your bike manufacturer’s
recommendation, a greater air pressure should be used.
IMPORTANT: DO NOT USE AIR PRESSURE OUTSIDE THE 100 TO 250 PSI RANGE.
6. Once sag has been set, pressurize the negative air chamber to match the main air chamber pressure.
TIP: ADJUSTING THE NEGATIVE AIR CHAMBER DETERMINES THE EASE OF INITIAL COMPRESSION. THE HIGHER THE AIR PRESSURE YOU PUT IN, THE EASIER IT IS TO COMPRESS THE SHOCK.
1. Before riding the bicycle, be sure the brakes are properly installed and adjusted. If the brakes don’t work properly, the
2. If the shock ever loses oil or if it makes sounds of excessive topping out, stop riding the bicycle immediately and have
3. Always use genuine RockShox parts. Use of after-market replacement parts voids the warranty and could cause