7. Measure the sag once again to make sure it is the same.
8. Replace both air caps.
Example: If your bike has 4” of rear wheel travel and you want to set it up for cross-country riding, your sag should be
0.6 - 1.2 in. If you weigh 175 lbs., pressurize the main chamber to 175 psi and measure your sag.
Rebound Damping Adjustment (Some Models)
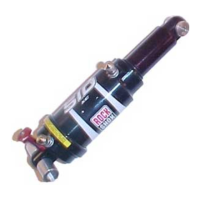
The SID rear shock includes a red rebound damping adjustment knob. Rebound is the extension or return of the shock.
Rebound damping adjustment allows you to control the rate at which the shock extends after it is compressed.
The shock’s rebound is quickest when the adjustment knob is in the full counterclockwise position. Rebound is slowest when
the adjustment knob is in the full clockwise position.
SETTING REBOUND
When you are setting rebound, a good starting point is the “curb” test. Be sure this is done after you set up your sag.
1. Set your rebound adjuster fully counterclockwise.
2. Ride the bike off the curb sitting in the saddle and count the number times the shock bounces. You want to achieve one bounce.
3. Turn the rebound adjuster a quarter turn clockwise and ride off the curb again. Continue to do this until one bounce is achieved.
4. Record the number of turns from the fully closed (full counterclockwise) position.
M AINTENANCE
After Every 8 Hours of Riding
• Clean your shock with mild soap and a toothbrush. Keep the body clean and lubricated.
• Never use a high-powered washer to clean the shock.
• Keep mounting hardware clean and lubricated. Refer to your bicycle’s owner’s manual for correct mounting hardware torque values. Also be sure to verify that your
shock’s mounting hardware is properly torqued (60-in-lb).
• Over-torqued mounting hardware will cause the shock to bind and malfunction. Under-torqued mounting hardware can damage frame, hardware, and shock.
After Every 20 hours of Riding
Remove, clean, and grease mounting hardware.
AIR CAN SERVICE
1. Release air in shock. Remove valve stems.
2. Using RockShox Spanner wrench, loosen completely Lock can. Remove air can from shock.
3. Closely inspect the inside finish of the air can. Check for nicks or scratches that could cause damage to the o-rings. Check the leading edge of the can for any sharp
burs that could damage the can o-ring or fixed piston glide ring.
4. Inspect all o-rings, wipers and glide rings for damage. Lubricate each o-ring, wiper and glide ring.
5. Lightly lubricate the SID Rear shock body. Gently slide the air can onto the SID Rear shock body.
6. Orient the air valve properly and lightly snug the lock can.
7. Re-install valve stems.
S ERVICE
The SID rear shock should be fully serviced every year by a qualified technician with proper tools. Please contact your local
RockShox dealer, RockShox Technical Services, or the nearest distributor in the International Distributors List.
Read the Warranty section for further warranty repair and contact information.