EasyManua.ls Logo

Roland Metaza MPX-50 User Manual

Roland Metaza MPX-50
55 pages
To Next Page IconTo Next Page
Page #1 background imageLoading...
Page #1 background image
Thank you very much for purchasing the MPX-50.
To ensure correct and safe usage with a full understanding of this
product's performance, please be sure to read through this manual
completely and store it in a safe location.
Unauthorized copying or transferral, in whole or in part, of this
manual is prohibited.
The contents of this operation manual and the specifications of this
product are subject to change without notice.
The operation manual and the product have been prepared and tested
as much as possible. If you find any misprint or error, please inform
us.
Roland DG Corp. assumes no responsibility for any direct or indirect
loss or damage which may occur through use of this product, regard-
less of any failure to perform on the part of this product.
model MPX-50
USER'S MANUAL

Table of Contents

Question and Answer IconNeed help?

Do you have a question about the Roland Metaza MPX-50 and is the answer not in the manual?

Roland Metaza MPX-50 Specifications

General IconGeneral
BrandRoland
ModelMetaza MPX-50
CategoryPrinter
LanguageEnglish

Summary

To Ensure Safe Use

About WARNING and CAUTION Notices

Explains the meaning of WARNING and CAUTION notices used in the manual.

About the Symbols

Describes the meaning of various symbols used for instructions and warnings.

About the Labels Affixed to the Unit

What's Metaza?

How Metaza Works

Part Names

Part 1 What to Do Before Marking

Checking the Accessories

Lists and instructs to check all included accessories before starting.

Setting Up and Connection

Installing the Software

Installing the Driver

Details the process for installing the driver software for Metaza.

Installing Dr. METAZA

Dr. METAZA Settings

Part 2 Performing Marking

1. Getting Ready to Perform Marking

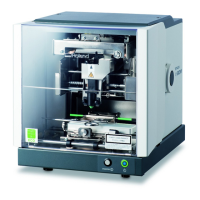
Outlines the initial preparations required before starting the marking process.

1-1 Preparing the Workpiece for Marking

Details conditions and steps for preparing the workpiece before marking.

Conditions for materials that can be marked

Specifies the thickness, size, and material properties suitable for marking.

Hardness of surface to mark

Shape of surface to mark

Describes the requirement for a flat marking surface without level differences.

Shape of the back of the surface to mark

Specifies that the back surface of the workpiece must be flat and level.

About the Marking Area

Illustrates the marking area dimensions and potential issues with expanded areas.

1-2 Preparing the Image

2. Loading the Workpiece

3. Performing Marking

3-1 Creating Marking Data

Details the process of creating or importing marking data using Dr. METAZA.

Starting Dr. METAZA

Explains how to launch the Dr. METAZA software application.

Names and Functions of Dr. METAZA's Screen Items

Decide on the Size and Shape of the Workpiece

Import an Image

Add Text

Save the file

3-2 Checking the Marking Results Before Marking (Preview)

3-3 Starting Marking

Stop Marking

Driver Settings

Part 3 Dr. METAZA Guide

Adding a Workpiece Shape

Explains methods to register custom workpiece shapes in Dr. METAZA.

Acquiring the Shape of a Workpiece with a Scanner

Guides on scanning a workpiece shape using a TWAIN-compliant scanner.

Creating the Shape Using a Commercial Paint-type Program

Trimming an Image

Creating a Decorative Frame Around an Image

Registering a Frequently Used Image (Symbol)

Importing an Image from a Scanner

Adding a Hand-drawn Image or Text

Adding a Symbol Image

Registering Your Own Original Frames

Part 4 Maintenance

Cleaning the Adhesive Sheet

Provides instructions on how to clean the adhesive sheet to restore its tackiness.

Cleaning the body and cover

Replacing the Head

Part 5 Troubleshooting

Metaza doesn't run when marking data is sent.

Lists checks and remedies for when the Metaza unit fails to operate after sending data.

The Dr.METAZA does not function.

Provides troubleshooting steps if the Dr. METAZA software is not working correctly.

Machining is performed, but marking is not possible.

Images are unattractive -- faint (images are dim).

Offers solutions for faint or dim marking results, including driver adjustments.

Images are unattractive -- dark (all images are whitish).

Provides guidance for overly dark or whitish marking results, suggesting driver adjustments.

Images are unattractive -- uneven.

The image at the same location is always too light (or too dark), or the image is uneven.

Explains how to adjust the base tilt to correct uneven marking related to position.

The marked location isn't where desired.

Specifications

Related product manuals