"CAUTION" Don't connect any other brand of Battery Eliminator, as this could
damage the internal circuitry of the TR-606. [Actually, any 9V DC adaptor with
centre negative providing 150mA of current will work - ed]
CAUTIONS
• When the TR-606 is not in use for long periods, remove the battery to prevent
leakage.
• If battery voltage drops, effect becomes inferior or no sound is produced. To
prevent that, replace the batteries.
• Be sure to keep the batteries securely connected, even while using the AC
Adaptor.
* Even if AC Adaptor cord comes out during performance, if the batteries are
connected, the TR-606 will continue to operate.
• If this unit is not to be used for long periods of time, be sure to switch the
power off and remove the exhausted batteries, or various troubles may be
caused by battery leakage.
Memory Back-Up
The TR-606 Rhythm Composer features a non-volatile memory which will retain
Rhythm Patterns and Track compositions when switched 'OFF' and disconnected from
any external power source. The TR-606 relies on batteries for it's back-up circuit to
protect these memories. Always replace the TR-606's batteries with a complete set of
fresh batteries when the RUN/BATTERY Indicator LED (G) either flashes or fails to
illuminate during the normal Run condition of the TR-606. If the batteries are
changed quickly, within one minute, the memory can retain the DATA. [Check out
battery.txt
for more information on this - ed]
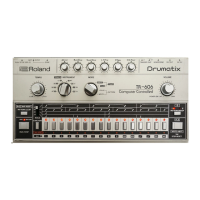
Front and Back Panel Layout
(A) = POWER SWitch/VOLUME Control
(B) = MODE Selector
(C) = TRACK/INSTRUMENT
(D) = TEMPO Control
(E) = INSTRUMENT MIC Controls (six small volume knobs)
(F) = CLEAR/RESET Button
(G) = BATTERY Check/RUN Indicator (LED above RUN/STOP button)
(H) = RUN/STOP Button
(I) = SCALE Selector (4 way switch above FUNCTION button)
(J) = FUNCTION Button
(K) = SELECTOR Switches (the 16 buttons along the bottom of the front
panel)
(L) = Indicator (the LEDs above the 16 SELECTOR switches)
(M) = TAP Button
(N) = PATTERN GROUP Button
(O) = PATTERN GROUP Indicator (LED above PATTERN GROUP button)
Writing Rhythm Patterns
We will write a 4/4 Rock Rhythm Pattern (shown in Fig. 1) into the computer
memory location chosen by the SELECTOR switch (K) #1.

 Loading...