ADVANCED
COURSE
(Com'd)
SYNC
INPUT/OUTPUT
The
SYNC
swiich on ihe TR-606 allows ii to
bu
synchronj/ed
perlecily
wlili unlis
such as the
Rolaod CSQ-6Q0 Digital
Sequencer, allowing
total rhythmic
Ireedoni
of
each unit while
remaining in
perfect teinpo
with
one
another.
This
interfacing uses the
exclusive Roland
standard
interface connection.
The
TR-606
may also
be
synchronized
to the
Arpeggio
section of the Roland Jupiter
8
polyphonic synthesizer.
To Sync two units,
connect
a
five
pin
Dll^l cord
with the SYNC
jack of each unit and
move the
TR
606
SYNC switch
to
the
INPUT
position
for connection with
ttie
CSQ
600, or to
the
OUTPUT
position for connection with ilia
Jupiter
8.
Remember that the
SYNC
switch
must be
in
ifie OUTPUT position so that tlie
TR-606
will operate by itself.
The
TR-606
may also
be
syncfironized lo the
Roland MC-4 polyphonic sequencer,
using
eittier ttie
TR
606 or the
MC^ to control the
other
unit.
For more
details
refer to the lv)C-4
owners manual.
Refer
to
Figure
1
for several
specific applica-
tions of
SYNC
connections.
Battery Eliminator
Tfie
TR-606
is fully portable,
normally relying
on
batteries lor all internal functions and to
power
the self-contained HEADPHONE ampli-
fier.
To
extend
battery life, merely connect a
BOSS ACA Battery Eliminator
in this
socket.
"CAUTION"
Don't connect
any
other
brand
of Battery lilirninaiors as this
could damage the
internal
circuiny
of the
TR-606.
Memory Baci<-Up
The
TR-606
Rhytliri> Composer features a non-
voliile
memory
whicli will retain
Rhythm
Patterns and
Track
compositions
when switch-
ed
'OFF'
and
disconnected
from
any external
power source. Tire TR-606 relies
on
its
batteries
as a back-up circuit to protect
these memories.
Always replace the
TR-606's
batteries with
a
complete set
of
new
batteries
when
the RUN/
BATTERY
Indicator
(G)
LED
either llasties or
fails to illuminate
during
the
normal
HUN
con-
dition of the
TR-606. If you
change the
batteries
as quickly
as within one minute,
the
memory
can liold
the
DATA.
Playing
Rhythm
Patterns
The series of
sixteen
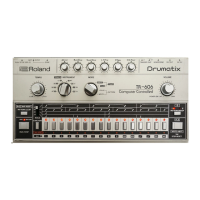
SELECTOR
Switches (K)
at
the bottom of the TR-606
panel are used to
select which Rhythm Pattern
you want to
play.
Each of these sixteen SELECTOR
Swiicfies
(K)
has
two
modes
If
&
llj
which
can be different
from each other for a total of thirty-two
Rhythm Patterns, with each Rhytlim lasting
for
one measure.
After hooking
up the
TR-6Q6
as
previously de-
scribed
in
the Basic
Connections Section, set the
MODE
Selector
@
to the
PATTERN PLAY
position.
When
this
is
done, you
will notice that
the LED on one
of
the
SELECTOR
Switches
(k)
will
begin to flash.
This tells
you thai the
flashing of
SELECTOR
Switch (K)
is
the first
Rhythm Pattern
that
will play
when you press
ttie
RUN/STOP
button (H).
Also lit on the
TR
606 Panel
is
one of the two
LEDs above
the
PATTERN GROUP
button
(n).
These indicate
from which group
!l
or
llj
the
flashing Rhythm
will play. To
cfiange from one
group lo the other,
press
the
PATTERN
GROUP
button
(N). and
the
LED will
cfiange
from
one lo the otlier. PATTERN GROUP
Selection
is
available only
while the Rhythm
is
stopped. Press the RUN/STOP button (H) lo
start tlie Rhythm running. Adjust tfie overall
Tempo
with
the
TEMPO
control (D) wliich
is
continuous
from 40
to
300 beats per minute.
While the Rhyltim
is
running, you will notice
that the LED indicators (L) on ihe
SELECTOR
Switches
(K)
flash in sequence from
the
left
to the
right
of the
unit.
The speed of
their
sequential
motion will
correspond
to
the tempo
of
the pattern (which
is
set by ilie TEMPO
con-
trol).
Press the RUN/STOP
button
(H) to stop
the
Rhythrn. When
this is
done, you
will
notice
that the LED
on the
Rhythm you had
selected
will again begin to flash.
Mixing
Percussion Sounds
The level of each percussion
sounds can be
raised or
lowered
in
accordance with
your own
taste through use of
the
six IVIIX controls
E at
the top of the panel. By using
these IVIIX
controls
(e),
it is
possible to attain
the perfect
batance
between ttie instruments
for any rhythm.
Switching
Rhythm Patterns
It is
possible
to switch from
one Rhythm
Pattern to another while
the
TR-606
Rhythm
is
running.
The
TR
606 will
always finisti
Ihe
measure, and play
until switched to
the newly
selected Rhythm. By switching
between the
Rhythms,
it
is
possible
to try
various Rhythms
together
to get a feel of switching
from a
straight
beat to a fill or
break.

 Loading...