9
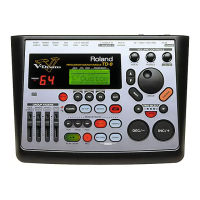
TD-3
Required items
• MIDI Cable
• Hi-Hat Control Pedal (FD-8 or FD-7)
• Pad 1 (PD-8 or PD-7)
• Pad 2 (PD-120 or PD-80R)
• Oscillator or audio device (synthesizer etc.)
• Headphones
• Powered Monitor Speaker x2
Entering test mode
1. Connect the AC adaptor.
2. Connect the hi-hat control pedal.
3. Hold down the [DRUM KIT], [LEVEL/PAN], and [AMBIENCE] buttons
and turn on the power to the unit.
“td3” appears in the seven-segment LEDs.
fig.test1
4. Press [AMBIENCE] button.
5. Press [CLICK] button.
The unit proceeds to “1. Version Test.”
When performing the “HI-HAT Pedal Test,” connect the hi-hat control pedal,
then turn on the power.
“5. HI-HAT Pedal Test” results in “no good” if the power is turned on without
the hi-hat control pedal being connected first.
Exiting Test Mode
It is possible to quit Test mode at any stage by switching off the power.
However, always complete the procedure by performing the Factory Reset.
Do NOT turn off the power during the Factory Reset or Device Test Process.
This could damage the TD-3's internal memory.
Basic Test Mode Procedure
• If a test results in “OK,” press the [EDIT] button to advance to the next
step.
If a number of tests end up resulting in “OK,” the unit then automatically
advances to the next test.
• When a test results in “NG,” or in order to force an advance to the next
test while the current test is still underway, press the [COACH] and
[EDIT] buttons simultaneously.
Following this, the unit advances to the next test when the [+] button is
pressed; press the [EDIT] button to enter the selected test.
To return to a previous test, press the [-] button then the [EDIT] button.
Advancing Through Test Mode
The [HI-HAT], [CRASH1], [CRASH2], [RIDE], [RIM], [KICK], [SNARE],
[TOM1], [TOM2], and [TOM3] LEDs are collectively referred to as the
TRIGGER LEDs.
1.Version Test
1. Upon entering Test mode, the [DRUM KIT] button lights up, and the
[INST] button and [HI-HAT] LED flash.
At this time, the CPU version is indicated in the seven-segment LEDs.
Ex: With CPU Version 1.00
fig.test2
2. Press the [INST] button.
The WAVE ROM version is indicated in the seven-segment LEDs.
3. Press the [EDIT] button to advance to the next test.
2.Device Test
fig.test3
1. The Device Test starts automatically.
First, all LEDs corresponding to the various devices light up.
The name of the device currently being tested is indicated in the seven-
segment LEDs.
When a device test results in “OK,” the corresponding LED goes off.
All device tests are performed automatically.
2. If all devices pass their tests, the procedure automatically advances to the
next test.
If there is a problem with a device, “Err” is indicated in the seven-segment
LEDs, and the LED corresponding to that device flashes.
When a flashing switch is pressed, the name of the device failing the test
appears in the seven-segment LEDs.
DEVICE LED 7SEG.
CPU [DRUMKIT] [CPU]
WAVE ROM [INST] [WAV]
EEPROM [LEVEL/PAN] [EEP]
DSP [TEMPO] [dSP]

 Loading...