11
Apr. 2000 VG-88
3. SWITCH/LED
Respective LEDs come on successively.
Check and make sure the respective LEDs for all the segments
are turned on and off accordingly.
Lighting sequence :
Segment 7 LED → [GUITAR AMP] → [POWER AMP+SP/
RETURN] → [LINE/PHONES] → PEDAL[CTL] → PEDAL[4] →
PEDAL[3] → PEDAL[2] → PEDAL[1] → Segment 7 LED
Press the "+" indicated switches appearing on the LCD in the
sequence designated below.
3. SWITCH / LED
■各 LED が順次点灯します。
全てのセグメントが点灯および消灯することを 確認してくださ
い。
点灯順序:
7 セグ LED → [GUITAR AMP] → [POWER AMP+SP/RETURN
→ [LINE/PHONES] → PEDAL[CTL] → PEDAL[4] → PEDAL[3]→
PEDAL[2] → PEDAL[1]→ 7 セグ LED
■LCD 画面に+表示されるスイッチを順番に押してくださ
い。
Switching sequence :
[F1]
→
[F2]
→
[F3]
→
[PAGE(<)]
→
[PAGE(>)]
→
[WRITE]
→
[EXIT]
→
F6]
→
[F5]
→
[F4]
→
[COSM GUITAR]
→
[COSM
AMP]
→
[EFFECTS]
→
[LEVEL/BPM/KEY]
→
[PEDAL/
ASSIGN]
→
[NAME/CHAIN]
→
[EZ EDIT]
→
[TUNER]
→
[CURSOR(DOWN)]
→
[CURSOR(LEFT)]
→
[CURSOR(UP)]
→
[CURSOR(RIGHT)]
→
[OUTPUT SELECT]
→
[BANK(DOWN)]
→
[BANK(UP)]
→
[CTL]
→
[4]
→
[3]
→
[2]
→
[1]
∗
If the wrong switch is depressed, a warning reading
"WRONG SWITCH!" appears on the LCD.
When the inspection is completed, the equipment proceeds to
the next inspection automatically.
SW 順序:
[F1] → [F2] → [F3] → [PAGE(<)] → [PAGE(>)] → [WRITE] →
[EXIT]→ [F6] → [F5] →[F4] → [COSM GUITAR] →[COSM AMP
→ [EFFECTS] → [LEVEL/BPM/KEY] → [PEDAL/ASSIGN] →
[NAME/CHAIN] → [EZ EDIT] → [TUNER] → [CURSOR(DOWN)
→ [CURSOR(LEFT)] → [CURSOR(UP)] → [CURSOR(RIGHT)
→[OUTPUT SELECT]→[BANK(DOWN)]→ [BANK(UP)] →[CTL
→[4]→[3]→[2]→[1]
※誤ったスイッチを押したときは "WRONG SWITCH !" と LCD
に表示されます。
検査が終了すると、自動的に次の検査に進みます。
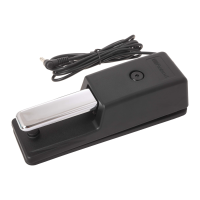
4. EXP PEDAL
Check the movement of the EXP pedal on the equipment.
4. EXP PEDAL
本体上の EXP ペダルの動作を確認します。
4-1 First, step on the pedal to the center inclination
(intermediate value) and "OK" will appear on CENTER.
4-1 まずペダルの傾きをセンター(中間値)にすると CENTER
に OK が表示されます。
4-2 Step on the pedal further (to its maximum stroke) and "OK"
will appear on PRESS.
4-2 さらに踏み込む(最大値)と PRESS にOK が表示されます
4-3 Finally, totally release the pedal (to its minimum stroke)
and "OK" will appear on RELEASE to conclude the pedal
inspection.
4-3 最後に手前へ戻しきる(最小値)と RELEASE に OK が表
示され、ペダルの検査は終了です。
When the inspection is completed, the equipment proceeds to
the next inspection automatically.
検査が終了すると、自動的に次の検査に進みます。
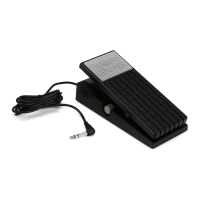
5. SUB EXP PEDAL
Connect the EV-5 to the [SUB EXP PEDAL/SUB CTL 1,2] jack
in advance.
Now, check the movement of the pedal connected to the [SUB
EXP PEDAL/SUB CTL 1,2] jack.
5. SUB EXP PEDAL
あらかじめ [SUB EXP PEDAL/SUB CTL 1,2] ジャックにはEV −
5 を接続しておいてください。
[SUB EXP PEDAL/SUB CTL 1,2] ジャックに接続されたペダル
の動作を確認します。
First, step on the pedal to the center inclination (intermediate
value) and "OK" will appear on CENTER.
まずペダルの傾きをセンター(中間値)にすると CENTER に
OK が表示されます。
Finally, totally release the pedal (to its minimum stroke) and
"OK" will appear on RELEASE to conclude the pedal inspection.
最後に手前へ戻しきる(最小値)と RELEASE に OK が表示さ
れ、ペダルの検査は終了です。
When the inspection is completed, the equipment proceeds to
the next inspection automatically..
検査が終了すると、自動的に次の検査に進みます。
6. BATTERY
Voltage of the memory backup battery is indicated.
6. BATTERY
メモリー・バックアップ用バッテリーの電圧が表示されます。
Press the [PAGE(RIGHT)] button to proceed to the next
inspection process.
[PAGE(RIGHT)] ボタンを押すと、次の検査に進みます。
Step on the pedal further (to its maximum stroke) and "OK" will
appear on PRESS.
さらに踏み込む(最大値)と PRESS に OK が表示されます。

 Loading...