EasyManua.ls Logo

Rubbermaid 1S84 - User Manual

Rubbermaid 1S84
16 pages
Print Icon
To Next Page IconTo Next Page
Loading...
RUBBERMAID
7' x 10' 6" RESIN STORAGE BUILDING
ASSEMBLY INSTRUCTIONS
Pre-Assembly:
Review the parts list and make sure that no parts are missing.
Review ALL assembly steps before beginning instructions.
Level the area where the shed will be located.
Areas of "fill dirt" should be tamped/compacted to prevent settling/sinking.
• If a foundation is desired, it should be constructed before assembly.
NOTE:
To simplify assembly and to ensure proper engagement of all components,
apply a mild detergent to dovetail and snap fits before assembling.
1S84
Description Assembly Letter Quantity Required Tools
Two Person Assembly
Safety Glasses
Phillips Screw Driver
Rubber Mallet
Liquid Soap
(2) Step Stools/Stepladders
P
M
X
X
M
Q
Q
T
T
T
T
L
P
H
J
AK
F
N
N
C
D
D
D
C
C
AN
AP
E
G
RL
RS
FF
GG
L
Front Floor Panel J-5H51 1
Repeat Floor Panel K-5H52 2
Left Side Panel C 3
Right Side Panel D 3
Left Back Panel E 1
Right Back Panel G 1
Left Front Panel H 1
Right Front Panel J 1
Wall Connector Q 24
Left Door AK 1
Right Door AF 1
Lock Hasp X 1
Window for Door LL 2
Gasket for Door Window MM 2
Door Reinforcement NN 2
Hinge Reinforcement PP 2
Handle Kit QQ 1
Spring Bolt Kit SS 1
Left Roof Panel NN 2
Left Skylight Roof Panel AN 1
Right Roof Panel P 2
Right Skylight Roof Panel AP 1
Gable M 2
Ridge Beam - Long RL 1
Ridge Beam - Short RS 1
Ridge Connector FF 2
Ridge Cap GG 1
Ridge Tape HH 2
Skylight w/Gasket Installed L 2
Roof Connector T 16
#14 x 1.0" Combo Pan Head Screw AA 56
#14 x 5/8" Combo Pan Head Screw JJ 12
#8 x 1/2" Combo Pan Head Screw KK 30
#8 SAE Flat Washer TT 30
1/4-20 x 0.5" Combo Round Head Bolt BB 4
1/4-20 Flat Washer Zinc CC 2
1/4-20 Hex Nut DD 4
Roof Pin EE 4
AF
HARDWARE ROOF DOORS WALLS FLOOR
In the event of severe weather, please disassemble and store in a secure location.
K-5H52
J-5H51
88.09"
128.85"
94.63"
Question and Answer IconNeed help?

Do you have a question about the Rubbermaid 1S84 and is the answer not in the manual?

Summary

Assembly Overview and Preparation

Pre-Assembly Checks and Notes

Review parts, level area, and apply detergent to fits before assembly.

Foundation and Floor Preparation

Site Leveling and Floor Panel Preparation

Prepare the construction site, level the area, and cut wall slot tabs on floor panels.

Floor Panel Assembly

Connecting Floor Panels

Connect floor panels and install screws, optionally securing to foundation.

Left Wall Section Assembly

Attaching Left Side Panels and Front Panel

Connect left side wall panels and the left front panel to the floor assembly.

Left Side and Back Wall Assembly

Connecting Left Back Panel and Wall Connectors

Attach the left back panel and install wall connectors to the left side wall.

Right Wall and Gable Installation

Attaching Right Back Wall and Gables

Connect the right back wall panel and install front and back gable panels.

Door Preparation and Window Installation

Preparing Door Panels and Installing Windows

Install hinge reinforcements, door reinforcements, gaskets, and windows onto door panels.

Door Installation

Hanging Front Doors

Insert hinge pins and engage door snaps into floor and gable sockets.

Ridge Beam Assembly

Connecting Ridge Beams and Connectors

Assemble the ridge beams and connectors using bolts and nuts.

Roof Assembly and Optional Reinforcement

Installing Ridge Cap and Gable Supports

Apply ridge tape, snap on ridge cap, place ridge beam assembly, and install optional lumber supports.

Ridge Beam Securing and Skylight Installation

Securing Ridge Beam and Attaching Skylight

Secure ridge beam to gable and attach skylight to roof panel.

Left Roof Panel Installation

Attaching Left Roof Panel

Raise and guide the left roof panel into the ridge beam assembly.

Left Roof Panel and Skylight Installation

Installing Left Skylight and Roof Panels

Raise and guide the left skylight and roof panels into the ridge beam assembly.

Roof Panel Connections

Installing Roof Connectors and Engaging Snaps

Install roof connectors and engage all snaps between roof panels and gables/walls.

Right Roof Assembly and Securing

Completing Roof Assembly and Securing

Repeat roof steps for the right side, and secure roof panels to gables and walls.

Overview

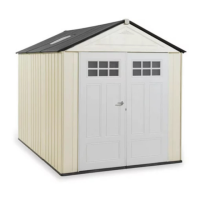
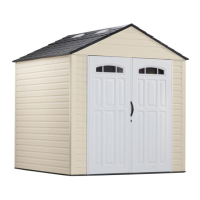
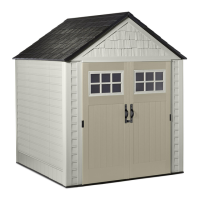
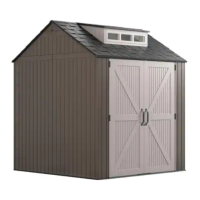
This document outlines the assembly and features of a Rubbermaid 7' x 10' 6" Resin Storage Building, designed for outdoor storage. The manual provides comprehensive instructions for setting up the shed, from site preparation to the final roof installation, emphasizing ease of assembly and durability.

Function Description:

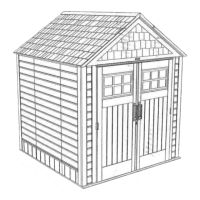
The Rubbermaid Resin Storage Building serves as a robust and weather-resistant solution for organizing and protecting various items outdoors. Its primary function is to provide secure storage for tools, gardening equipment, outdoor furniture, and other household goods, keeping them safe from the elements and organized. The shed's design incorporates features that enhance its utility as a storage unit, including a spacious interior, double doors for easy access, and optional skylights for natural light. The resin construction ensures longevity and resistance to common outdoor issues like rust, rot, and fading, making it a low-maintenance alternative to traditional wooden sheds. The building is designed to be a permanent outdoor fixture, offering a dedicated space for storage needs.

Usage Features:

The storage building is designed with several user-friendly features to optimize its functionality and convenience.

  • Spacious Interior: With dimensions of 7' x 10' 6", the shed offers ample internal space, allowing for the storage of large and bulky items. The internal height of 94.63 inches (approximately 7 feet 10 inches) provides sufficient vertical clearance for tall equipment.
  • Double Doors: The inclusion of double doors (Left Door Panel AK and Right Door Panel AF) facilitates wide entry, making it easy to move items in and out, such as lawnmowers, wheelbarrows, or large storage bins. The doors are equipped with a lock hasp (X) for added security, allowing users to secure their belongings with a padlock (not included).
  • Window for Door: Each door panel includes a window (LL) with a gasket (MM) to allow natural light into the shed, improving visibility inside without the need for artificial lighting during the day. The "frosted" side of the window should face the gasket, providing diffused light and privacy.
  • Skylight Roof Panels: The shed features optional skylight roof panels (AN and AP) that further enhance natural light penetration, creating a brighter interior environment. These panels can be assembled in one of three positions, offering flexibility in light distribution.
  • Resin Construction: Made from durable resin, the shed is resistant to dents, rust, and rot, which are common problems with metal or wood sheds. This material also makes the shed easy to clean and maintain, requiring only occasional washing with mild detergent.
  • Optional Roof Support: For areas prone to extreme snow or heat, the manual suggests an optional step to install two 2" x 6" x 124-1/4" pieces of lumber into the gables (M) for extra roof support. While the shed is designed to function properly without them, this feature provides enhanced structural integrity in challenging weather conditions.
  • Foundation Flexibility: The shed can be assembled on a level construction site, and if a foundation is desired, it should be constructed prior to assembly. Recessed anchor locations (8 places) are provided to secure the shed floor to a foundation, offering stability and preventing shifting.
  • Two-Person Assembly: The assembly process is recommended for two people, ensuring safety and efficiency, especially when handling larger components like roof panels and gables.
  • Liquid Soap Lubrication: To simplify assembly and ensure proper engagement of components, applying a mild detergent (liquid soap) to dovetail and snap fits is recommended. This reduces friction and allows parts to slide into place more easily.
  • Wall Connectors: Wall connectors (Q) are used to secure the wall panels, providing structural rigidity and ensuring a tight fit between components.
  • Ridge Beam Assembly: The roof structure is supported by a ridge beam assembly (RL, RS, FF), which is crucial for the shed's stability and roof integrity. Ridge tape (HH) and ridge caps (GG) are applied to cover seams, providing a weather-tight seal.

Maintenance Features:

The Rubbermaid Resin Storage Building is designed for minimal maintenance, thanks to its material and construction.

  • Durable Resin Material: The resin construction inherently resists common outdoor wear and tear, such as rust, rot, and fading, which means less frequent painting, staining, or sealing compared to wooden or metal sheds.
  • Easy to Clean: The smooth surfaces of the resin panels are easy to clean. A mild detergent and water are typically sufficient to remove dirt, grime, or mildew, restoring the shed's appearance.
  • Weather Resistance: The shed is built to withstand various weather conditions, protecting stored items from rain, sun, and wind. However, in the event of severe weather, the manual advises disassembling and storing the shed in a secure location, indicating a design that allows for temporary relocation if necessary.
  • Secure Fasteners: The use of screws (AA, JJ, KK), bolts (BB), washers (CC, TT), and nuts (DD) ensures that all components are securely fastened. The manual emphasizes not to overtighten screws, especially when installing windows, to avoid compressing gaskets excessively, which could compromise the seal.
  • Gasket Seals: Gaskets (MM) around the windows ensure a watertight seal, preventing moisture intrusion and protecting the interior from the elements. Proper installation of these gaskets is key to maintaining the shed's weather resistance.
  • Modular Design: The modular nature of the shed, with individual panels and connectors, suggests that if a part were to be damaged, it could potentially be replaced, extending the overall lifespan of the storage building.
  • Ridge Tape and Caps: The ridge tape and caps are designed to cover seams on the roof, providing an additional layer of protection against water infiltration, which is critical for maintaining a dry interior.

Overall, the Rubbermaid 7' x 10' 6" Resin Storage Building is a practical, durable, and user-friendly solution for outdoor storage, offering a combination of security, accessibility, and low maintenance.

Rubbermaid 1S84 Specifications

General IconGeneral
MaterialResin
LockableYes
UV ProtectionYes
Weather ResistantYes
ShapeRectangular
Lid TypeHinged

Related product manuals