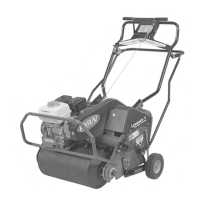
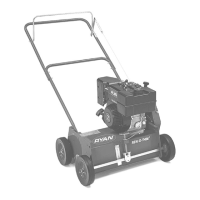
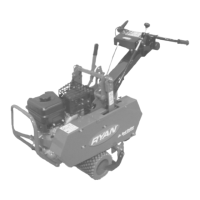
The document describes the Ryan Lawnaire with Easy Steer Technology, a line of lawn aerators designed for efficient and user-friendly operation. These machines are primarily used for aerating lawns, which involves creating small holes in the soil to allow air, water, and nutrients to penetrate the grass roots, promoting healthier growth.
Models and Configurations
The manual covers several models, including:
- 554910A: Lawnaire V with EST - Honda
- 554913A: Lawnaire IV with EST - Honda
- 554914B: Lawnaire IV with EST - B&S
- 554916B: Lawnaire V with EST - B&S
The "EST" in the model names refers to "Easy Steer Technology," a key feature designed to enhance maneuverability and ease of use. The choice between Honda and Briggs & Stratton (B&S) engines indicates different power plant options for the same core aerator design.
Important Technical Specifications
The technical specifications are detailed for both Lawnaire IV and Lawnaire V models:
Lawnaire IV
- Dimensions:
- Length: 28" (711 mm)
- Width: 51" (1295 mm)
- Height (handle folded): 46" (1168 mm)
- Height (transport): 47.5" (1206 mm)
- Height (handle folded): 30" (762 mm)
- Weight:
- Dry, w/o acc. weight: 240 lbs. (109 Kg)
- Dry, w/ acc. weight: 279 lbs. (126 Kg)
- With water tank full and acc. weight: 280 lbs. (127 Kg)
- Speed:
- Transport: 3.6 mph (5.8 kph)
- Aerate: up to 3.5 mph (5.6 kph)
- Drive:
- Primary: V Belt, 4L section
- Secondary: #40 plated roller chain
- Wheels:
- Front: 11" (279 mm) Dia. water tank, 5.2 gal. (19.7 L) max. capacity, 8 x 2.50 semi-pneumatic tires with 3/4" ball bearings
- Rear: 8 x 2.50 semi-pneumatic tires with 3/4" ball bearings
- Aeration:
- Tines: 3/4" (19 mm) formed from .08" hardened chrome molybdenum alloy steel, 30 per unit
- Penetration Depth: 2 3/4" (70 mm) max.
- Swath Width: 19" (483 mm)
- Hole Pattern: 3 3/4" x 7" (95 x 178 mm) on center
- Production: Up to 28,975 sq. ft. / hour
- Engines:
- Model 554910A & 554913A: HONDA GX120K1HX, 4 cycle, 7.2 cu.in. (118 cc), 3.5 HP (2.6 KW), recoil/on/off switch, 3200 RPM no-load, 1400 + 100 RPM, 3.4 qt. (3.2 L) fuel tank, 6 to 1 gear reduction.
- Model 544914B & 544916B: #12Z4520131F8, Type 0141, Trim .01 Briggs & Stratton, 4 cycle, 12.5 cu.in. (206cc), 6.0HP (4.5KW), recoil/on/off switch, 3200 RPM +/- 100 RPM no-load, 2000 RPM, 3.2 qt. (3.0 L) fuel tank, 6 to 1 gear reduction.
Lawnaire V
- Dimensions:
- Length: 35.5" (902 mm)
- Width: 52.5" (1334 mm)
- Height (handle folded): 46" (1168 mm)
- Height (transport): 47.5" (1206 mm)
- Height (handle folded): 30" (762 mm)
- Weight:
- Dry, w/o acc. weight: 228 lbs. (122 Kg)
- Dry, w/ acc. weight: 266 lbs. (140 Kg)
- With water tank full and acc. weight: 330 lbs. (1497 Kg)
- Speed:
- Transport: 3.6 mph (5.8 kph)
- Aerate: up to 3.5 mph (5.6 kph)
- Drive:
- Primary: V Belt, 4L section
- Secondary: #40 plated roller chain
- Wheels:
- Front: 11" (279 mm) Dia. water tank, 7.9 gal. (29.9 L) max. capacity, 8 x 2.50 semi-pneumatic tires with 3/4" ball bearings
- Rear: 8 x 2.50 semi-pneumatic tires with 3/4" ball bearings
- Aeration:
- Tines: 3/4" (19 mm) formed from .08" hardened chrome molybdenum alloy steel, 42 per unit
- Penetration Depth: 2 3/4" (70 mm) max.
- Swath Width: 26" (673 mm)
- Hole Pattern: 3 3/4" x 7" (95 x 178 mm) on center
- Production: Up to 40,400 sq. ft. / hour
Usage Features
The Lawnaire aerators are designed for ease of operation and safety.
Unpacking and Assembly
- Unpacking: Involves cutting banding securing the aerator to the pallet and grabbing the handle to pull the unit over the side of the unit. A warning is provided about banding tension and snap-back.
- Handle Assembly: For Lawnaire V models, the handle is bolted in place, pulled up to the transport lift handle, and then the unit is carefully rolled off the pallet.
- Clutch Cable Check: The clutch cable is adjusted prior to shipping. Users must pull the clutch control handle back and down to make sure the idler engages the belt, then release it completely. Adjustment may be necessary if the idler does not fully disengage. Spring extension should not exceed .25 inch.
- Final Preparations: Includes checking engine oil, lubricating the roller chain with Lubriplate #13563 or equivalent, and filling the gas tank with fresh, clean gasoline.
Controls
- Transport Lift Handle: Pushing down on the handle lowers the tines for aerating. Pulling up moves the tines so the aerator can be moved or transported without incurring damage to the unit or the turf.
- Clutch Control Handle (Bail): Engages aerator drive clutch. Pull on the handle to engage the clutch. Release the handle to disengage. A warning advises that releasing the clutch on an incline will allow the unit to roll down the incline.
- Throttle Control: Adjusts engine speed. Pushing the control forward increases speed; pulling back reduces speed.
- Engine Controls: Honda engines use a choke, a fuel valve, and an On/Off switch. Briggs & Stratton engines use a choke control and a fuel shut-off valve. These controls are used for starting and stopping the engine.
Pre-Operation Check List
Before starting the engine, operators should:
- Review and follow all safety rules and safety decal instructions.
- Check that all safety decals are installed and in good condition.
- Check to make sure shields and guards are properly installed and in good condition.
- Check that all hardware is properly installed and secured.
- Check to be sure engine is free of dirt and debris.
- Pay particular attention to cooling fins, governor parts, and muffler.
- Clean air intake screen.
- Check air cleaner.
- Inspect area and remove stones, branches, or other hard objects that might be thrown, causing injury or damage.
- Clean area around oil fill dipstick.
- Remove dipstick and check to be sure oil is in operating range (between max/min dipstick). Do not overfill.
- Install dipstick assembly firmly until cap bottoms out on tube.
- Dipstick assembly must always be secured into fill tube when engine is running.
- Check all lubrication points and grease as instructed in manual.
Fueling
- Fill fuel tank with good quality, clean, unleaded regular gasoline (petrol).
- Use octane level recommended by the engine manufacturer.
- Use a funnel to avoid spilling.
- Warnings are provided against smoking, overfilling, and spilling fuel.
Aerating
- Water Drum: Rotate the water drum on the front of the unit until the filler plug is positioned at the top. Remove the plug, fill the drum with water, and replace the plug.
- Starting Engine: Move the engine On/Off switch to "ON," position and then pull the recoil starter and choke as required to start the engine.
- Transport Lift Handle: Lift the transport lift handle if necessary to make sure the tines are not touching the ground. Advance the throttle, slowly pull back on the clutch handle control, and transport the aerator to the work area.
- Operation: Upon reaching the work area, release the clutch control handle and adjust the throttle speed for aerating. Push down on the transport lift handle, lowering the aerating tines to the turf. Pull back slowly on the clutch control handle to start aerating.
- Maximum Tine Penetration: To achieve maximum tine penetration into turf, apply downward pressure on the handle until the drum is off the ground.
- Ending Aeration: At the end of each aerating pass, release the clutch control handle, lift up on the handle assembly, and pivot the unit on the water drum. Resume aerating.
- Finishing Aeration: When finished aerating, lift up on the transport lift handle to move the unit into transport position. Drain the water drum when finished with aerating.
Maneuvering Safely
- Slow down before turning.
- Be aware when approaching blind corners, shrubs, trees, tall grass, or other objects that may obscure vision.
- Slope Operation: Slopes are a major factor in loss-of-control and tip-over accidents. Extra caution is required. Evaluate the risks involved before operating on slopes. Do not operate on slopes if uneasy or uncertain. Ultimate responsibility for safe operation on slopes rests with the operator. Do not operate steep slopes.
- A slope is too steep if:
- The machine must be crabbed (turned partially sideways uphill) to drive across the slope.
- The machine turns downhill going across the slope.
- You are uneasy about being on the slope.
- With walk-behind machines, operate across slopes, not up and down.
- Avoid starting or stopping on a slope. If wheels lose traction, disengage the traction clutch and proceed slowly straight down the slope.
- Keep all movement on the slopes slow and gradual. Do not make sudden changes in speed or direction.
- Do not turn on slopes unless necessary, and then turn slowly and downhill when possible.
- Do not operate near dropoffs, ditches, or embankments.
- Follow the manufacturer’s recommendations for wheel weights or counterweights to improve stability.
Maintenance Features
Regular maintenance is crucial for the longevity and performance of the Lawnaire aerators.
Lubrication
- Grease the idler pivot and wheel bearings at the start of the season and every 25 hours.
- Keep roller chain clean and in proper running order. Lubricate with Lubriplate #13563 or equivalent at the start of the season and every 25 hours.
Tine Wheels
- Grease Bearings in 1-5 at the start of the season and every 25 hours.
- Replace damaged or broken tines.
- Do not weld or straighten tines.
- Clean tines after use, inside and out.
- Apply a light coat of oil to tines to prevent rust.
Engine
- Maintain engine in a level position.
- Check oil levels in the engine and gear reduction case.
- Add if required (see engine operation manual for details).
- Inspect air cleaner element.
- Clean or replace as necessary.
Adjustments
- Clutch Adjustments: The clutch cable spring should be extended 1/8" - 1/4" (3 - 6mm) when the clutch is engaged.
- To Adjust: Loosen the nut E at the clutch cable mounting point on the clutch control handle. Adjust the position as needed.
- Chain: The roller chain should have 1/8" - 1/4" (3 - 6mm) deflection at the center point between the idler and water drum sprockets.
- To Adjust: Loosen the mounting bolt on one of the movable idler sprockets and slide in its slot until the desired tension is reached. Tighten the bolt. Note there are two (2) movable sprockets. If one does not provide sufficient take-up, use the other. Do not over tighten the chain. Excessive chain tension will reduce chain and bearing life. It can also lead to fatigue failure of the frame.
Transporting
- If a tote trailer will be used to transport the unit, the two cast weights must be removed from the aerator frame and a locking shaft installed in their place.
- Removing the cast weights and draining the water drum will decrease the weight for easier loading on a vehicle or trailer.
- To remove the weights, pull up on the latch A securing the weights B and slide the weights out.
- When manually transporting the machine for short distances:
- Pull up on the transport lift handle so that the tines are raised.
- Pull back on the clutch control handle (bail) to engage the drive. The water drum will propel the machine forward.
- Use caution when removing the cast weights. Each weight is approximately 22 lbs.
- Be sure to close the fuel shut off valve before transporting the unit.
- Removable Transport Wheels: The rear wheels of the Lawnaire V EST are removable for transporting the aerator through fence gates. The wheels removed the Lawnaire V will pass through a 32 inch opening. With the engine off, lower the aerator so the tines are on the ground and the wheels are off the ground. Remove hair pins C from the axles. Slide wheels and axles out of transport frame. Lift up on the aerator handle so the tines are off the ground. With the tines off the ground, push the aerator through the gate on the front drum. Once on the other side of the gate, reinstall the wheels.
Storage
- Before storing for an extended period (30 days or more):
- Drain all fuel from the fuel tank and fuel lines.
- Start the engine and run until all the fuel is used from the carburetor float bowl.
- While the engine is still warm, drain the crankcase oil and refill with the proper weight oil corresponding to the season the equipment will next be used.
- Remove the spark plug and squirt a small amount of engine oil into the cylinder. Turn the engine over a few times to distribute the oil.
- Drain the water drum. Always drain the water drum for winter storage. Freezing water can rupture the drum.
- Grease the clutch pivot fitting, tine wheel, and wheel bearings.
- Lubricate the chain.
- To put the equipment into service after an extended period of storage:
- Check for loose parts and tighten if necessary.
- Check for cracked or broken tines and replace as necessary.
- Fill the fuel tank with clean, fresh fuel.
- Check the engine and gear reduction case oil levels with the engine in a level position.
- Start the engine.
- Check for fuel leaks.
- Check clutch control operation to make sure the unit stops when the clutch control is released.
- General Storage:
- Stop the engine and allow to cool before storing.
- Drain the fuel tank outdoors only.
- Store fuel in an approved container in a cool, dry place.
- Keep the machine and fuel containers in a locked storage place to prevent tampering and to keep children from playing with them.
- Do not store the machine or fuel container near appliances with an open flame such as a water heater or other appliance with a pilot light.
- Keep petrol (gasoline) storage area free of grass, leaves, and excessive grease to reduce fire hazard.
- Clean grass and debris from cutting units, drives, mufflers, and engine to help prevent fires.
The manual emphasizes safety warnings throughout, including California Proposition 65 warnings regarding exhaust and battery chemicals. It also provides detailed illustrations for assembly and parts identification, making it a comprehensive guide for owners and operators of the Ryan Lawnaire aerators.