Revision 4 - December 17,1998 Ryan TCAD 9900 Series Page 2-21
Terminate each cable at the Processor with TNC plug connectors. Terminate each cable
end at each antenna using the mating connector required by the antenna (BNC or TNC).
Connect the cable ends at the antennas to each antenna. At the Processor, connect the
TOP antenna to the terminal(s) marked “TOP,” and connect the BOTTOM antenna to the
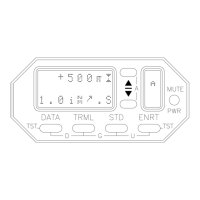
terminal(s) marked “BOTTOM.” Figure 2-11 illustrates the location of these terminals on
the Processor.
Precautions in routing antenna cables:
A. Route the cable avoiding sharp bends and using strain relief. Secure
as necessary to prevent chafing. Avoid routing antenna cables with
other electrical cables.
B. Avoid tie-wrapping transponder output cables or GPS antenna cables
with TCAD antenna cables. Also, do not tie-wrap a cable bundle so as
to deform cables. Separate the coupler line and TCAD antenna from
other transmitting cables as much as possible.
C. Insure that all connections are sound, i.e. avoid frayed and exposed
shields.
NOTE: Some of the cable types specified for the antenna lines have unusual
diameters and stiffness. Use the proper connectors and crimping tools to assure good
connection and shielding.
2.19 ELECTRICAL WIRING OF ALTITUDE ENCODER
An altitude encoder is required in order that TCAD can compare the altitude of a threat
aircraft with the host aircraft to display altitude separation. Also, using data from an
altitude encoder, corrected for barometric pressure, TCAD can display the altitude of both
host and threat aircraft.
Encoders that meet the requirements of TSO C88a can be used. Ordinarily, TCAD should
be connected to the encoder connected to the transponder, as the encoder inputs to TCAD
are totally isolated as depicted by Figure 2-18. By using the same altitude encoder for
both transponder and TCAD, the pilot will view the same altitude as reported by the on-
board transponder to ATC.
The altitude encoder is connected to the TCAD Processor through the 15-pin connector,
J1. The location is illustrated by Figure 2-11. Figure 2-19 illustrates the 15-pin cable-end
connector for mating with J1. Refer to either Figure 2-14 or Figure 2-15 for wiring
details.