6
CONTROL PANNELS
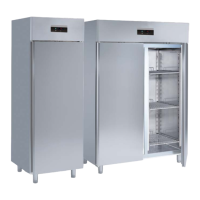
All the refrigerators are equipped with a general switch (1) and a thermoregulator (2):
“CHILIING/POSITIVE TEMPERATURE (48)
“FREZING/NEGATIVE TEMPERATURE (49)
“FREZING/NEGATIVE TEMPERATURE (49a)
STARTING AND WORKING
To start operation, follow this procedure:
- Insert the plug into the current tap; (50)
- position the line switch on ON; (51)
- push the main switch (1); the green indicator turns on;
Now set the operating temperature with the thermoregulator (2).
Check on the thermoregulator display (2) that the internal temperature of the counter corresponds to the set
value.
WORKING SETPOINT AND CONFIGURATION PARAMETERS
“POSITIVE TEMPERATURE” (48)
Setting the working setpoint
• press
LED will flash
• press
or , within 15 seconds to change the temperature value.
• after changing the value, confirm by pressing
, or avoiding any operation for 15 seconds.
You also can modify the working setpoint through parameter SP.
Working setpoints
LABEL MIN. MAS. U.M. DEF. WORKING SETPOINTS
r1 r2 °C/°F (1) 0 working setpoint
Setting configuration parameters
To gain access the procedure:
• make sure no procedure is running
• press
and 4 s: the display will show “PA”
• press
• press
or in 15 s to set “-19”
• press
or do not operate 15 s
• press
and 4 s: the display will show “SP”
To select a parameter:
• press
or
To modify a parameter:
• press
• press
or in 15 s
• press
or do not operate 15 s.
To quit the procedure:
POS DESCRIZIONE
1 MAIN SWITCH
2
THERMOREGULATOR