Do you have a question about the Salus THERMO 091FL and is the answer not in the manual?
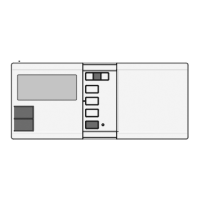
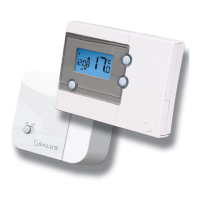
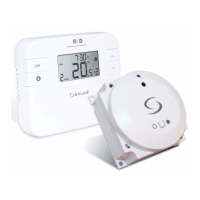
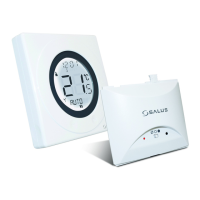
Describes the physical appearance, sliding door, and battery replacement access.
Lists technical parameters like temperature range, accuracy, power, dimensions, and operating conditions.
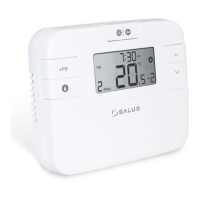
Details the indicators and symbols shown on the liquid crystal display.
Explains comfort, economy, and defrost temperatures indicated on the LCD.
Explains the programmable nature of the thermostat for automatic temperature adjustment.
Describes how to temporarily change temperature without altering programs.
Guides on choosing an optimal location for proper thermostat operation.
Details the COM and NO terminals used for connecting the thermostat.
Explains the steps for physically installing the thermostat onto a wall.
Covers battery installation and initial system activation.
Instructions on how to set the current day and time on the thermostat.
How to check and adjust comfort and economy temperature settings.
How to override current program settings temporarily.
Explains how to view and change the thermostat's programmed schedules.
Details how to perform a factory reset to restore default settings.
How to select between heating and cooling system control.
Configuration of a minimum cycle time to protect the system.
Setting the temperature differential for system switching (0.5°C or 1°C).
Differences in operation and settings when controlling a cooling system.
The Salus Controls Thermostat is a programmable device designed to regulate room temperature, offering both heating and cooling functionalities. It aims to provide comfort and energy savings through its various operational modes and programmable settings.
The primary function of this thermostat is to maintain a desired room temperature. It can operate in two main modes: heating and cooling. In heating mode, the thermostat activates the heating system when the room temperature falls below the set point and deactivates it when the temperature rises above the set point. Conversely, in cooling mode, it activates the cooling system when the room temperature rises above the set point and deactivates it when it falls below.
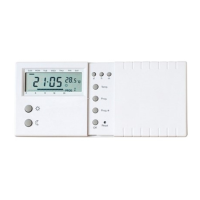
The thermostat features a large LCD display that provides essential information at a glance, including the current time, day of the week, room temperature, set temperature, and operational mode. The display also shows various icons to indicate the status of the device, such as the flame icon for heating, the snowflake icon for cooling, and battery low indicators.
One of the key features is its programmability. Users can set up to nine distinct programs, including three user-defined programs, for each day of the week. These programs allow for different temperature settings (comfort or economy) at various times throughout the day. This flexibility enables users to optimize energy consumption by lowering temperatures when the building is unoccupied or during sleep hours and raising them during active periods. The thermostat supports a 7-day programming cycle, meaning programs can be tailored for each day of the week.
The device offers a "Manual Override" function, which allows users to temporarily adjust the temperature without altering the programmed schedule. This is useful for short-term changes in comfort needs. The manual override can be set for a specific duration, after which the thermostat reverts to its programmed operation. There is also a "Permanent Manual Override" option, which maintains the manually set temperature indefinitely until it is manually canceled.
An "Economy Temperature" feature allows for a predefined lower temperature setting, typically used during periods when less heating or cooling is required, such as overnight or when the building is empty. The "Comfort Temperature" is a higher setting, suitable for periods of occupancy.
The thermostat includes a "5-minute minimum cycle time" feature, particularly relevant for cooling systems. This function prevents the external system from switching on too frequently, which can extend the lifespan of the HVAC equipment. If the cooling system has been off for less than 5 minutes, it will not switch on again until the 5-minute period has elapsed.
The "Span" setting allows users to define the temperature difference between the turn-on and turn-off temperatures. This hysteresis prevents rapid cycling of the heating or cooling system, contributing to energy efficiency and system longevity. Users can select between 0.5°C or 1°C span settings.
The thermostat also incorporates a "Holiday" function, enabling users to set a specific temperature for an extended period, such as during a vacation. This feature helps save energy by maintaining a reduced temperature while the premises are unoccupied, automatically reverting to the programmed schedule upon the user's return.
The thermostat is designed for user-friendly operation with a simple interface consisting of several buttons: "Prog" for programming, "OK" for confirmation, "h" for hour adjustment, and up/down arrows for temperature and time adjustments.
To set the time and day, users press the "Prog" button repeatedly until the time or day indicator flashes, then use the "h" or up/down arrows to make adjustments. The "OK" button confirms the settings.
Programming the thermostat involves selecting a program number (0-8), then setting the desired comfort or economy temperatures for specific time slots throughout the day. The "Prog" button cycles through the days and program slots, while the up/down arrows adjust temperatures, and the "h" button adjusts time.
The "Manual Override" is activated by simply pressing the up or down arrow buttons to adjust the temperature. The display will show "MAN" to indicate manual mode. To set a temporary override, users can adjust the temperature and then press "OK" to set a duration. For a permanent override, the temperature is adjusted, and the "OK" button is held for a few seconds.
The "Holiday" function is accessed by pressing "Prog" until the holiday icon appears. Users can then set the desired holiday temperature and the number of days for the holiday period.
The thermostat includes a "View/Change Temperature" feature, allowing users to quickly check or modify the current set temperature without entering full programming mode.
The device also supports a "Keypad Lock" function to prevent unauthorized changes to settings. This is particularly useful in public or shared environments.
The thermostat is designed for low maintenance. The primary maintenance task involves replacing the batteries when the low battery indicator appears on the LCD display. The manual recommends using two AA alkaline batteries.
For installation, the thermostat comes with a drilling template, screws, and wall anchors, facilitating easy and secure mounting on the wall. It is important to mount the thermostat in an area with good air circulation, away from direct sunlight, drafts, or heat sources, to ensure accurate temperature readings. The recommended mounting height is approximately 1.5 meters from the floor.
The device includes a "Reset" button, typically a small hole requiring a pointed object to press. This button allows users to restore the thermostat to its initial factory settings, which can be useful for troubleshooting or if settings become corrupted. The manual advises against using a pencil to press the reset button due to potential graphite residue causing short circuits.
The thermostat is designed to be robust against electrostatic discharge, but in extreme cases, a reset might be required if the device malfunctions due to high electrostatic interference.
The manual provides clear instructions for wiring the thermostat to the heating or cooling system, emphasizing safety precautions and recommending professional installation if the user is unsure. It also highlights the importance of checking the wiring diagram specific to the heating/cooling system.
Overall, the Salus Controls Thermostat is a versatile and user-friendly device aimed at providing efficient temperature control and energy savings through its comprehensive programming and operational features.
| Display | LCD |
|---|---|
| Switching voltage | 230V AC |
| Programmable | Yes |
| Mounting | Wall Mounted |
| Temperature accuracy | 0.5°C |
| Output | Relay |
| Switching current | 3A |
| Compatibility | Heating systems |